Citroen Ami (2023 year). Manual in english
WELCOME
Key
Safety warning
Thank you for choosing Citroën AMI.
This document contains essential information and recommendations
Additional information
you can use to get to know your mobility device (hereafter: 'vehicle') in
complete safety. We strongly recommend that you familiarise yourself
with it.
Environmental protection feature
Your vehicle is fitted with some of the equipment and accessories shown
in this document, depending on the country of sale.
Location of equipment/button indicated using
The descriptions and illustrations are for guidance only.
a black area
This vehicle is marketed by Automobiles CITROËN, a public limited
company with a share capital of 159,000,000 euros whose head office is
located at 2-10 boulevard de l'Europe, 78300 POISSY, FRANCE, registered
with the Trade and Company Register (RCS) of Versailles under number
642 050 199, hereafter referred to as the "Manufacturer" and who
reserves the right to modify the technical characteristics, equipment and
accessories without being required to update this document.
If the vehicle requires any repairs or maintenance, contact a member
of the Manufacturer's dealer network, hereafter: "dealer or qualified
workshop".
The Manufacturer declares, in accordance with the provisions of European
legislation (Directive 2011/53) relating to End-of-Life Vehicles, that it
achieves the objectives set by this legislation and that recycled materials
are used in the manufacture of the products that it sells.
No part of this document may be reproduced or translated without
written permission from the Manufacturer.
CarManuals2.co
Contents
Overview
Safety 5
Technical data 9
Safety - General recommendations
16
Electric motor
36
Hazard warning lamps
16
Dimensions
36
Eco-driving
Horn
16
Identification markings
37
Seat belts
16
Child seats
17
Dashboard instruments 1
Alphabetical index
Instrument panel with monochrome display
screen
6
Driving 6
Warning and indicator lamps
6
Driving recommendations
19
Appendix
Charge level
7
Parking brake
19
Distance recorder
8
Drive selector
20
Starting/Stopping the vehicle
20
Access 2
Doors
9
Practical information 7
Windows
9
Charging the traction battery
22
Electric motor
24
Checking levels
24
Ease of use and comfort 3
Checks
26
Driver's seat
10
Free-wheeling
27
Door mirrors
10
Advice on care and maintenance
27
Ventilation/Heating/Demisting
10
Interior fittings
11
Available accessories
12
In the event of a breakdown 8
Changing a wheel
29
Changing a bulb
29
Lighting and visibility 4
Changing a fuse
30
Exterior lighting
14
12 V battery
32
Direction indicators
14
Towing the vehicle
35
Wipers/Screenwash
14
Changing a wiper blade
15
2
CarManuals2.co
Overview
used complies with applicable standards and
Call a dealer or qualified workshop as soon
Safety precautions -
is compatible with the vehicle.
as possible.
Electric vehicles
In case of doubt, contact a professional
An electric vehicle has two types of electrical
installer.
In the event of exposure to a fire
circuit:
Immediately exit and evacuate all
Precautions related to vehicle cleaning
- vehicle traction provided by a 48 V battery
passengers from the vehicle. Never attempt
module.
to fight the fire yourself - risk of explosion!
Before cleaning the vehicle, check that
- power supply for the on-board circuit
You must immediately contact the
the windows and doors are properly
(instrument panel, lights, ventilation/heating,
emergency services, informing them that
closed.
USB socket, etc.), provided by a 12 V battery.
the incident involves an electric vehicle.
Do not wash the vehicle while the traction
Precautions relating to the 48 V electrical
battery is being charged.
circuit
Overview
The components and cables which make
Precautions in the event of a breakdown
up the traction electrical circuit are
In the event of a complete loss of power, the
marked with this symbol.
vehicle is no longer driven by the electric motor.
The electric vehicle's charging system
Quickly move the vehicle to a safe place in
may become hot during use and after
accordance with all roadside safety regulations.
the ignition is switched off.
Immobilise the vehicle, activate the hazard
All work on or modifications to the vehicle’s
warning lamps, put on the high visibility safety
electrical system (traction battery, cables
vest, leave the vehicle and find a safe place.
and other components visible from the
Call a dealer or qualified workshop as soon as
interior or exterior) is strictly prohibited
possible.
- risk of severe burns or electric shock
Precautions related to road accidents
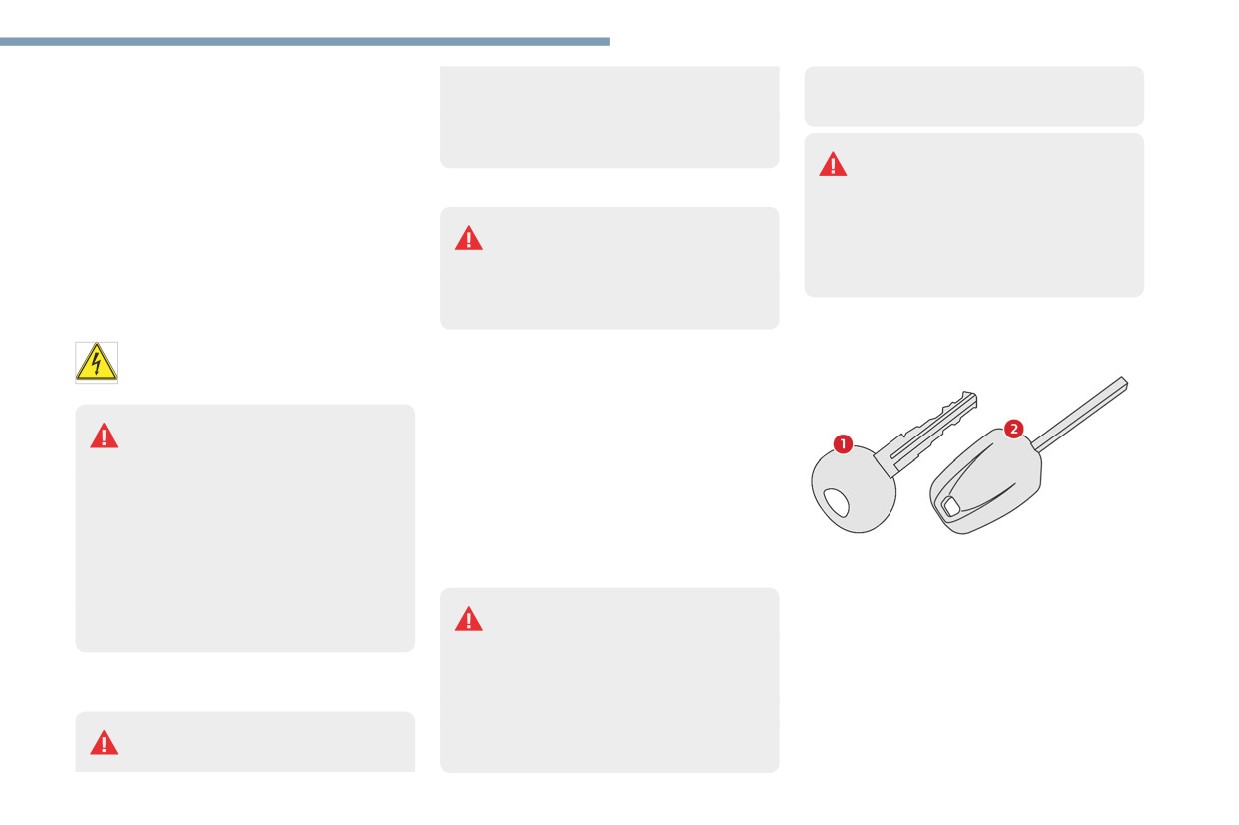
1.
Key for locking/unlocking doors
(short-circuit)!
2.
Ignition key for switching motor on/off
If required, call a dealer or qualified
In the event of an accident or impact
workshop.
to the vehicle's underbody
In situations like these, the electrical
Precautions relating to the electrical
circuit or traction battery may be seriously
installation
damaged.
Stop as soon as it is safe to do so.
Before any connection is made, check
Apply the parking brake and switch off the
that the electrical installation to be
ignition.
3
CarManuals2.co
Overview
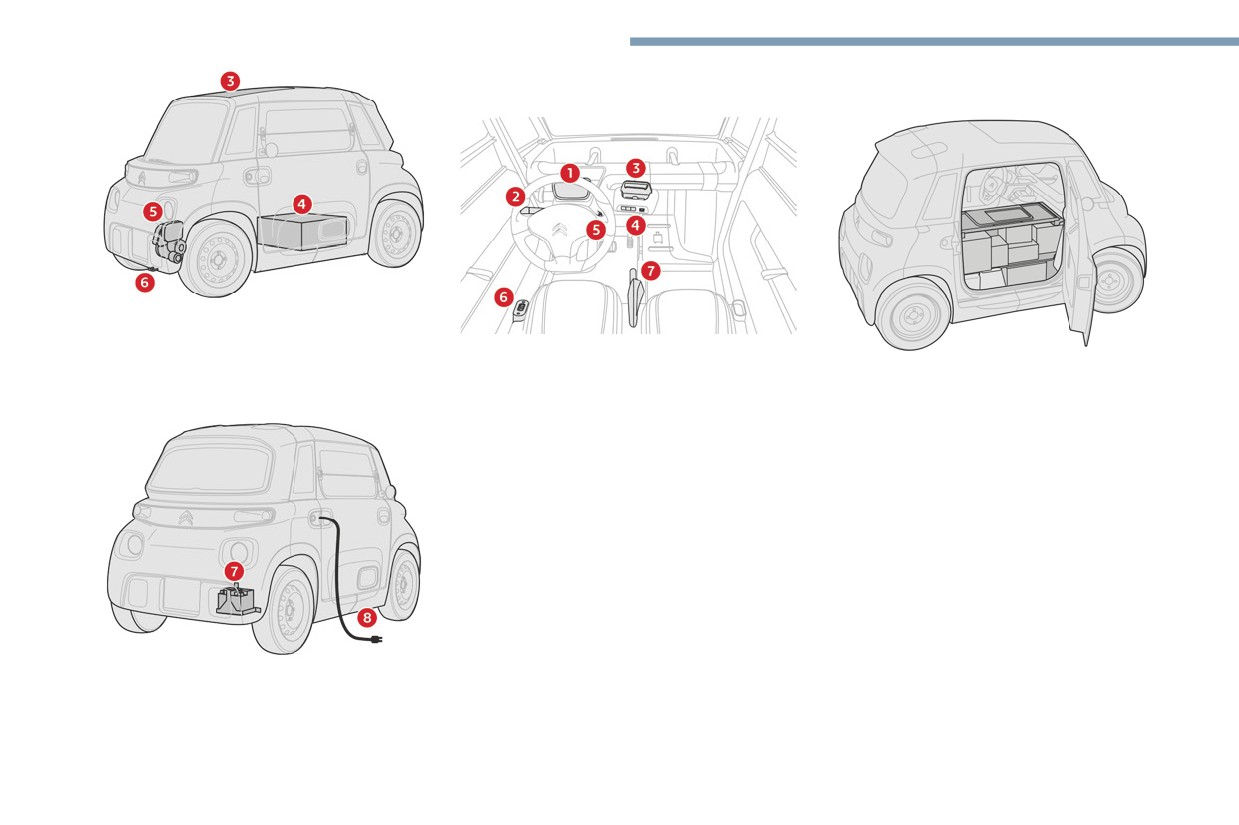
Instruments and controls
CARGO version
3.
Panoramic glass sunroof
4.
48 V traction battery
1.
Instrument panel with monochrome display
5.
Electric motor
screen
The CARGO version is an electric mobility
solution for professional use.
6.
Integrated towing eye
2.
Multifunction control stalk:
The passenger seat is replaced by a modular
- Wipers/Screenwash
load space bounded by:
- Direction indicators
- a fixed vertical partition, separating the driver
- Horn
and the entire load.
3.
Smartphone rest
- an upper movable shelf, leaving the right door
4.
Switch panel:
mirror visible.
- Heating/Demisting
The loading (e.g. mail, parcels, tools) is always
- Ventilation
accessible from the outside as well as from the
- Hazard warning lamps
inside by raising the upper movable shelf.
USB socket
An additional closed storage compartment (e.g.
5.
Motor start/stop switch
smartphone, pens, glasses) is located at the
6.
Drive selector
back of the upper movable shelf.
7.
Parking brake
7.
12 V battery
8.
Charging cable
4
CarManuals2.co
Eco-driving
If the tyres need to be replaced, you must fit
Eco-driving
tyres which are identical to the original ones
Eco-driving is a range of everyday practices
(size, load/speed rating, type and structure).
that enable you to optimise your vehicle's
Ensure the vehicle is serviced regularly and
consumption of electrical energy.
observe the schedule of service checks
Optimising driving range
indicated in the Manufacturer's service
How much electrical energy your vehicle
schedule.
consumes depends on your speed, driving style,
vehicle load and route.
Apply pressure gradually to the accelerator
pedal and maintain safe distances between
vehicles.
Anticipate the need to slow down well in
advance and, where possible, brake smoothly or
slow the vehicle using engine braking with the
regenerative braking function.
Control the use of electrical equipment
Before setting off, if the passenger
compartment is too warm, cool it down by
opening the windows in order to reduce the use
of the ventilation system.
In the event of a frost, remove the ice from all
glass surfaces using a scraper in order to reduce
the use of the heating/demister function.
Comply with the servicing instructions
Check tyre pressures regularly when the tyres
are cold, referring to the label affixed to the
base of the passenger seat.
Perform this check particularly at each change
of season and after the vehicle has been
stationary for a long period.
5
CarManuals2.co
Dashboard instruments
An active lamp may be accompanied by an
Flashing, along with the fixed
Instrument panel with
audible signal.
cable connected indicator lamp,
monochrome display
dashes instead of the charging time and an
When the ignition is switched on
audible signal (repeated beeps).
screen
The red or orange warning lamps come on for
The charging cable is connected and the
a few seconds. These warning lamps should go
parking brake is released.
off as soon as the motor is switched on.
Charging will only be possible after applying the
If a lamp remains lit
parking brake.
If a warning lamp remains lit (red or orange),
The vehicle cannot be started while the
this indicates the presence of a fault which
charging cable is connected.
needs further investigation.
Braking
For more information on a system or a function,
Fixed, accompanied by an audible signal
refer to the corresponding section.
(3 beeps).
The brake fluid level has dropped significantly.
List of warning and indicator
You must stop the vehicle.
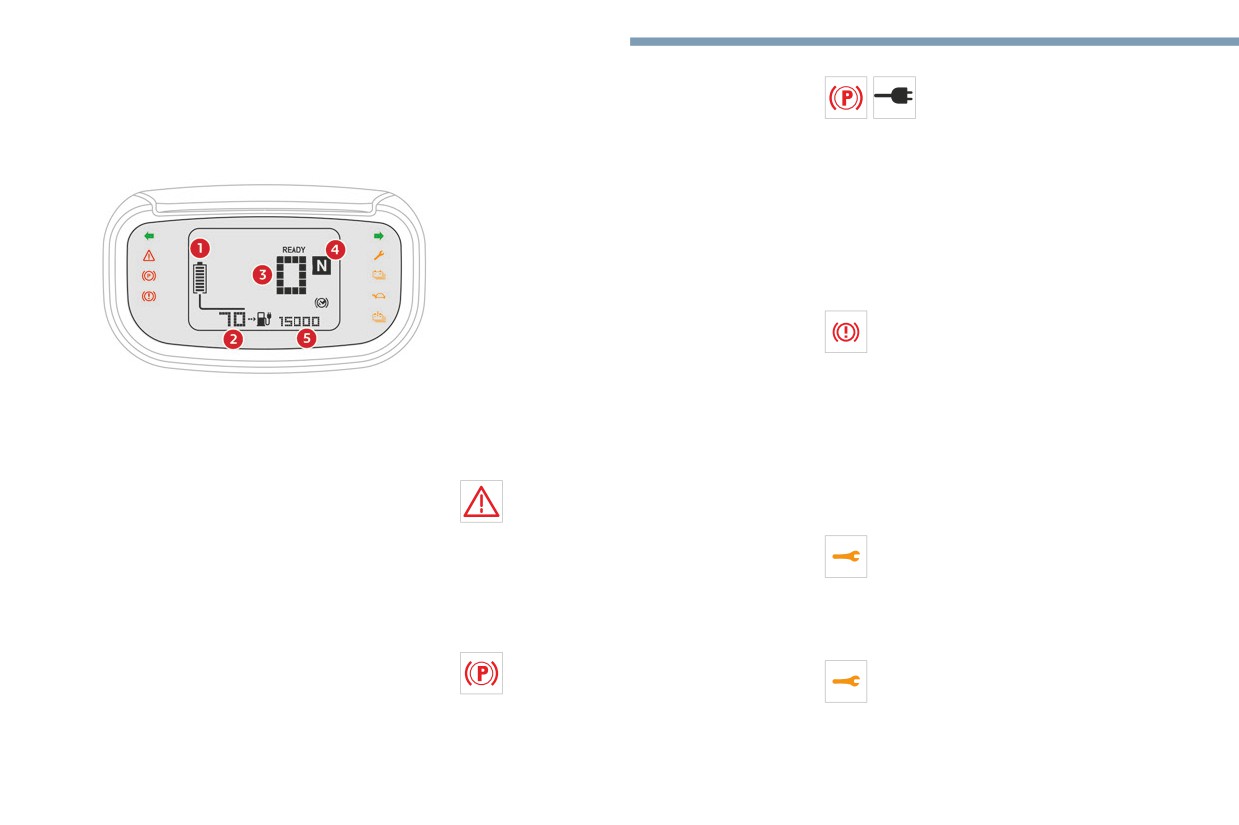
1.
Traction battery charge level
Stop as soon as it is safe to do so and switch off
lamps
2.
Driving range or remaining charging time
the ignition.
Red warning/indicator lamps
3.
Speedometer (mph or km/h)
Check for the presence of a leak.
STOP
Call a dealer or qualified workshop.
4.
Drive selector position
Fixed, accompanied by an audible signal
Orange warning/indicator lamps
5.
Distance recorder (miles or km)
(3 beeps).
Service
A serious fault has been detected.
Fixed, accompanied by an audible signal
You must stop the vehicle.
Warning and indicator
(1 beep).
Stop as soon as it is safe to do so and switch off
lamps
One or more major faults, for which there is/
the ignition.
are no specific warning lamp(s), have been
Displayed as warning lamps on the sides of the
Call a dealer or qualified workshop.
detected.
instrument panel and symbols on the display
Parking brake
Call a dealer or qualified workshop.
screen, the indicator lamps inform you of a fault
Fixed.
Fixed, combined with another warning
or when a system is in operation.
The parking brake is still applied or not
lamp.
Certain lamps may come on in one of two
properly released.
Refer to the explanation for the corresponding
modes: fixed (continuous) or flashing.
To move off, release the parking brake fully.
lamp.
6
CarManuals2.co
Dashboard instruments
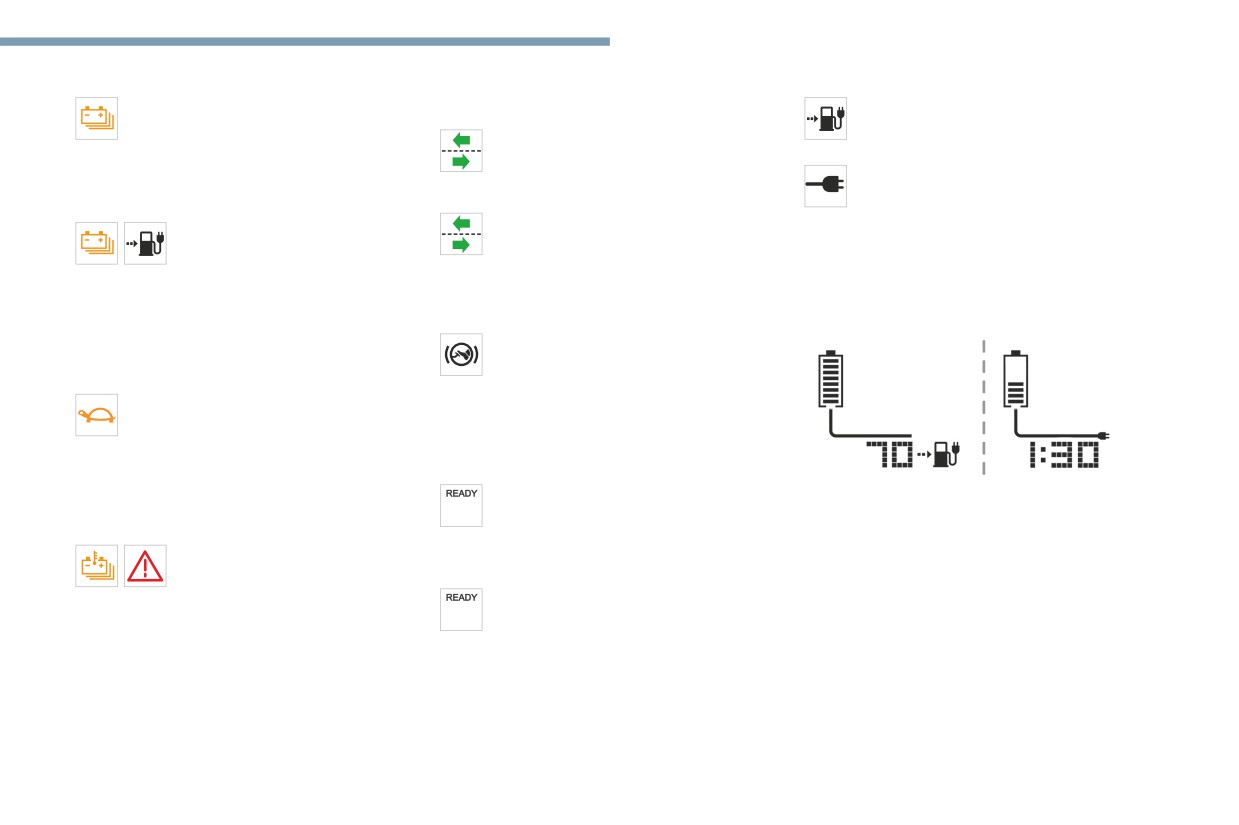
Minimum traction battery charge level
Green warning/indicator lamps
Vehicle driving range
1
Fixed, combined with the last bar on the
Fixed.
Direction indicators
charge meter showing and an audible
The remaining driving range is displayed.
Flashing left or right indicator with
signal (1 beep).
Cable connected
audible signal.
The traction battery has reached the first alert
Fixed, combined with the remaining
The left or right direction indicator lamps are
threshold.
charging time.
on.
Put the vehicle on charge as soon as possible.
The charging cable is connected to the
Flashing left and right indicators with
Fixed, combined with the flashing
charging socket.
audible signal.
vehicle driving range warning
The traction battery is being charged.
The hazard warning lamps are on.
lamp and an audible signal (1 beep).
The traction battery has reached the second
White indicator lamps
Charge level
alert threshold.
Foot on the brake
The motor's power decreases rapidly.
Flashing.
You must put the vehicle on charge.
Insufficient pressure or no pressure
Limited power
detected on the brake pedal for changing the
Fixed, accompanied by an audible signal
direction of travel.
(1 beep).
Depress the brake pedal to select or change the
A drop in performance in the drive train due to
direction of travel.
a low battery temperature.
Vehicle ready to drive
The decrease in motor power temporarily
Fixed.
This indicates traction battery charge level,
affects the vehicle's performance.
The vehicle is switched on.
showing up to 8 bars.
Maximum traction battery temperature
The warning lamp remains on while driving.
With the ignition switched on and the vehicle
Fixed, combined with the STOP
The lamp will go out when you switch off the
moving, this is permanently displayed below the
warning lamp and an audible
motor and exit the vehicle.
remaining driving range (miles/kilometres).
signal (1 beep).
Fixed, accompanied by an audible signal
When the vehicle is being charged, dashes are
The traction battery's temperature is too high.
(1 beep).
displayed for the first 3 minutes, then the time
You must stop the vehicle.
A drive position is selected without any
(hours/minutes) remaining until charging is
Stop as soon as it is safe to do so and switch off
pressure on the pedals for 5 seconds.
complete.
the ignition.
Press D or R on the drive selector, then
For more information about the Warning
Call a dealer or qualified workshop.
accelerate or brake.
lamps, refer to the corresponding section.
7
CarManuals2.co
Dashboard instruments
Distance recorder
This measures the total distance travelled by
the vehicle since its initial registration.
The distance recorder is permanently displayed
when the ignition is switched on and the
vehicle is being charged.
8
CarManuals2.co
Access
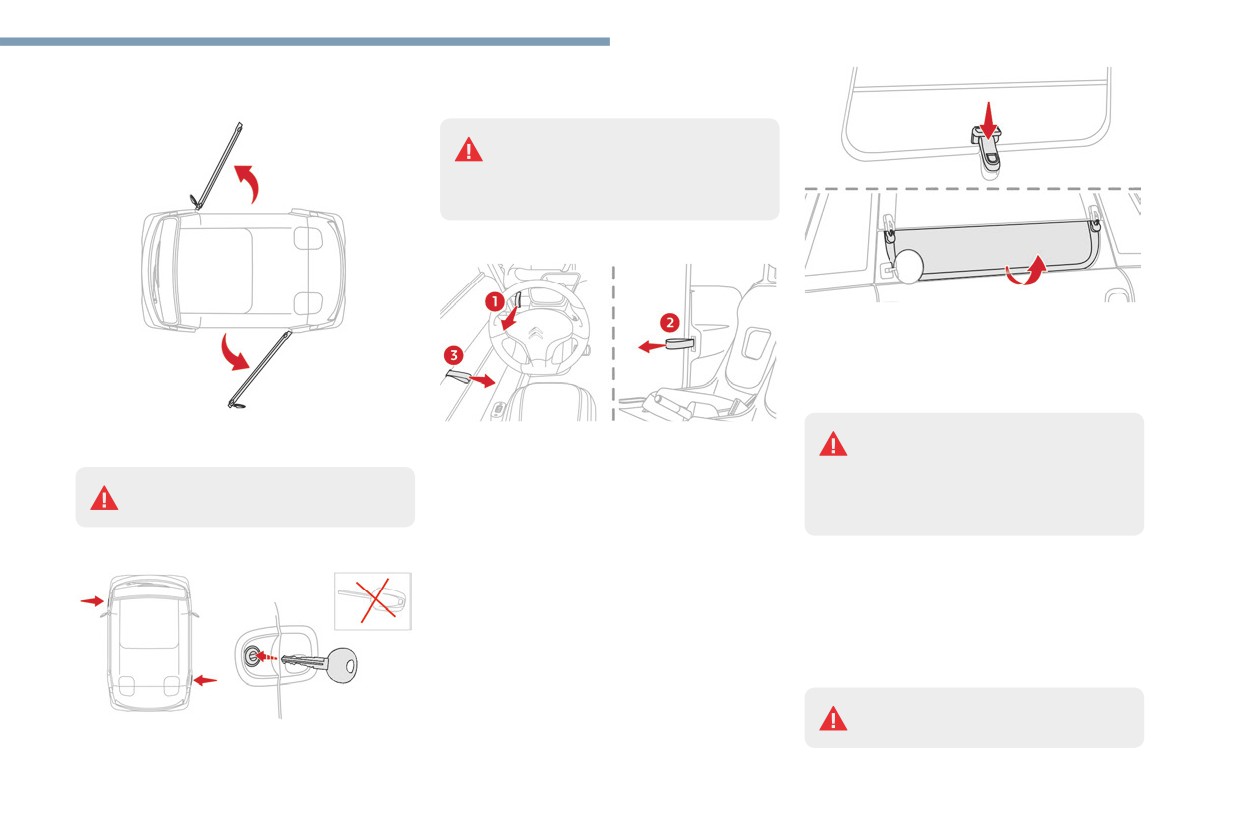
► Press the door lock to partially open the
Doors
2
door.
After unlocking a door, do not turn the
key to the left as you risk being
trapped in the vehicle when the door is
closed again.
From inside
To open:
► Press the locking handle to release the
window.
► Lift the window until it stops to keep it fully
open.
The vehicle has two doors which open in
► To open the driver's door, pull strap 1 at the
Take care when opening the window
opposite directions.
end of the dashboard.
- there is a risk of it unlocking and
► To open the passenger door, pull strap 2 to
lowering while driving, if it is not properly
Do not open the door when moving.
the right of the passenger seat.
locked in the stopped position or on a very
► To close the door, pull strap 3 in the middle
uneven road surface.
of the door.
From outside
To close:
► Pull the window to unlock it from the
Windows
outside.
► Lower the window fully until it locks in
Each window has two parts:
place.
- A fixed upper section.
► Press against the window to check that it is
- A moveable lower section.
locked.
Take care when closing a window - you
risk trapping your fingers!w
► Turn the access key to the right/left in the
door lock to unlock/lock it.
9
CarManuals2.co
Ease of use and comfort
Driver's seat
Door mirrors
Ventilation
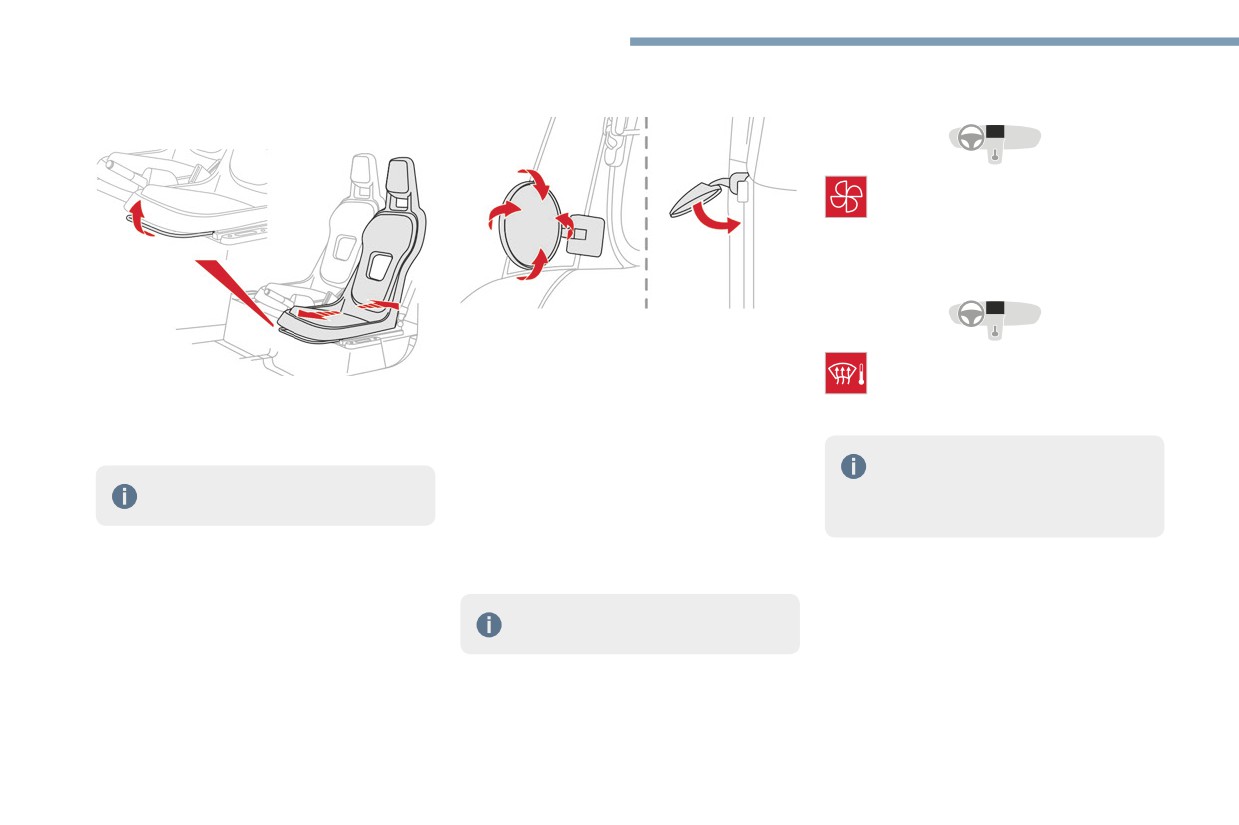
Longitudinal adjustment
► Press this button to turn ventilation
on/off (confirmed by warning lamp
lighting up/going out).
Heating/Demisting
The door mirrors are adjusted and folded
manually.
► Move the door mirror in four directions in
► Press this button to turn Heating/
order to obtain the best visibility.
Demisting on/off (confirmed by warning
► Lift the bar and slide the seat forwards or
lamp lighting up/going out).
backwards.
The ventilation also turns on/off.
► Release the bar to lock the seat in position
Ventilation/Heating/
on one of the notches.
The demisting system reduces misting
Demisting
on the windscreen. If the side windows
The passenger seat does not slide.
The air circulating inside the passenger
are misted up, wipe them with a clean, soft
compartment comes in from outside through
cloth.
an opening at the base of the windscreen.
The controls are located on the central control
bar on the dashboard.
To ensure good air flow, be sure not to
block the air inlet and extractors.
10
CarManuals2.co
Ease of use and comfort
Interior fittings
With CARGO version
USB socket
3
Except CARGO version
The USB socket can be used to charge a
portable device.
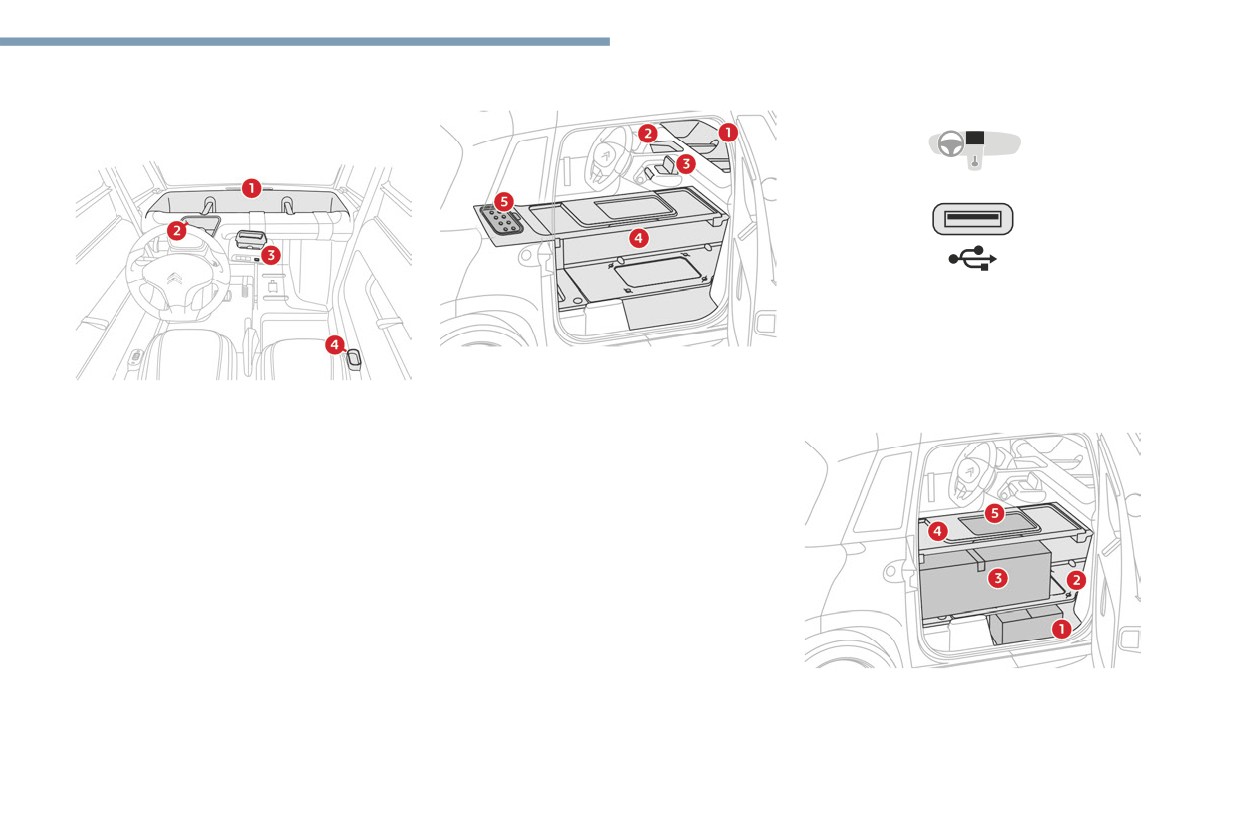
1. Open triple-compartment storage unit
Modular load space
2. Driver's storage compartment/Housing for
1. Open triple-compartment storage unit
Bluetooth speaker
(With CARGO version)
2. Driver's storage compartment/Housing for
3. Smartphone rest/USB socket
Bluetooth speaker
4. Modular load space
3. Smartphone rest/USB socket
5. Closed storage compartment
4. Passenger storage compartment
► Press the central button to open the
cover.
The modular load space consists of:
1. Lower storage area
2. Lower retractable shelf
11
CarManuals2.co
Ease of use and comfort
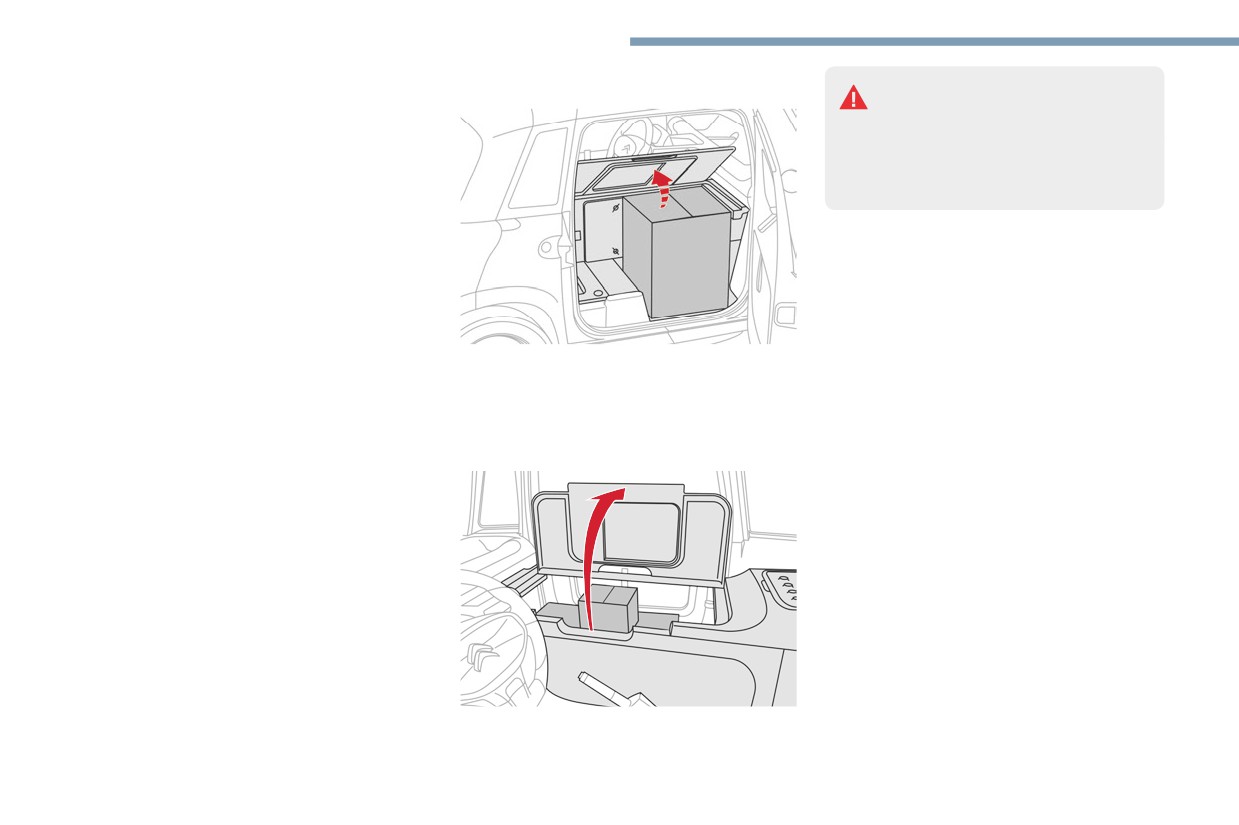
Upper movable shelf - Access from outside
Do not drive with the upper movable
3. Central storage area
shelf up - Risk of dropping the upper
Lashing rings are provided for securing
movable shelf and poor visibility!
objects with tensioners or straps (not
Do not drive with bulky objects on the upper
supplied).
movable shelf - Risk of falling objects and
4. Upper movable shelf
poor visibility!
(parked vehicle, max. 40 kg for occasional
use)
5. Document holders
Available accessories
Maximum loading weight: 140 kg
The Manufacturer offers a wide range of original
Lower retractable shelf
accessories.
► When loading long, flat objects (max.
These accessories have all been adapted to suit
1.2 m) and limited load (<20 kg), put the lower
the vehicle and are all backed and guaranteed
► Raise the upper movable shelf slightly and
retractable shelf in place.
by the Manufacturer.
pull it towards you.
► Secure the load in the middle of the lower
For more information on the after-sales
► Push the upper movable shelf into its
retractable shelf with appropriate fasteners
accessories available, visit the website of our
retaining stops.
(tensioners or straps not supplied).
partner Mister-Auto or contact an authorised
► When loading high and heavy objects
Upper movable shelf - Access from inside
dealer.
(>20 kg), raise the lower retractable shelf
Exterior
against the fixed vertical partition.
Wheel trims/Quarter-light decal/Lower door
decal.
Interior
Driver and passenger mats.
Door nets/Separator net/Load retaining net
(CARGO version)/Front passenger hook/
Passenger purse hook/Dashboard storage.
Smartphone retainer clasp/Connector unit.
Additional interior mirror (CARGO version).
► Raise the upper movable shelf towards the
side window until it stops.
12
CarManuals2.co
Ease of use and comfort
Some models come fitted with
3
longitudinal roof bars. These are purely
for aesthetic purposes. Transverse roof bars
must not be fitted to these longitudinal bars.
13
CarManuals2.co
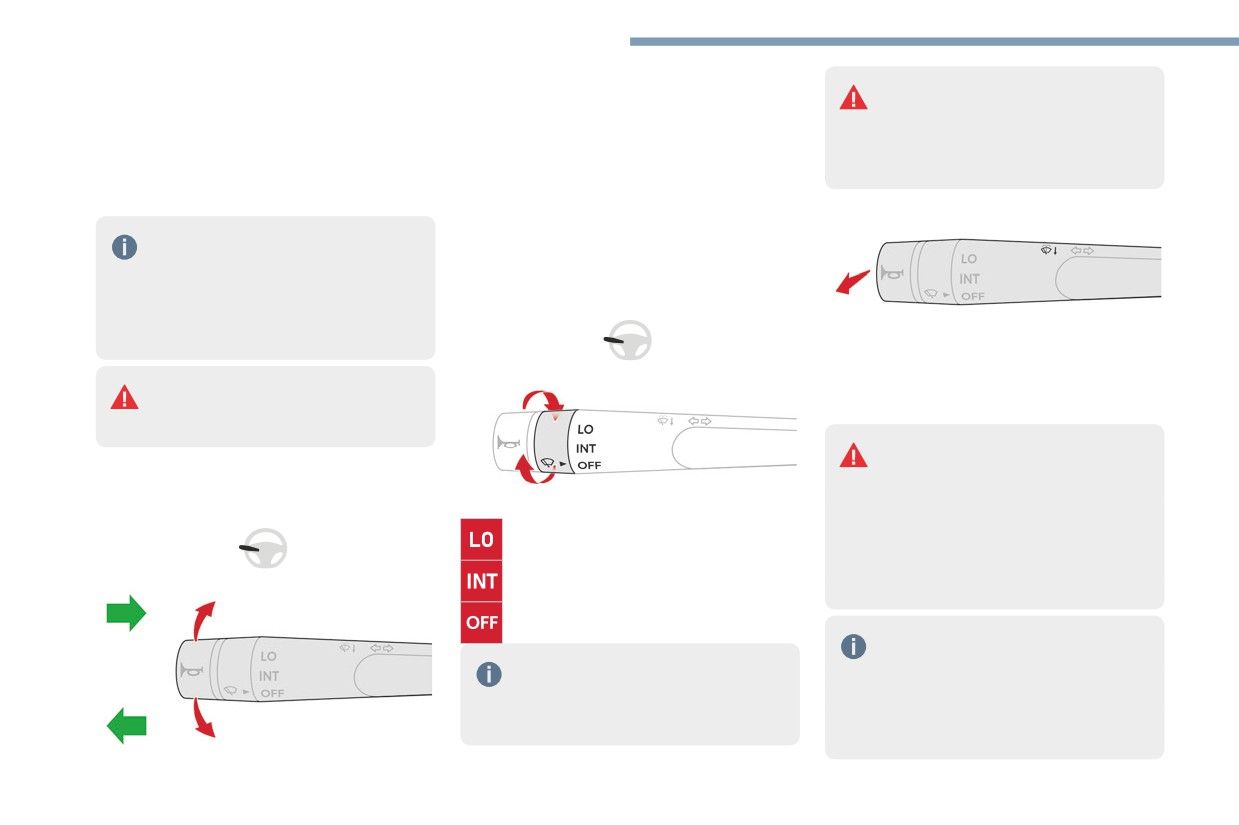
Lighting and visibility
► Left or right: lower or raise the multifunction
Never operate the wipers when the
Exterior lighting
control stalk beyond the point of resistance.
windscreen is dry. Before operating the
When the ignition is switched on, all the lights
Three flashes
wipers when the weather is extremely cold
come on (sidelamps, dipped beam headlamps
or hot, check that the wiper blades are not
and number plate lamps).
► Press briefly upwards or downwards (without
stuck to the windscreen.
When the ignition is switched off, all the lights
going beyond the point of resistance) and the
go out.
direction indicators will flash 3 times.
Screenwash
In some weather conditions (e.g. low
temperature or humidity), misting on
Wipers/Screenwash
the internal surface of the glass of the
Wipers
headlamps and rear lamps is normal, and will
disappear after the lamps have been on for a
► Pull the wiper control stalk towards you and
few minutes.
hold.
The screenwash operates as long as you hold
Never look too closely at the light
the multifunction control stalk, followed by a
beam of LED lamps/headlamps: risk of
cycle of 5 wipes when you release the stalk.
serious eye injury!
To avoid damaging the wiper blades,
do not operate the screenwash if the
screenwash reservoir is empty.
Direction indicators
► Turn the knob to the desired position:
Only operate the screenwash if there is no
Continuous wipe
risk of the fluid freezing on the windscreen
and hindering visibility. In winter, use "very
Intermittent wipe
cold climate" rated products.
Never top up with water.
Switching off
To ensure flat-bladed wipers remain
effective:
Before operating the wipers in wintry
- Handle them with care.
conditions, clear any snow, ice or frost
- Clean them regularly using soapy water.
from the windscreen, and from around the
- Do not use them to hold a piece of
wiper arms and blades.
cardboard against the windscreen.
14
CarManuals2.co
Lighting and visibility
- Replace them at the first signs of wear.
4
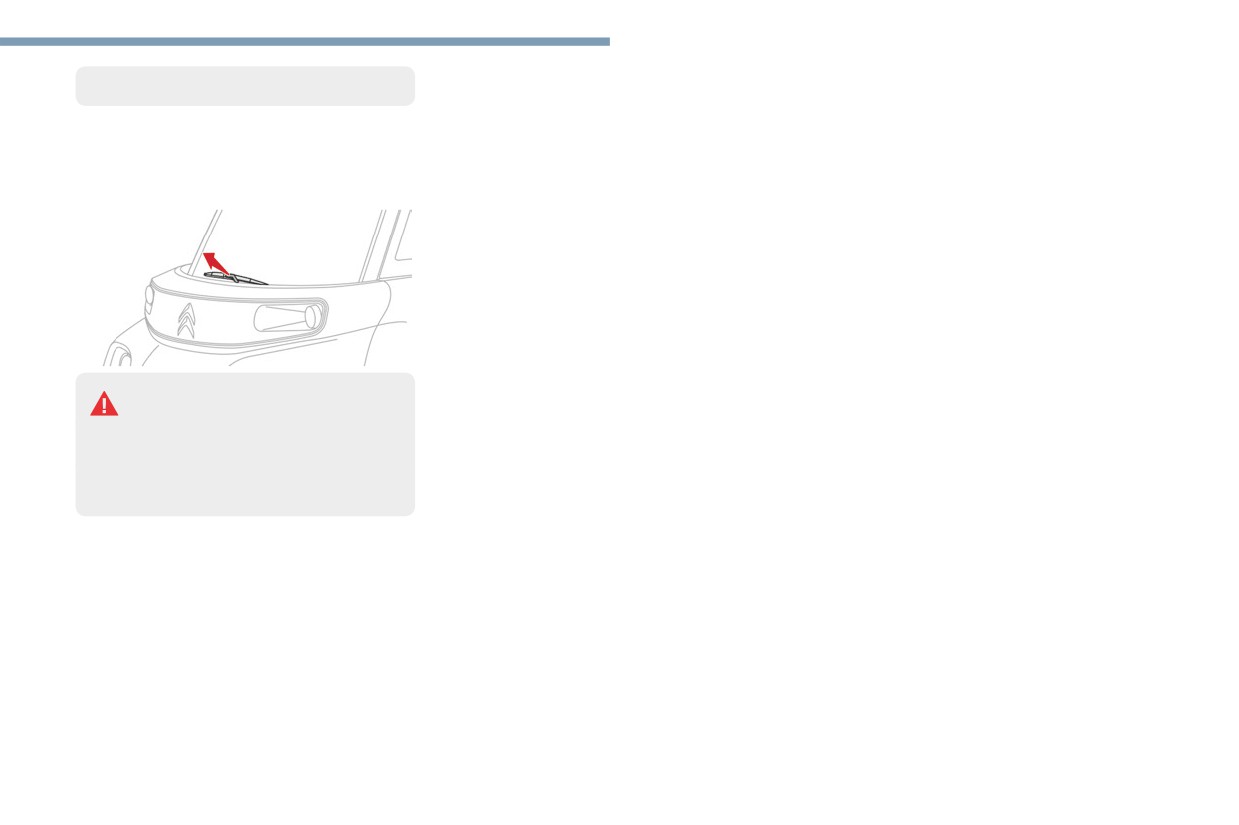
Changing a wiper blade
Removing/refitting
Take care not to hold the arms at the
jet locations.
Do not touch the wiper blades. Risk of
irreparable damage.
Do not release them while moving them.
Risk of damaging the windscreen!
► Clean the windscreen using screenwash
fluid.
► Grasp the wiper blade by its rigid part and
pull it towards you as far as it will go.
► While keeping the wiper arm raised, unclip
the worn blade and remove it.
► While keeping the wiper arm raised, install
the new blade and clip it into place.
► Lower the arm carefully and support it until
it reaches the windscreen.
15
CarManuals2.co
Safety
requirements defined by the Manufacturer
Safety - General
Seat belts
will result in the suspension of the
recommendations
The seat belts are equipped with an inertia reel
commercial warranty.
which allows the strap length to automatically
Do not remove the labels attached in
adjust to your shape. The seat belt returns to its
different places on your vehicle. They
storage automatically when it is not used.
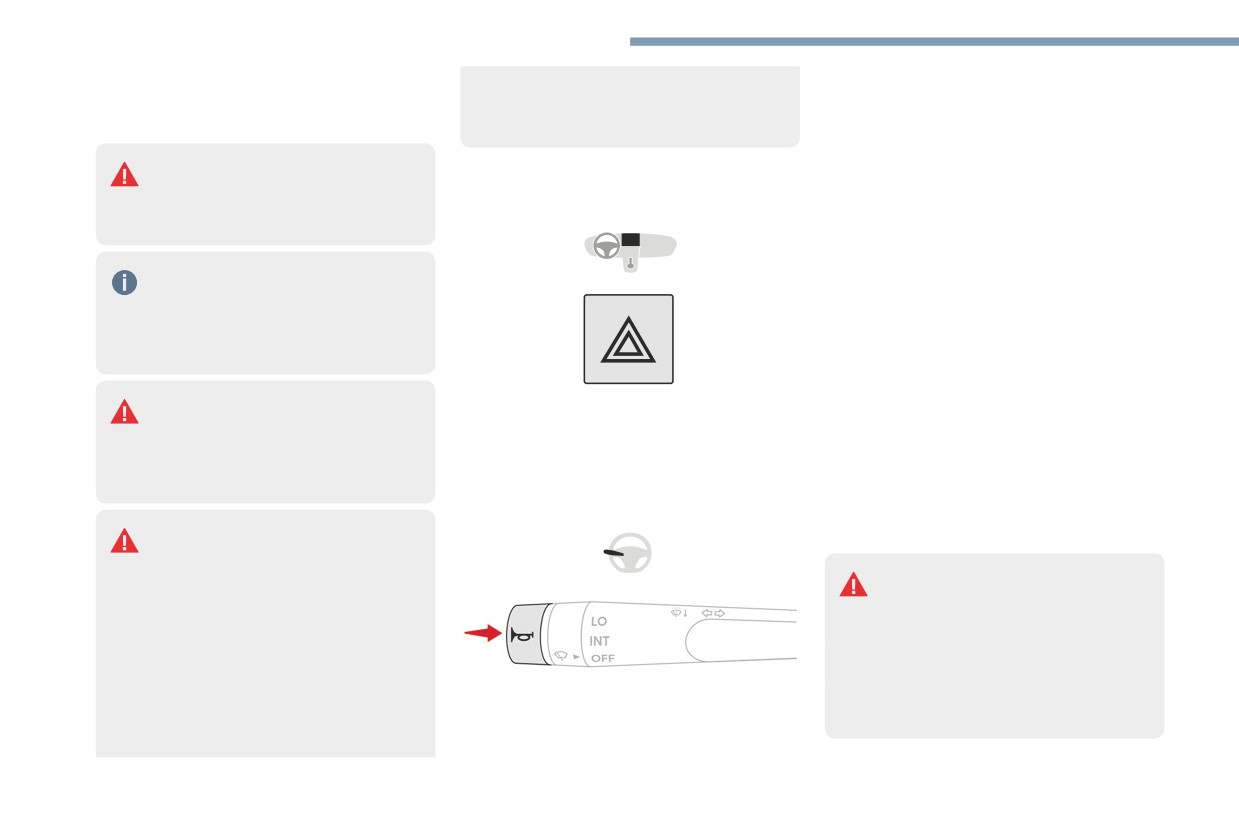
Hazard warning lamps
include safety warnings as well as
The inertia reels are fitted with a device which
identification information for the vehicle.
automatically locks the strap in the event of a
collision, emergency braking or if the vehicle
For any work on your vehicle, use a
rolls over. It can be released by pulling the strap
qualified workshop that has the
firmly and then releasing it so that it reels in
technical information, skills and equipment
slightly.
required, all of which a dealer or qualified
Fastening
workshop is able to provide.
► Pull the strap, then insert the tongue into
the buckle.
Depending on national regulations,
► Pressing this button causes all the direction
► Check that the seat belt is fastened
certain safety equipment may be
indicators to flash.
correctly by pulling on the strap.
mandatory: high visibility safety vests,
They can operate with the ignition off.
Unlocking
warning triangles, breathalysers, spare bulbs,
► Press the red button on the buckle.
spare fuses, fire extinguisher, first aid kit, etc.
Horn
► Guide the seat belt as it is reeled in.
Installing equipment and accessories
Advice
Fitting electrical equipment
or accessories not approved by the
The driver must ensure that the
Manufacturer may cause excessive power
passenger uses the seat belt correctly
consumption and faults in your vehicle's
and that it is securely fastened before
electrical system. Contact a dealer or
setting off.
qualified workshop for information on the
The driver or passenger must always fasten
range of approved accessories.
their seatbelt even for short journeys.
► Press the button located on the end of the
Any modification or adaptation not intended
Before and after use, ensure that the seat
multifunction control stalk.
or authorised by the Manufacturer or
belt is reeled in correctly.
carried out without meeting the technical
16
CarManuals2.co
Safety
Installation
Clean the seat belt straps with soapy water
Check that the seat belt is properly
5
The lower part of the strap must be
or a textile cleaning product, sold by dealers
tightened over the child seat and that
positioned as low as possible on the pelvis.
or qualified workshops.
it holds the child seat firmly against the
The upper part must be positioned in the
vehicle seat.
hollow of the shoulder.
For child seats with a support leg, ensure
In order to be effective, a seat belt must:
Child seats
that the support leg is in firm and steady
- be tightened as close to the body as
contact with the floor.
possible.
The regulations on carrying children
- be pulled in front of you with a smooth
are specific to each country. Refer to
Installing a booster seat
movement, checking that it is not twisted.
the legislation in force in your country.
The chest part of the seat belt must
- must only be used to secure one person.
be positioned on the child's shoulder
- must not show signs of tearing or fraying.
For maximum safety, please observe the
without touching the neck.
- must not be changed or modified, in order
following recommendations:
Ensure that the lap part of the seat belt
to avoid affecting its performance.
- In accordance with European regulations, all
passes correctly over the child's thighs.
children under the age of 12 or less than 1.5
Use a booster seat with a backrest, equipped
metres tall must travel in approved child seats
Recommendations for children
with a belt guide at shoulder level.
appropriate for their weight, on seats fitted
Use a suitable child seat if the
with a seat belt.
passenger is less than 12 years old or shorter
As a safety measure, do not leave:
- Children weighing less than 9 kg must
than one and a half metres.
- A child alone and unsupervised
travel in the "rearward facing" position.
Make sure that the seat belt is correctly
inside the vehicle.
positioned and tightened.
- A child or an animal in a vehicle exposed
Advice
Never use the same seat belt to secure more
to the sun with the windows closed.
than one child.
An incorrectly installed child seat in a
- The keys inside the vehicle.
Never carry a child on your lap.
vehicle compromises the child's safety
For more information on Child seats, refer to
in the event of an accident.
the corresponding section.
Ensure that there is no seat belt or seat belt
buckle under the child seat, as this could
Maintenance
destabilise it.
Have the seat belts checked regularly
Remember to fasten the seat belts or the
by a dealer or qualified workshop, particularly
child seat harness keeping the slack relative
if the straps show signs of damage.
to the child's body to a minimum, even for
short journeys.
17
CarManuals2.co
Safety
Locations for child seats secured using the seat belt
In accordance with European regulations, this table indicates the options for installing child seats secured using the seat belt and universally approved
(a) in relation to the weight of the child.
Weight of the child/indicative age
Seat
Under 13 kg
From 9 to 18 kg
From 15 to 25 kg
From 22 to 36 kg
(groups 0 (b) and 0+)
(group 1)
(group 2)
(group 3)
Up to about 1 year old
From about 1 to 3 years old
From about 3 to 6 years
From about 6 to 10 years
old
old
Passenger seat
U
UF
UF
UF
U: Seat position suitable for installing a child seat secured using the seat belt and universally approved for "rearward facing" and/or "forward facing"
use.
UF: Seat position suitable for installing a child seat secured using the seat belt and universally approved for "forward facing" use.
X: Seat position not suitable for installing a child seat for the stated weight class.
(a) Universal child seat: child seat which can be installed in any vehicle using the seat belt.
(b) Group 0: birth to 10 kg. Carrycots and "car" infant carriers cannot be installed on the front passenger seat.
18
CarManuals2.co
Driving
Interior sound environment
Driving
6
During use, you may hear certain perfectly
recommendations
normal noises specific to electric vehicles, such
General information
as:
- Regenerative braking.
► Observe the driving regulations and remain
- Traction battery relay when starting.
vigilant whatever the traffic conditions.
- Vehicle tyres or aerodynamics when driving.
► Monitor your environment and keep your
hands on the wheel to be able to react to
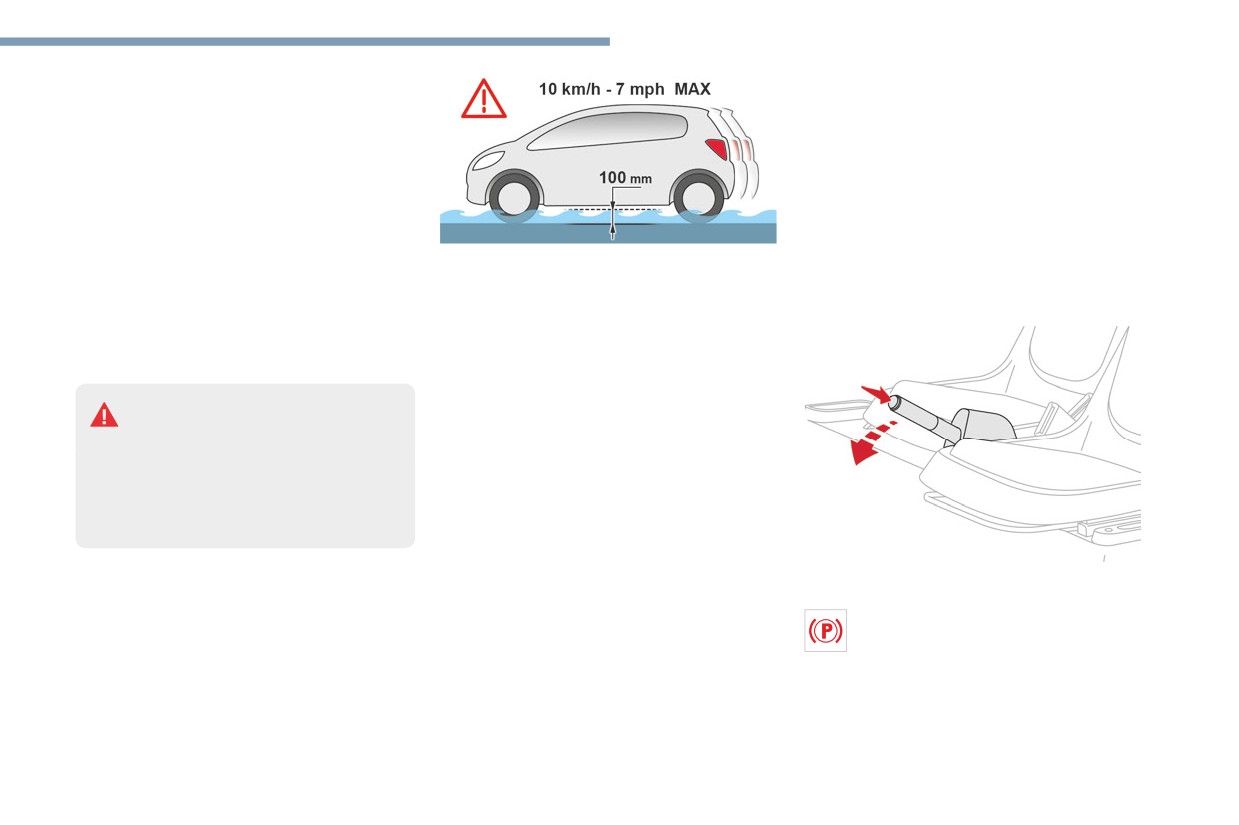
If you are obliged to drive on a flooded road:
anything that may happen any time.
Parking brake
► Check that the depth of water does not
► Drive smoothly, anticipate the need for
exceed 10 cm, taking account of waves that
Unlocking
braking and maintain a longer safety distance,
might be generated by other users.
especially in bad weather.
► Drive as slowly as possible without stalling.
► Stop the vehicle to carry out operations that
In all cases, do not exceed 6 mph (10 km/h).
require close attention (such as adjustments).
► Do not stop and do not switch off the
Never drive with the parking brake
motor.
applied. Risk of overheating and
On leaving the flooded road, as soon as safety
damaging the braking system!
conditions allow, make several light brake
Never leave a vehicle running unattended.
applications to dry the brake discs and pads.
If the driver must leave the vehicle, the
If in any doubt about the condition of your
parking brake must be applied and N mode
vehicle, consult a dealer or qualified workshop.
selected using the drive selector.
Electric mobility
On flooded roads
► Pull the parking brake lever up slightly, press
We strongly advise against driving on flooded
Exterior sound environment
the release button, then lower the lever fully.
roads, as this could seriously damage your
Pay particular attention to children, pedestrians,
If this warning lamp lights up when the
vehicle's motor and electrical systems.
cyclists and motorcyclists.
vehicle is moving, this indicates that the
As this vehicle uses a silent means of
parking brake is still applied or has not been
propulsion, these people may not be aware that
fully released.
a vehicle is approaching.
Application
In order to avoid a collision with these people,
► Pull the parking brake lever up to immobilise
the vehicle is fitted with a pedestrian horn.
the vehicle.
19
CarManuals2.co
Driving
When parking on a slope, turn the
Do not depress the accelerator pedal
Starting/Stopping the
wheels against the kerb and/or place a
when switching to D or R mode.
chock behind one of the wheels, apply the
vehicle
parking brake and switch off the ignition.
Engine braking and energy recovery
Ignition switch
The vehicle is fitted with an energy
recovery system which operates during
Drive selector
deceleration: regenerative braking.
This system of engine braking consists of
recovering part of the energy generated
during deceleration and feeding it back to
the traction battery in order to improve the
vehicle's driving range.
When the traction battery is fully charged
and during the first few miles/kilometres of
a journey, the regenerative braking does not
operate.
1.
Stop position
Adapt your driving style and use the brake
Switching off the engine.
pedal.
2.
Ignition on position
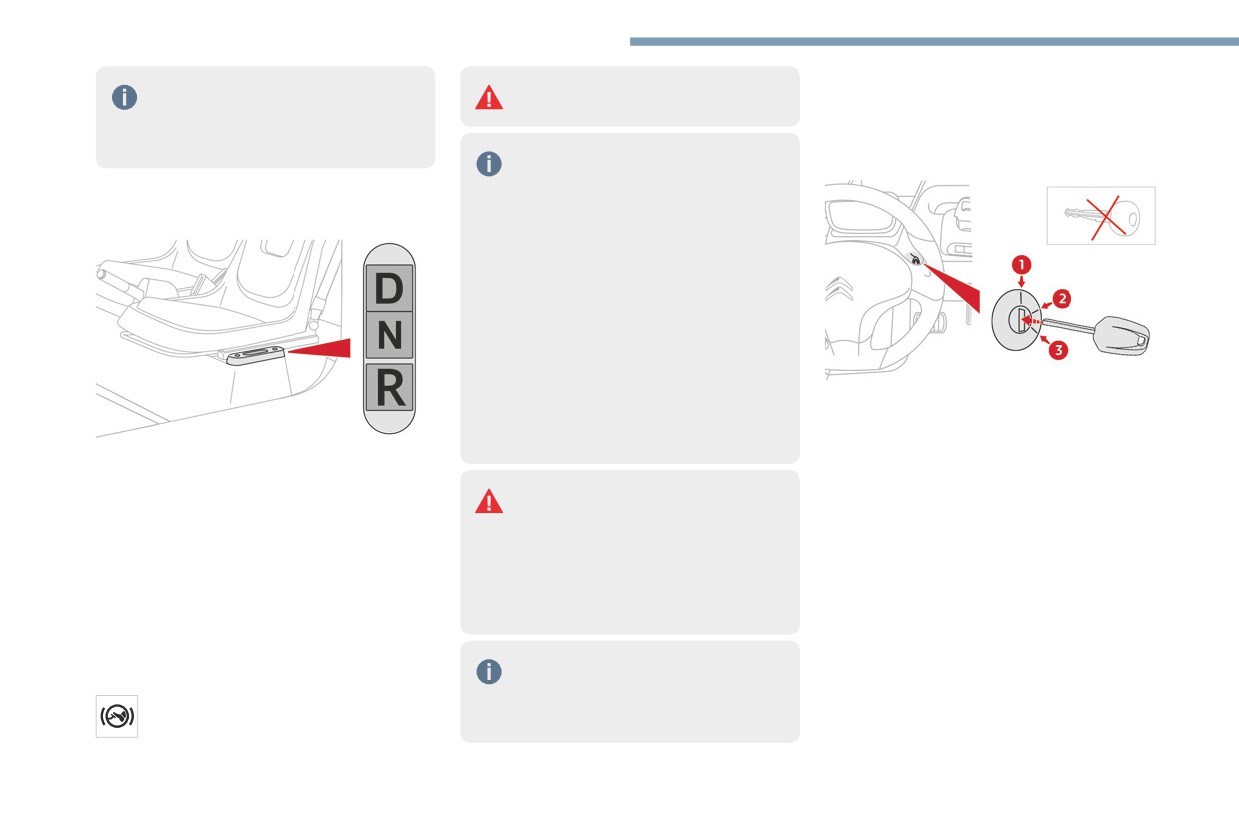
The drive selector has 3 buttons:
Use electrical accessories.
D. Forward (Drive)
Engine braking and brake pedal
3.
Starting position
N. Neutral
The engine braking can never replace
Engine starting.
R. Reverse (Rear)
the brake pedal.
Starting
When driving downhill, it is essential not to
When the ignition is switched on, the
exceed the maximum speed of the vehicle
When the ignition is switched on, the
instrument panel lights up.
and to voluntarily limit its speed by using the
instrument panel lights up, all lights come on
When the motor is switched on, N mode is
brake pedal.
and the steering column is unlocked.
displayed on the instrument panel, along with
the READY warning lamp.
► To move to D or R mode, depress the brake
In order to protect the drive chain, a
pedal and then press the desired button.
slight decrease in performance may be
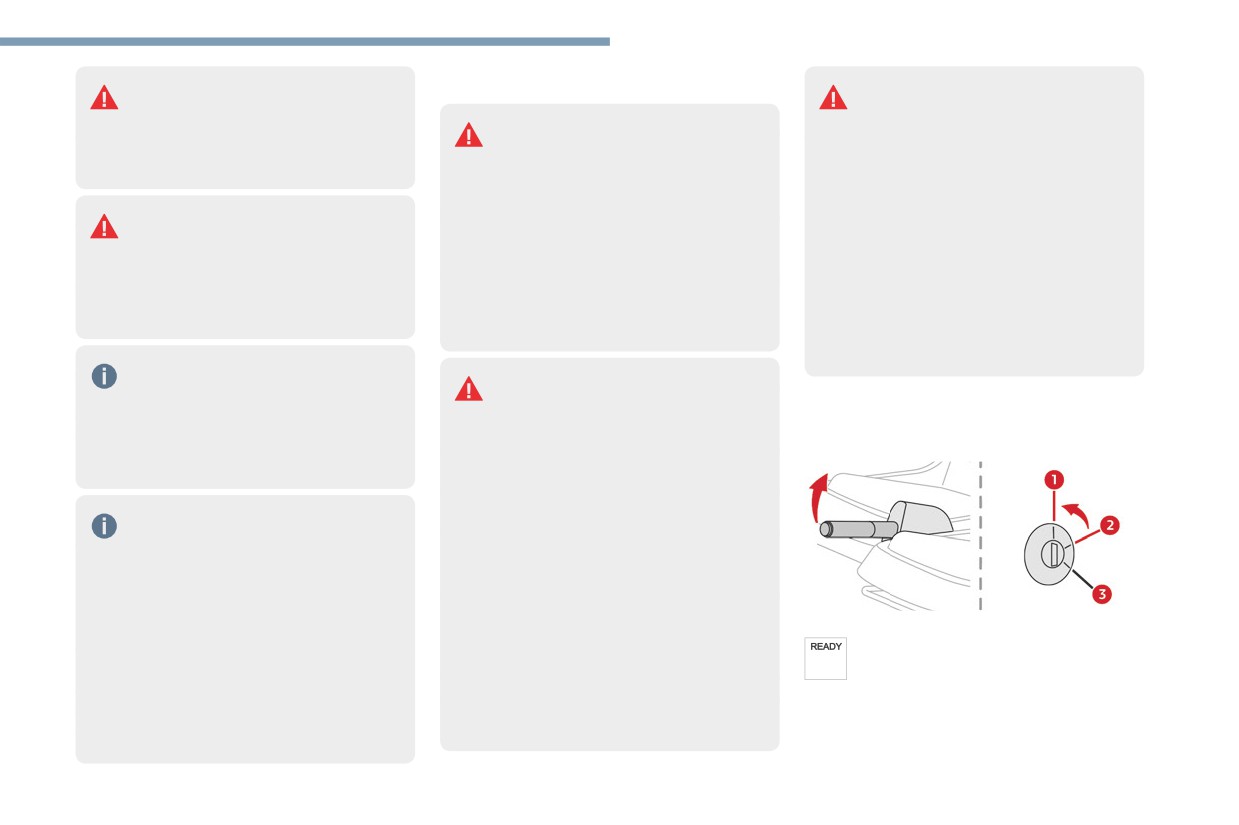
By default, this lamp flashes.
observed at low temperatures or during
prolonged use of maximum power.
20
CarManuals2.co
Driving
go out and the steering column is locked
6
automatically.
If the instrument panel remains on
after the ignition has been switched
off, contact an authorised dealer.
Never leave the vehicle with the key in
the ignition and a child or animal alone
in the vehicle, even for a short time.
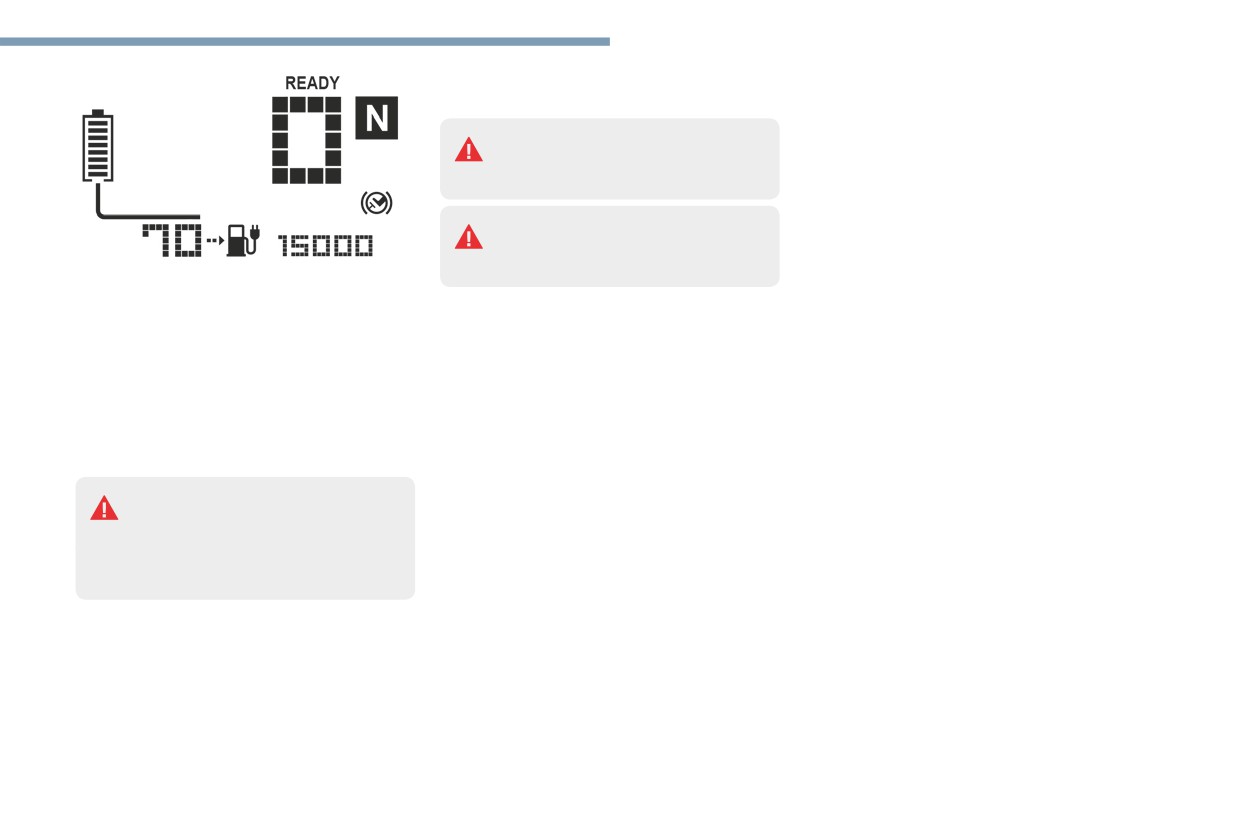
► Turn the ignition key fully forward.
When the motor is started, N mode is displayed
on the instrument panel, along with the READY
warning lamp.
► Depress the brake pedal.
► Select D or R mode using the drive selector.
► Release the parking brake.
► Release the brake pedal.
► Depress the accelerator pedal and the
vehicle moves off.
If, in the 5 seconds following selection
of D or R mode, the accelerator pedal
is not depressed, an audible signal sounds.
Starting the motor is impossible while the
vehicle is connected to a power socket.
Switching off
► Depress the brake pedal.
► Apply the parking brake.
► Turn the ignition key fully towards you.
► Release the brake pedal.
A few seconds after the ignition is switched
off, the instrument panel goes off, all the lights
21
CarManuals2.co
Practical information
The relief of the road, such as climbing a steep
Charging connector adapter
Charging the traction
slope, also affects the maximum speed that the
The charging connector adapter supplied with
battery
vehicle can reach.
the vehicle is compatible with the electrical
Principle
systems in the country of sale.
The charging connector adapter allows to
The traction battery stores the energy needed
connect the domestic charging cable from the
to operate the electric motor and the vehicle's
vehicle to a Type 2 charging socket.
electrical cabin components. It is discharged
during use, and must therefore be regularly
Characteristics
recharged. There is no need to wait for the
traction battery to fall to its reserve level before
Intensity max
16 A
recharging.
direct current (DC)
The traction battery's driving range varies
voltage
according to the conditions of use: speed,
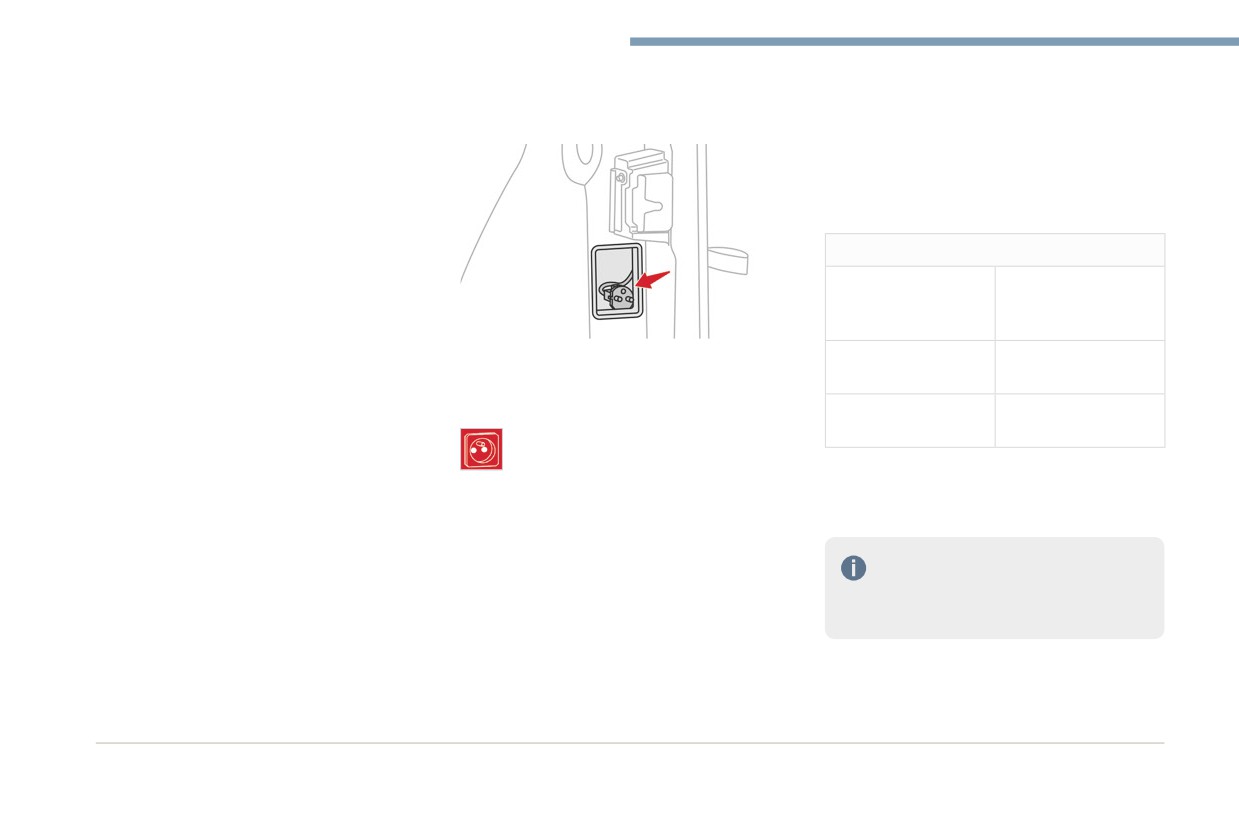
The charging cable is permanently attached to
Charging socket
Type 2
driving style, heating, load carried and road
the vehicle. It is stored in its housing located
configuration
surface.
inside the passenger door frame under the door
The traction battery's driving range can also
Operating
-40°C to +50°C
latch.
vary depending on whether the age of its
temperature range
The single-phase AC domestic mains
components.
power socket must be standard type E/
The charging connector adapter is also available
Like any equipment with a lithium-ion battery,
F* 16 A; load is limited to 8 A.
as an accessory.
the vehicle incorporates a protection mode to
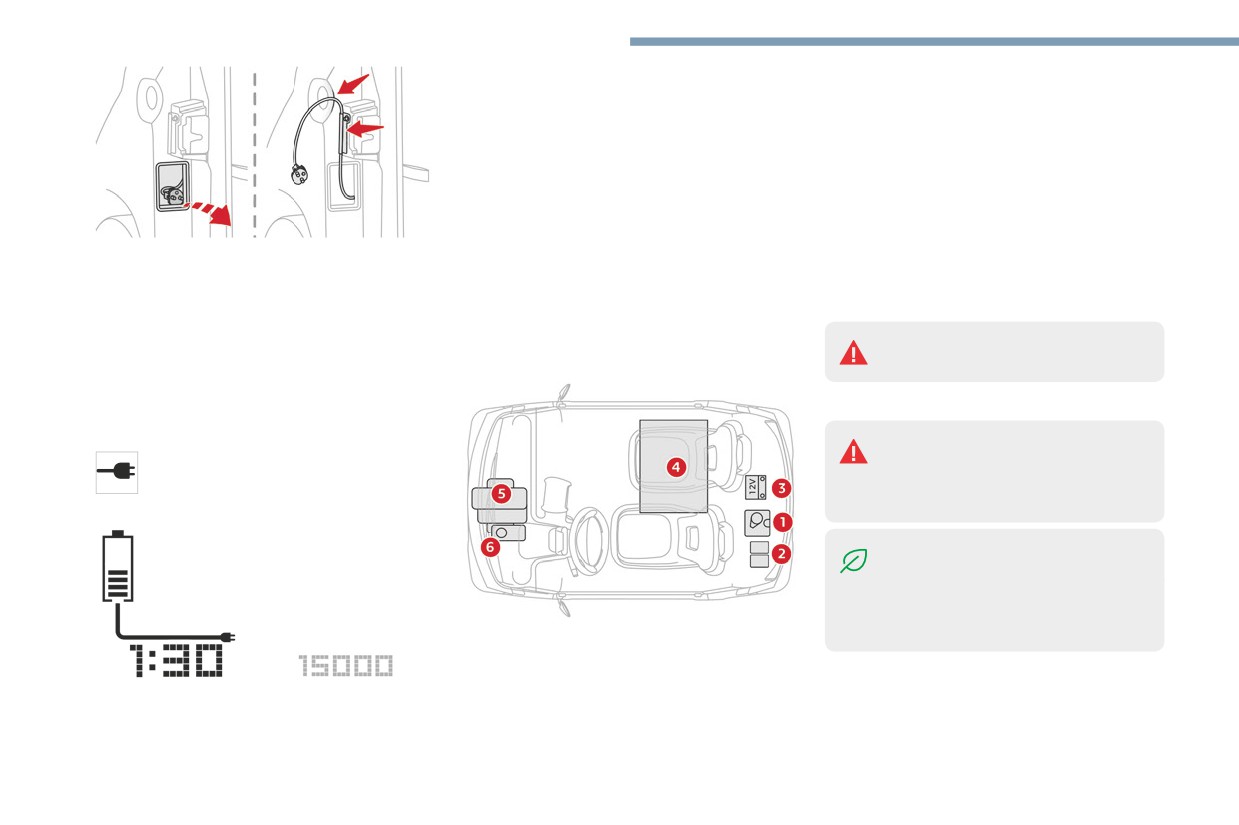
To charge the battery, unfurl the charging cable
For more information, contact a CITROËN
optimise the durability of its traction battery.
fully before connecting it to the domestic
dealer or a qualified workshop.
Depending on the charge level and temperature
power supply.
of its traction battery, power may be limited to
Charging progress can also be checked
For a full charge, follow the charging procedure
protect the battery cells.
via the MyCitroën App application in
until it stops automatically.
This protection mode affects the maximum
combination with the connector unit (sold
To interrupt the charging process at any
speed of the vehicle at low charge level (< 20%)
separately).
time, disconnect the charging cable, unlock
and at low or high battery temperature (< +5°C
the passenger door and store the cable in its
or > +45°C).
housing.
Charging progress is permanently displayed on
the instrument panel.
* Type J for Switzerland
22
CarManuals2.co
Practical information
For safety reasons, the motor will not
Important recommendations
Plugging in/Unplugging
7
start while the charging cable is
Never plug the cable into the wall
connected.
Power socket
socket (or unplug it) with wet hands.
Fully charge the traction battery at least
Have a professional check that the
Immediately stop charging if the charging
once a month.
electrical system to be used complies with
cable or wall socket become too hot to
applicable standards and is compatible with
touch.
the vehicle.
Do not expose it to flammable vapours - Risk
Charging temperature
Always use a correctly earthed power socket,
of electrical arcing or sparks!
For vehicles manufactured before
protected by a 30 mA residual current
After connecting the charging cable, check
2020/11/23, the charging is possible at
device.
that the instrument panel switches on,
temperatures between 0°C and +50°C.
Always use a power socket that is protected
otherwise disconnect and reconnect the
From this date, the charging is possible at
by a circuit-breaker appropriate for the
charging cable.
temperatures between -5°C and +50°C.
electrical circuit’s current rating.
Charging will not start if the parking brake is
not applied.
Parking in cold wheather
Charging cable
When the outside temperature drops
Incorrect use of this charging cable
Connection
below +5°C:
may result in fire, property damage and
► Park the vehicle as close as possible to a
- Park the vehicle in an enclosed area.
serious injury or death by electrocution!
power socket.
- Maintain a charge level of the traction
Never use the charging cable if it is defective
battery above 50%.
or damaged in any way (corrosion, cuts).
Never attempt to repair or open the
Vehicle immobilised for a long period
charging cable.
(more than 3 weeks)
If the charging cable is defective, consult
Park the vehicle in a location that is
a dealer or qualified workshop to obtain a
protected from the elements and where
replacement.
the temperature is between 0°C and +40°C
Never use the charging cable with an
(exposure to extreme temperatures can
extension cable, a multi-plug socket, a
► Apply the parking brake.
damage the traction battery).
conversion adaptor or in a damaged power
► Switch off the ignition (position 1);
The charging level in the traction battery
socket.
the READY warning lamp goes out.
must be around 50%.
Never immerse the charging cable in water.
Disconnect the connector unit.
Never attempt to move the vehicle using the
Remove the F7-50 A fuse.
charging cable.
Disconnect the 12 V battery.
23
CarManuals2.co
Practical information
The charge level increases slowly as charging
6. Brake fluid reservoir
progresses.
When the charge is completed, the instrument
panel switches off.
Checking levels
Disconnection
Check all of the following levels regularly in
► Disconnect the charging cable from the
accordance with the Manufacturer's service
power socket.
schedule. Top them up if required, unless
► Open the passenger door.
otherwise indicated.
► Open the passenger door.
► Store all of the charging cable inside its
If a particular level has dropped significantly,
► Pull the charging cable fully out of its
housing.
have the corresponding circuit checked by a
housing.
► Close the passenger door.
dealer or qualified workshop.
► Close the passenger door, passing the
charging cable through the guide hole in the
Fluids must comply with the
door frame and then into the handle recess.
Electric motor
Manufacturer's recommendations.
► Connect the charging cable to the power
socket. The instrument panel lights up.
Used products
► Check that the charging cable is not
stretched tight.
Avoid prolonged contact of used fluids
This indicator lamp lights up on the
with the skin.
instrument panel, along with dashes
Most of these fluids are harmful to health
instead of the charging time.
and very corrosive.
Do not discard used fluids into sewers
or onto the ground.
Drain used fluids into the dedicated
containers provided by dealers or qualified
workshops.
1. Screenwash fluid reservoir
2. Fuse box
3.
12 V battery
The remaining charging time is displayed after a
4. Traction battery/48 V electrical circuit
few minutes.
5. Electric motor
24
CarManuals2.co
Practical information
Brake fluid
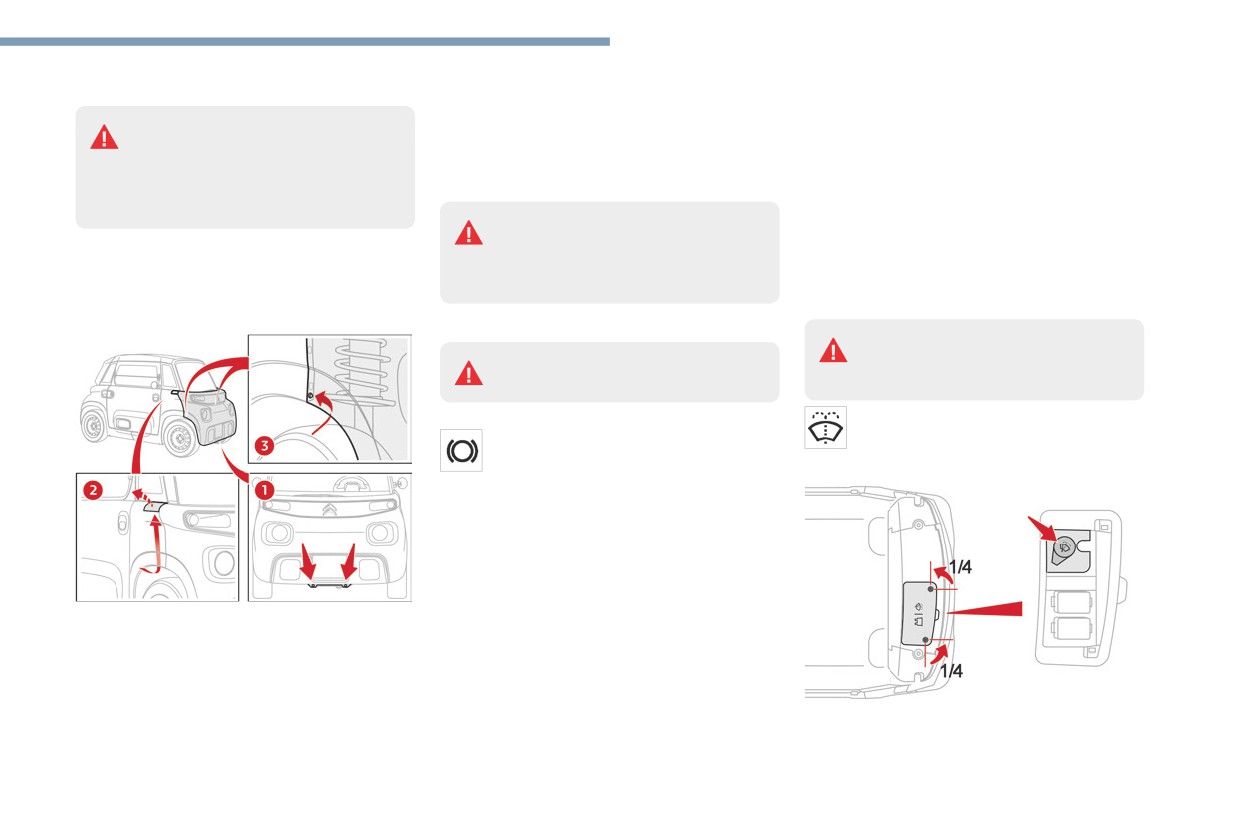
► Remove the 2 lower side fixing screws from
► Clip the 2 upper access flaps to the wings.
7
the wheel arches.
Before doing any work
► Pull the bumper horizontally for about ten
Screenwash fluid
Switch off the ignition, apply the
centimetres until the attachment points come
Access/Topping up
parking brake, check that the instrument
away.
The fluid must be topped up with a pre-mixed
panel is off and that the charging cable is
► Disconnect the indicator wiring looms.
product.
not connected.
Before topping up, it is necessary to
In winter (temperatures below 0°C), a fluid
To find out how often the brake fluid should be
protect the motor and its connectors
containing an anti-freeze agent which is
replaced, refer to the Manufacturer's servicing
in order to avoid any risk of brake fluid
appropriate for the temperature conditions
schedule.
splashing onto them.
must be used in order to protect the system's
Removing front bumper
components (pump, tank, ducts, jets).
Topping up
Filling with pure water is prohibited in
Use only DOT4 brake fluid from a
all circumstances (risk of freezing,
sealed container.
limescale, etc.).
► Clean the cap before removing it to refill.
► Top up to the required level when
The level of this fluid should be close to
necessary.
the "MAX" mark. If not, check the brake
Tank capacity: 1 litre.
pads for wear.
Refitting front bumper
► Bring the bumper close to the frame.
► Connect the indicator wiring looms.
► Place it in position and then push the
bumper horizontally until the attachment
► Remove the 2 lower fixing screws from the
points clip into place.
frame.
► Screw the 2 upper side fixing screws into
► Remove the 2 upper access flaps from the
the flaps.
wings, pass an arm under the wing and lift it up.
► Screw the 2 lower side fixing screws into the
► Remove the 2 upper side fixing screws from
wheel arches.
the flaps.
► Screw the 2 lower fixing screws into the
► Turn both fixing screws a quarter turn.
frame.
► Unclip the access cover.
25
CarManuals2.co
Practical information
► Remove the cap from the tank to top up.
brake must be adjusted, even between two
Under-inflation increases energy
services.
consumption. Non-compliant tyre
This system must be checked by a dealer or
pressures cause tyres to wear prematurely
Checks
qualified workshop.
and have an adverse effect on the vehicle's
Unless otherwise indicated, check these
road holding - risk of accident!
components in accordance with the
Brake pads/Discs/Drums
Manufacturer's service schedule.
Driving with worn or damaged tyres reduces
Brake wear depends on the style of
Otherwise, have them checked by a dealer or
the braking and road holding performance
driving, particularly in the case of
qualified workshop.
of the vehicle. We recommended regularly
vehicles used in town, over short distances. It
checking the condition of tyres (tread and
may be necessary to have the condition of the
Only use products recommended by
sidewalls) and wheel rims as well as the
brakes checked, even between vehicle services.
the Manufacturer or products of
presence of valves.
Unless there is a leak in the circuit, a drop in the
equivalent quality and specification.
When the wear indicators no longer appear set
brake fluid level indicates that the brake pads
In order to optimise the operation of
back from the tread, the depth of the grooves
are worn.
components as important as those in the
is less than 1.6 mm; it is essential to replace the
For information on checking brake disc/
braking system, the Manufacturer selects
tyres.
drum wear, contact a dealer or a qualified
and offers very specific products.
Using different size wheels and tyres from
workshop.
those specified can affect the lifetime of
After washing the vehicle, moisture, or
tyres, wheel rotation, ground clearance, the
12 V battery
in wintry conditions, ice can form on
speedometer reading and have an adverse
The battery does not require any
the brake discs and pads: braking efficiency
effect on road holding.
maintenance.
may be reduced. Gently dab the brakes to
Check regularly that the terminals are correctly
dry and defrost them.
Shock absorbers
tightened and that the connections are clean.
It is not easy for drivers to detect when
For more information on the
shock absorbers are worn. Nevertheless,
Wheels and tyres
precautions to take before any work
shock absorbers have a major impact on road
All tyre pressures must be checked when
on the 12 V battery, refer to the
holding and braking performance.
the tyres are cold.
corresponding section.
For your safety and driving comfort, it is
The pressures indicated on the tyre pressure
important to have them regularly checked by a
label are valid for "cold" tyres. If you have driven
dealer or a qualified workshop.
Manual parking brake
for more than 10 minutes or more than 6 miles
If you notice excessive brake lever travel
(10 kilometres), add 0.3 bar (30 kPa) to the
or decreased effectiveness, the parking
values indicated on the label.
26
CarManuals2.co
Practical information
Rinse the vehicle using demineralised water,
Bodywork
Changing to
7
then gently wipe the bodywork with a clean
free-wheeling
microfibre cloth.
Do not use abrasive products or
Promptly clean off any marks containing
solvents, petrol or oil to clean the
In certain situations, you must allow the vehicle
corrosive chemical substances liable to
bodywork.
to free-wheel (when being towed, on a rolling
damage the vehicle's paintwork (including
Never use an abrasive sponge to clean
road, transport by rail or sea, etc.).
tree resin, bird droppings, insect secretions,
stubborn stains. Risk of scratching the
► Switch the ignition off.
pollen and tar).
paintwork!
► Release the parking brake.
If justified by the environment, clean the
Do not apply polish.
vehicle more frequently to remove salty
Advice on care and
Decals
deposits (in coastal areas), soot (in industrial
maintenance
areas) and mud (in wet or cold areas). These
(Depending on version)
substances can be highly corrosive.
Do not use a high-pressure washer to
General information - Exterior
Contact a dealer or qualified workshop for
clean the vehicle - risk of damaging or
advice on removing stubborn stains requiring
Do not wash the vehicle in full
detaching the decals!
special products (such as tar or insect
sunshine or in extremely cold
removers).
conditions.
Use a high-flow hose (temperature
Do not use a high pressure washer or
between 25°C and 40°C).
General information - Interior
automatic carwash to clean the vehicle.
Place the jet of water perpendicular to the
Use a water jet (temperature between +20°C
When cleaning your vehicle, never
surface to be cleaned.
and +40°C).
clean the interior with a jet of water.
Rinse the vehicle with demineralised water.
Any liquids carried inside the vehicle in
Before starting to clean your vehicle,
mugs or other open containers can spill,
Textile - Maintenance
remember to lock the windows and
presenting a risk of damage if they come
doors.
into contact with the controls on the
Do not use aggressive cleaning
Use a sponge and soapy water or a pH
dashboard. Be alert!
products (e.g. alcohol, solvent or
ammonia).
neutral product.
Do not use steam-cleaning systems - Risk of
Move the water jet perpendicular to the
affecting the adhesion of the fabrics!
surface to be cleaned, avoiding the door
seals.
27
CarManuals2.co
Practical information
Remove dust from the textile parts
- Sugary and/or alcoholic drinks: clean with
regularly with a dry cloth, soft brush or
lukewarm water, or lemon juice if the stain is
vacuum cleaner.
persistent.
Rub down the textile parts once per year
- Hair gel, coffee, tomato sauce, vinegar:
with a clean, damp cloth. After leaving
clean with lukewarm water and lemon juice.
overnight to dry, brush with a soft-bristled
For solid substances, then use a soft brush or
brush.
vacuum cleaner.
For liquid substances, then use a damp
Textile - Stain removal
microfibre cloth and then dry with another
cloth.
Do not rub the stain or it may spread
or you may cause the substance to
penetrate the surface.
Act quickly by reducing the stain from
its edges inwards.
Remove as much substance or solids as
possible using a spoon or spatula, and
remove as much liquid as possible using
absorbent paper.
Product/Procedure to use depending
on the type of stain:
- Grease, oil and ink: clean with a pH-neutral
detergent.
- Vomit: clean with sparkling mineral water.
- Blood: spread flour over the stain and
allow to dry; remove with a slightly damp
cloth.
- Mud: allow to dry and then remove with a
slightly damp cloth.
- Cake, chocolate, ice cream: clean with
lukewarm water.
28
CarManuals2.co
In the event of a breakdown
Changing a wheel
Direction indicators
Rear lamps
8
Rapid flashing of the indicator lamp for
The vehicle is not equipped with on-board tools,
a direction indicator (left or right) indicates
such as a jack or wheel brace.
that one of the bulbs on the corresponding
In the event of a flat tyre, call a dealer or
side has failed.
qualified workshop.
To have winter tyres fitted or the wheels
changed, consult a dealer or qualified workshop.
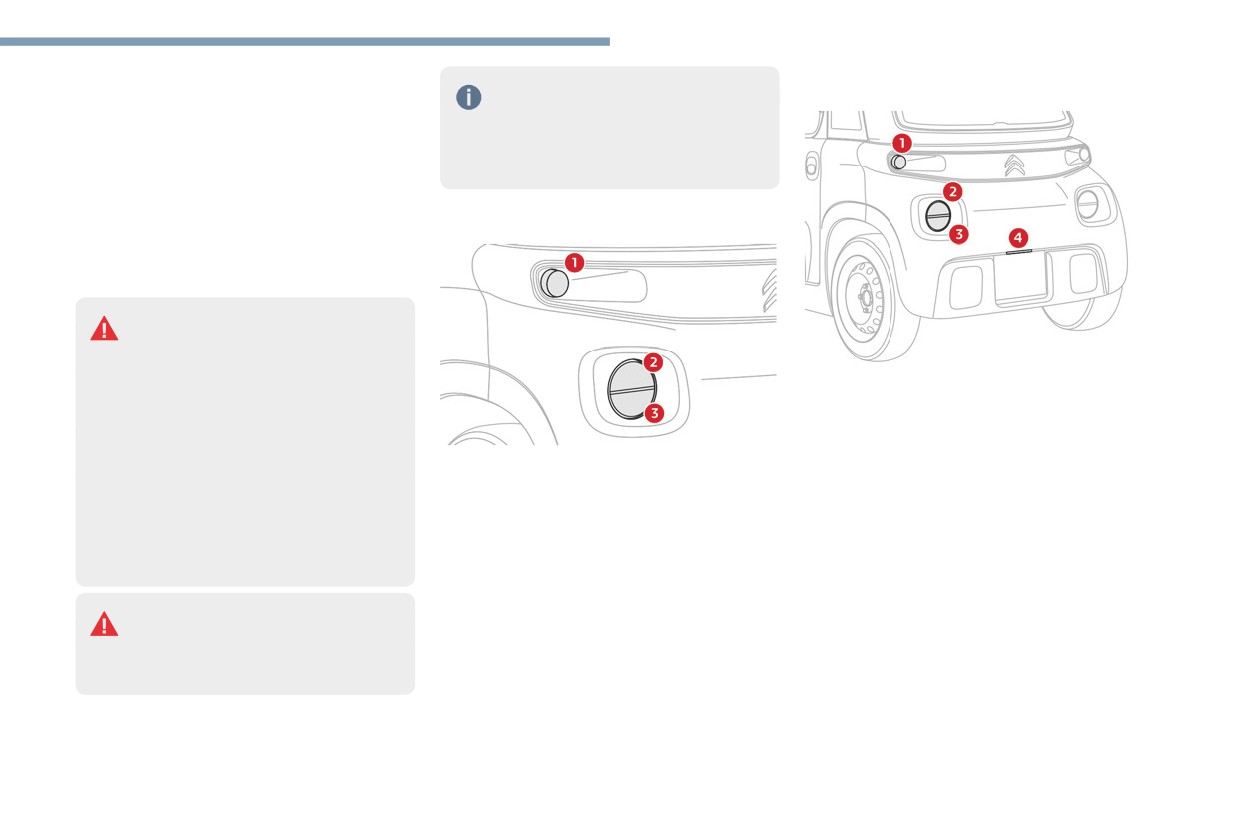
Front lamps
Changing a bulb
Cleaning
The headlamps have polycarbonate
lenses with a protective coating:
- Do not clean them with a dry or abrasive
1. Direction indicators
cloth, nor with detergent or solvent
2. Sidelamps
products.
- Use a sponge and soapy water or a pH
3. Brake lamps
neutral product.
1. Direction indicators
4. Number plate lamp
- When using a jet of water to clean off
2. Sidelamps
persistent marks, do not keep the jet
3. Dipped beam headlamps
directed towards the headlamps, lamps or
their edges for too long, so as not to damage
their protective coating and seals.
Light-emitting diodes (LEDs)
Do not touch LED headlamps/lamps.
To replace this type of bulb, you must
consult a dealer or qualified workshop.
29
CarManuals2.co
In the event of a breakdown
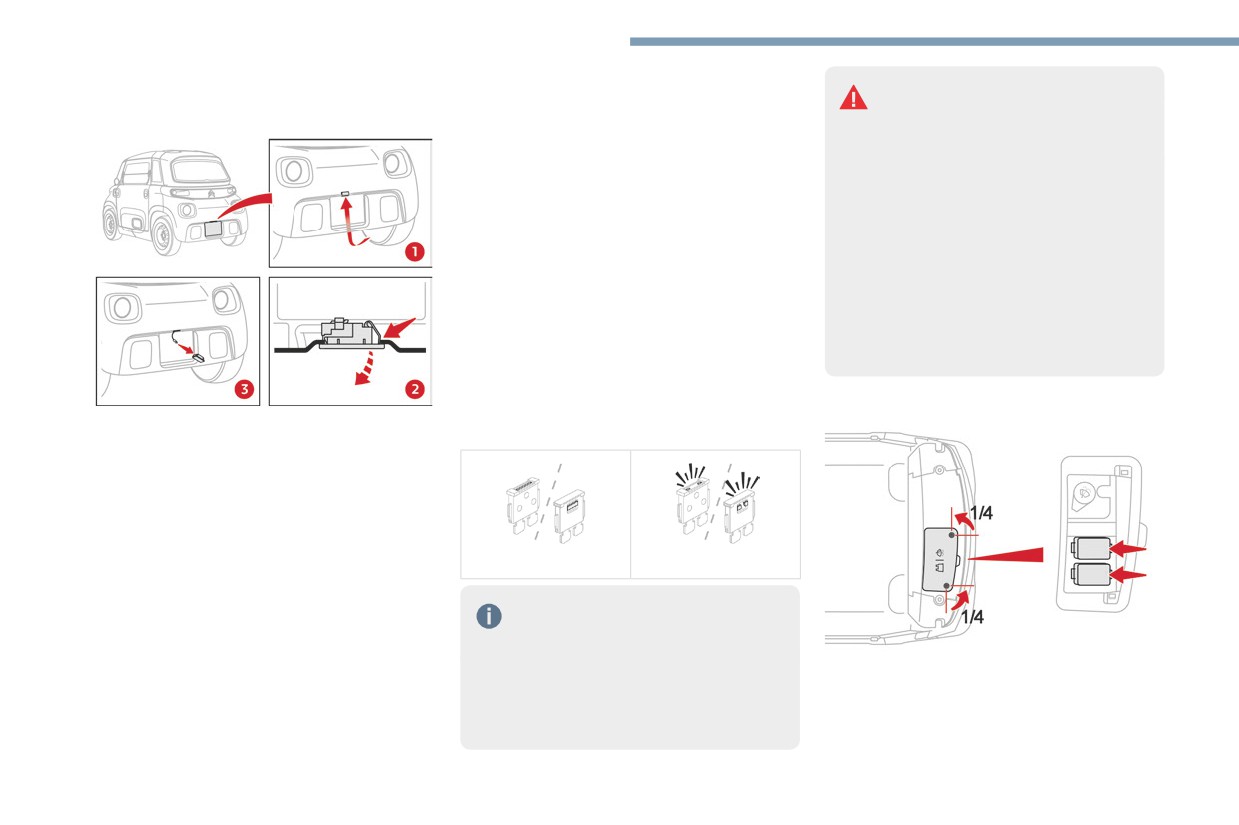
Number plate lamp
Installing electrical accessories
Changing a fuse
Before fitting other electrical
Removing
Before changing a fuse:
equipment or accessories to your vehicle,
► Identify the cause of the fault and fix it.
contact a dealer or a qualified workshop.
► Switch off all power consumption.
The Manufacturer accepts no responsibility
► Immobilise the vehicle and switch off the
for any costs incurred in repairing the vehicle
ignition.
or for rectifying malfunctions resulting from
► Identify the defective fuse using the current
the installation of accessories not supplied
allocation tables and diagrams.
or not recommended by the Manufacturer
To replace a fuse, it is essential to:
and not installed in accordance with its
► Pull the fuse out of its housing and check
recommendations, in particular when the
the state of its filament.
combined power consumption of all of the
► Always replace the failed fuse with a fuse of
additional equipment connected exceeds 10
the same rating (same colour); use of a different
milliamperes.
rating may cause malfunctions - risk of fire!
If the fault recurs soon after replacing a fuse,
Accessing the fuses
have the electrical system checked by a dealer
► Lie down behind the vehicle in the middle of
or qualified workshop.
the rear bumper.
► Pass your arm behind the bumper to reach
the lamp above the foam shock absorber.
► Pinch the fixing clip holding the lamp.
► Push the lamp down while holding the fixing
clip.
► Disconnect the lamp from its wiring loom.
Good
Faulty
► Leave the wiring loom dangling through the
bumper.
The fuse allocation tables and
corresponding diagrams are available
Refitting
through a dealer or qualified workshop.
► Connect the new lamp to the suspended
Replacement with a fuse not shown in
► Turn both fixing screws a quarter turn.
wiring loom.
the allocation tables could cause a serious
► Unclip the access cover.
► Replace the lamp into its housing by
malfunction of the vehicle. Consult a dealer
► Pull out the faulty fuse and replace it.
pressing it until it clips into place.
or qualified workshop.
30
CarManuals2.co
In the event of a breakdown
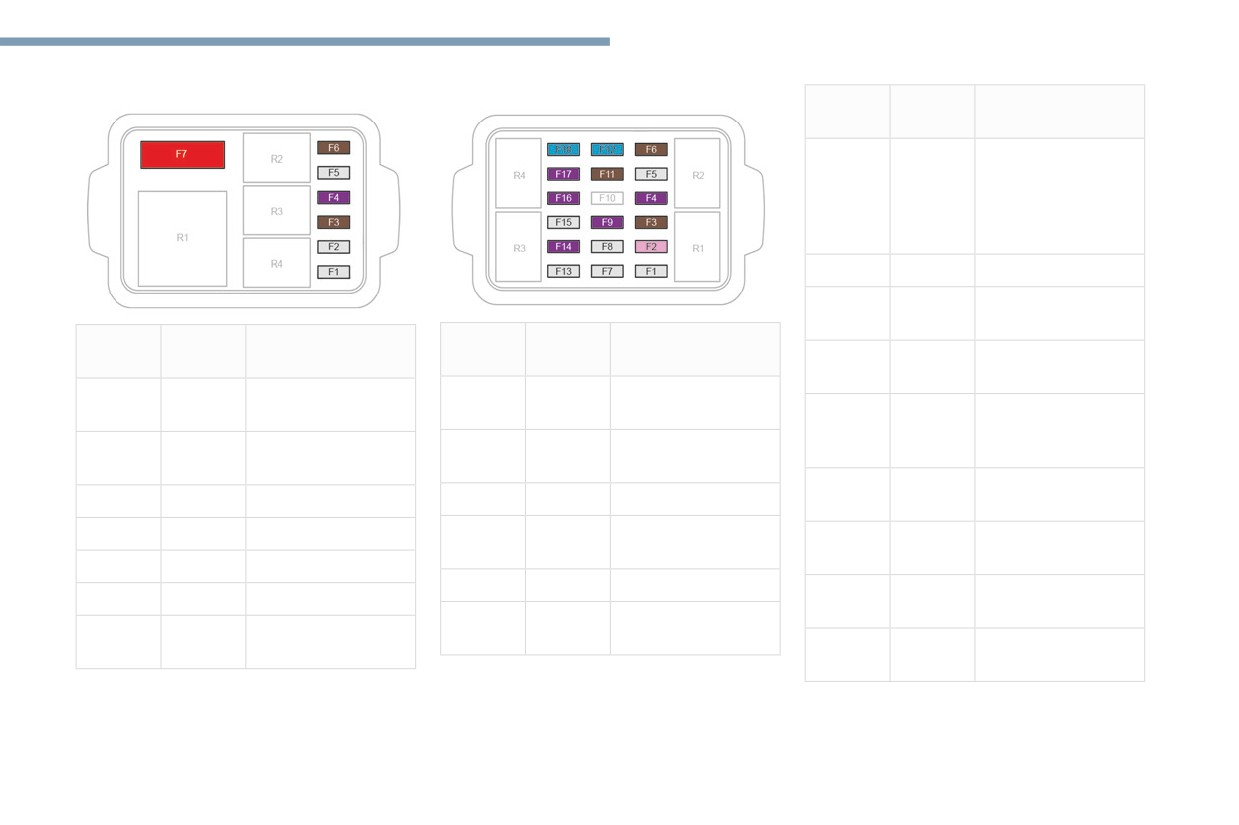
Fuse table - Box 1
Fuse table - Box 2
Fuse N°
Rating
Functions
8
(Amps)
F9
3 A
USB socket -
Lighting for
ventilation/heating/
demisting buttons,
drive selector
F11
7.5 A
Diagnostic socket
F12
15 A
Wiper motor
(+Battery)
Fuse N°
Rating
Functions
Fuse N°
Rating
Functions
F13
2 A
Rear left wheel
(Amps)
(Amps)
speed sensor
F1
2 A
Brake switch
F1
2 A
Steering mounted
(+Battery)
control (left)
F14
3 A
Sidelamps front
left and rear right -
F2
2 A
Main computer
F2
4 A
Main computer
Number plate lamp
(+Battery)
(+After ignition)
F15
2 A
Sidelamps rear left
F3
7.5 A
Fan
F3
15 A
Screenwash pump
and front right
F4
3 A
Instrument panel
F5
2 A
Instrument panel
F16
3 A
Right-hand dipped
warning lamps
beam headlamp
F5
2 A
Battery computer
F7
2 A
Motor computer
F17
3 A
Left-hand dipped
F6
7.5 A
Horn
beam headlamp
F8
2 A
Brake switch (+After
F7
50 A
Battery drive train/
ignition)
F18
15 A
Wiper motor (+After
DC/DC converter
ignition)
31
CarManuals2.co
In the event of a breakdown
12 V battery
Recharging the 12 V battery
Removing/Refitting
Do not recharge the battery without
Removing rear bumper
Lead-acid starter batteries
first disconnecting the terminals and
removing the battery.
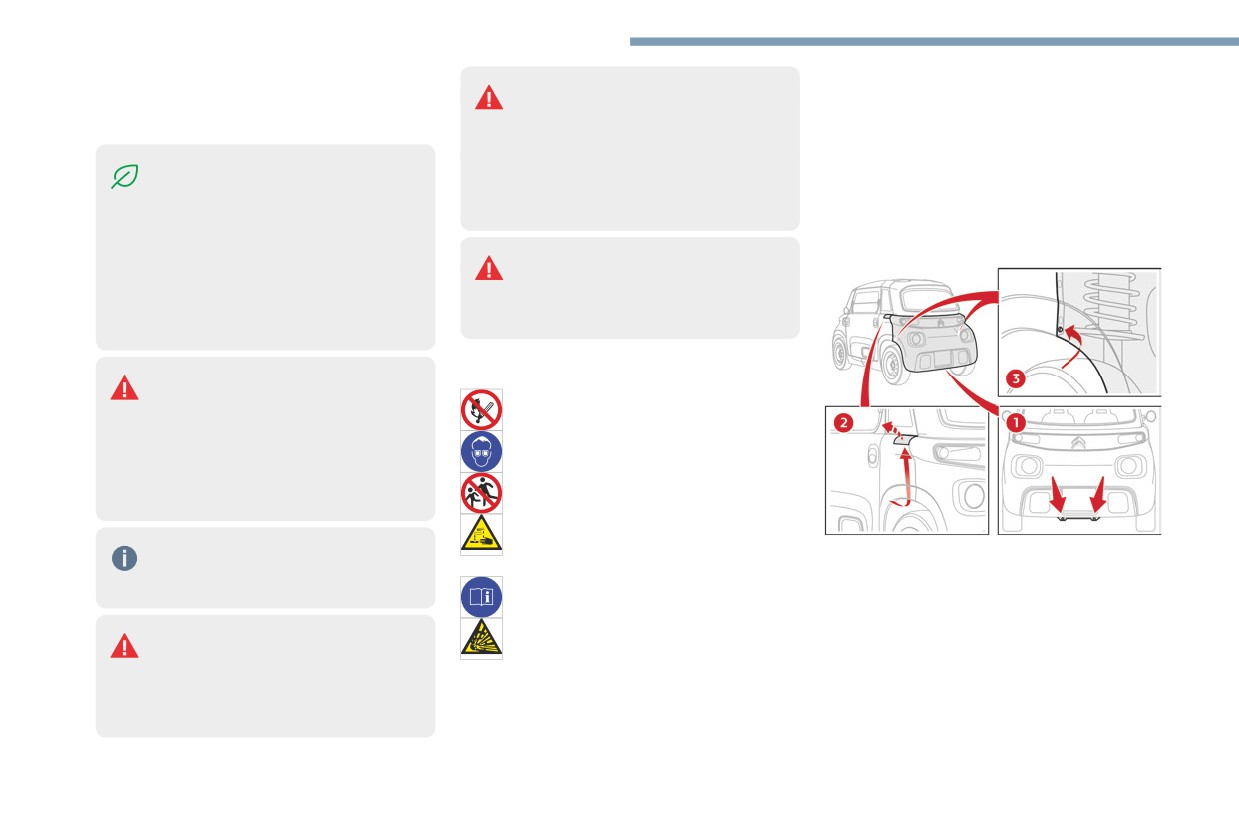
► Remove the number plate lamp prior to
These batteries contain harmful
Do not disconnect the battery terminals
starting.
substances (sulphuric acid and lead).
while the READY indicator lamp is lit, or
For more information on the Number plate
They must be disposed of in accordance
while the vehicle is charging.
lamp, refer to the corresponding section.
with regulations and must never under any
► Pass the lamp's suspended wiring loom
circumstances be discarded with household
behind the bumper.
Jump-starting another vehicle
waste.
Do not use the 12 V battery to jump-
Take used remote control batteries and
start another vehicle or to charge another
vehicle batteries to a special collection
vehicle's battery.
point.
Protect your eyes and face before
Symbols
handling the battery.
No sparks or naked flames, no smoking.
All operations on the battery must be carried
out in a well ventilated area and away from
Always protect your eyes. Explosive
naked flames and sources of sparks, to avoid
gases can cause blindness and injury.
any risk of explosion or fire.
Keep the vehicle's battery out of the
Wash your hands afterwards.
reach of children.
The vehicle's battery contains sulphuric
Flat 12 V battery
acid which can make you go blind or
► Remove the 2 lower fixing screws from the
It is no longer possible to start the
cause severe burns.
frame.
motor or recharge the traction battery.
For more information, refer to the
► Remove the 2 upper access flaps from the
handbook.
wings, pass an arm under the wing and lift it up.
Explosive gases can be present close to
Before working on the 12 V battery
► Remove the 2 upper side fixing screws from
the battery.
Switch off the ignition, apply the
the flaps.
parking brake, check that the instrument
► Remove the 2 lower side fixing screws from
panel is off and that the charging cable is
the wheel arches.
not connected.
32
CarManuals2.co
In the event of a breakdown
► Pull the bumper horizontally for about ten
Refitting the battery
► Screw the 2 lower fixing screws into the
8
centimetres until the attachment points come
frame.
away.
► Clip the 2 upper access flaps to the wings.
► Disconnect the indicator wiring looms.
► Finally, replace the number plate lamp.
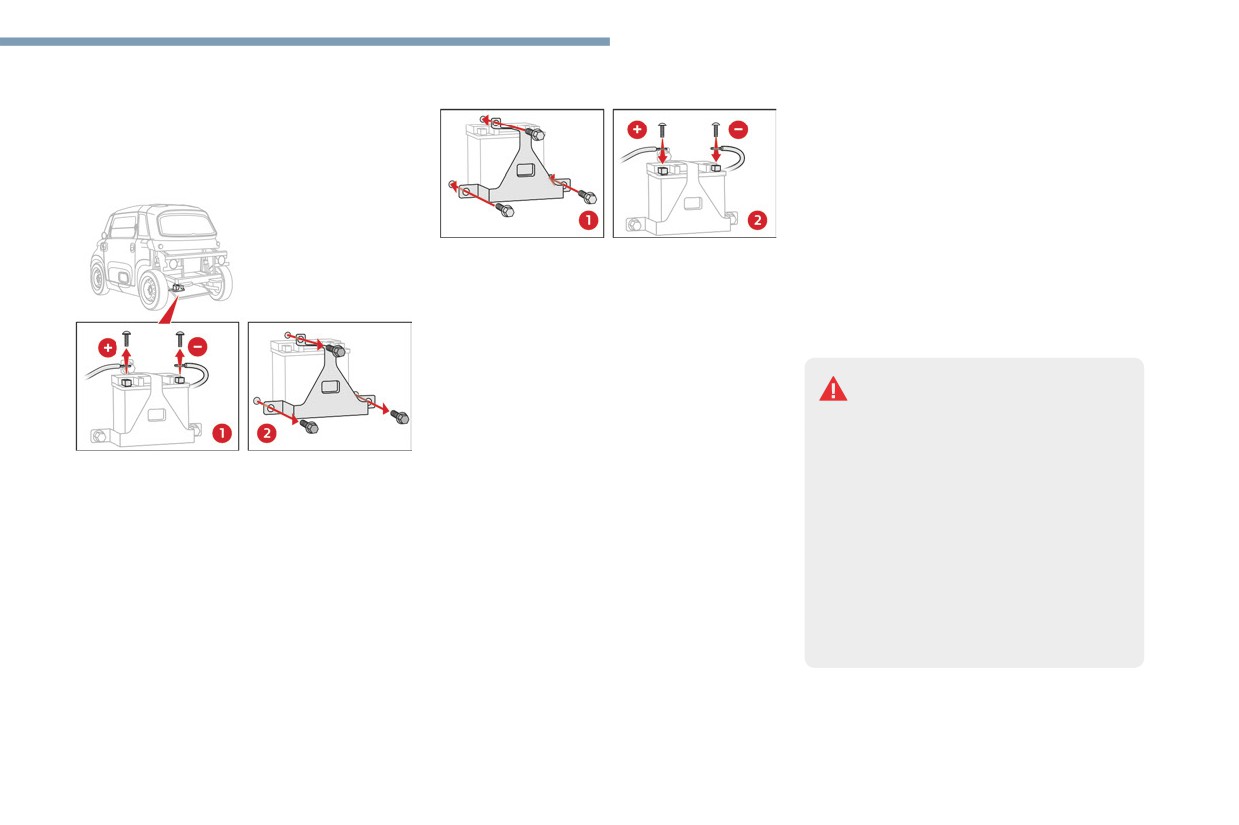
Removing the battery
For more information on the Number plate
lamp, refer to the corresponding section.
Starting using another
► Place the battery into its compartment.
battery
► Replace the retainer brace and its 3 fixing
If the vehicle's battery is flat, the motor can be
screws.
started using a backup battery (either external
► Reconnect the positive terminal first
or from another vehicle) and jump leads or
(left-hand side), next reconnect the negative
using a battery booster.
terminal (right-hand side):
• Insert the nut horizontally into the
Never start the motor by connecting a
terminal's square housing.
battery charger.
• Place the clamp on top of the terminal.
Never use a 24 V or higher battery booster.
• Insert the screw into the terminal and nut
Check beforehand that the backup battery
► Disconnect the negative terminal first
and screw tight.
has a nominal voltage of 12 V and a capacity
(right-hand side), next disconnect the positive
Refitting rear bumper
at least equal to that of the discharged
terminal (left-hand side):
battery.
► Bring the bumper close to the frame.
• Unscrew and remove the screw from the
The two vehicles must not be in contact
► Pass the lamp's suspended wiring loom in
clamp.
with each other.
front of the bumper.
• Remove the clamp from the terminal.
Disconnect or turn off all electrical devices in
► Connect the indicator wiring looms.
► Make sure that any disconnected clamps
both vehicles (portable devices, radio, wipers,
► Place it in position and then push the
do not come into contact with the battery
lights, etc.).
bumper horizontally until the attachment
terminals - Risk of short-circuit!
Do not disconnect the (+) terminal while the
points clip into place.
► Unscrew the 3 fixing screws on the battery's
motor is switched on.
► Screw the 2 upper side fixing screws into
retainer brace.
the flaps.
► Remove the retainer brace and then the
► Screw the 2 lower side fixing screws into the
battery.
wheel arches.
33
CarManuals2.co
In the event of a breakdown
► Leave the vehicle switched on for at least
30 minutes to allow the traction battery to
recharge the 12 V battery.
If the battery charge level in the traction
battery is too low, connect the vehicle's
charging cable.
Charging the battery using a
battery charger
For optimum service life of the battery, it is
essential to maintain an adequate level of
charge.
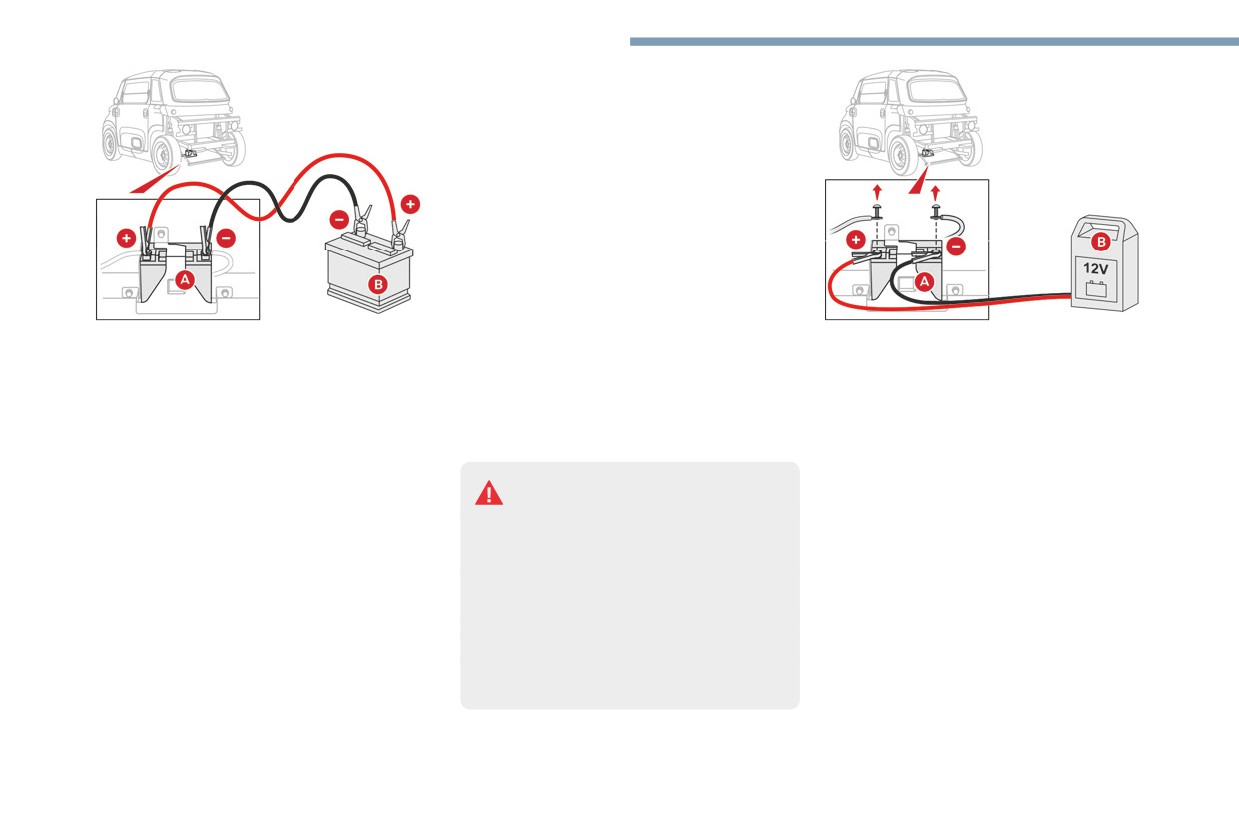
► Connect the red cable to the (+) terminal
► Switch the ignition off.
In some circumstances, it may be necessary to
of the flat battery A, then to the (+) terminal of
► Disconnect or turn off all electrical devices
charge the battery:
the backup battery B, or booster.
(portable devices, wipers, lights, etc.).
- When using the vehicle mainly for short
► Connect one end of the green or black
► Switch off charger B before connecting
journeys.
cable to the (-) terminal of the backup battery B
the cables to the battery, so as to avoid any
- If the vehicle is to be taken off the road for
or of the booster (or to an earth point on the
dangerous sparks.
several weeks.
assisting vehicle).
► Ensure that the charger cables are in good
► Connect the other end of the green or black
To recharge the vehicle's battery
condition.
cable to the negative (-) terminal of flat battery
yourself:
► Connect the cables from charger B as
A.
- Only use a charger compatible with lead-
follows:
► Start the engine/switch on the motor on the
acid batteries and with a nominal voltage
• Positive (+) red cable to the (+) terminal on
assisting vehicle and leave it running for a few
of 12 V.
battery A.
minutes.
- Follow the instructions provided by the
• Negative (-) black cable to the (-) terminal on
► Turn the ignition key to start the disabled
manufacturer of the charger.
battery A.
vehicle.
- Never reverse polarities.
► At the end of the charging operation, switch
The traction battery takes over the supply to
- Disconnect the 12 V battery.
off charger B before disconnecting the cables
the 12 V circuit.
Make sure the vehicle's charging cable is not
from battery A.
► Wait for the assisting vehicle to return to
connected at the same time.
idle.
► Disconnect the jump leads in reverse order.
34
CarManuals2.co
In the event of a breakdown
Towing the vehicle
8
Observe the legislation in force in the
country where you are driving.
Before towing the vehicle, it is essential to
put the vehicle in free-wheeling mode.
For more information on Free-wheeling,
refer to the corresponding section.
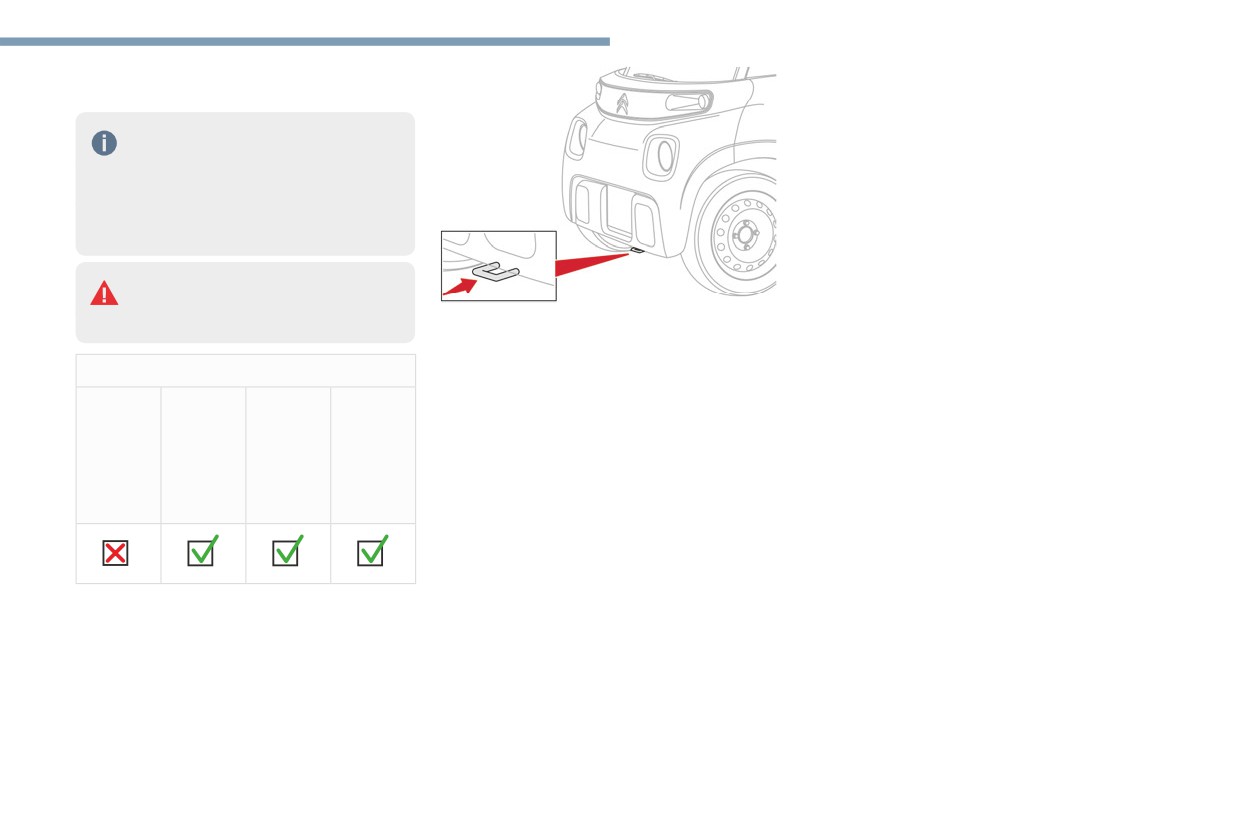
An electric vehicle must never be used
for road transfers.
Use the towing eye only to free the vehicle
It may be used, for example, to exit a rut.
when stuck, or to secure it for recovery on a
flatbed lorry or trailer.
Towing constraints
Front
Rear
Flatbed
4
wheels
wheels
wheels
on the
on the
on the
ground
ground
ground
with
towbar
35
CarManuals2.co
Technical data
Electric motor
Version
AMI
AMI
CARGO
Version
AMI
AMI
CARGO
Model code:
Z2CA
Z2CA
9A...
Model code:
Z2CA
Z2CA
9A...
Technology
Lithium-Ion
Weights
Installed capacity
5.4 (useful)
(kWh)
Unladen weight,
483
487
battery included (kg)
Domestic charging
Maximum loading
140
140
Alternating current
230 (single-phase)
weight with driver
voltage (Vac)
(kg)
Rating (A)
16
Gross vehicle weight
700
700
Charging cable
3
(kg)
length (m)
Tyres
155/65R14
Charging time (hr)
4 hrs for 100%*
Electric motor
Driving range (miles/
46/75
Technology
Synchronous with
km)
permanent magnets
Nominal power: EC
6/8.2
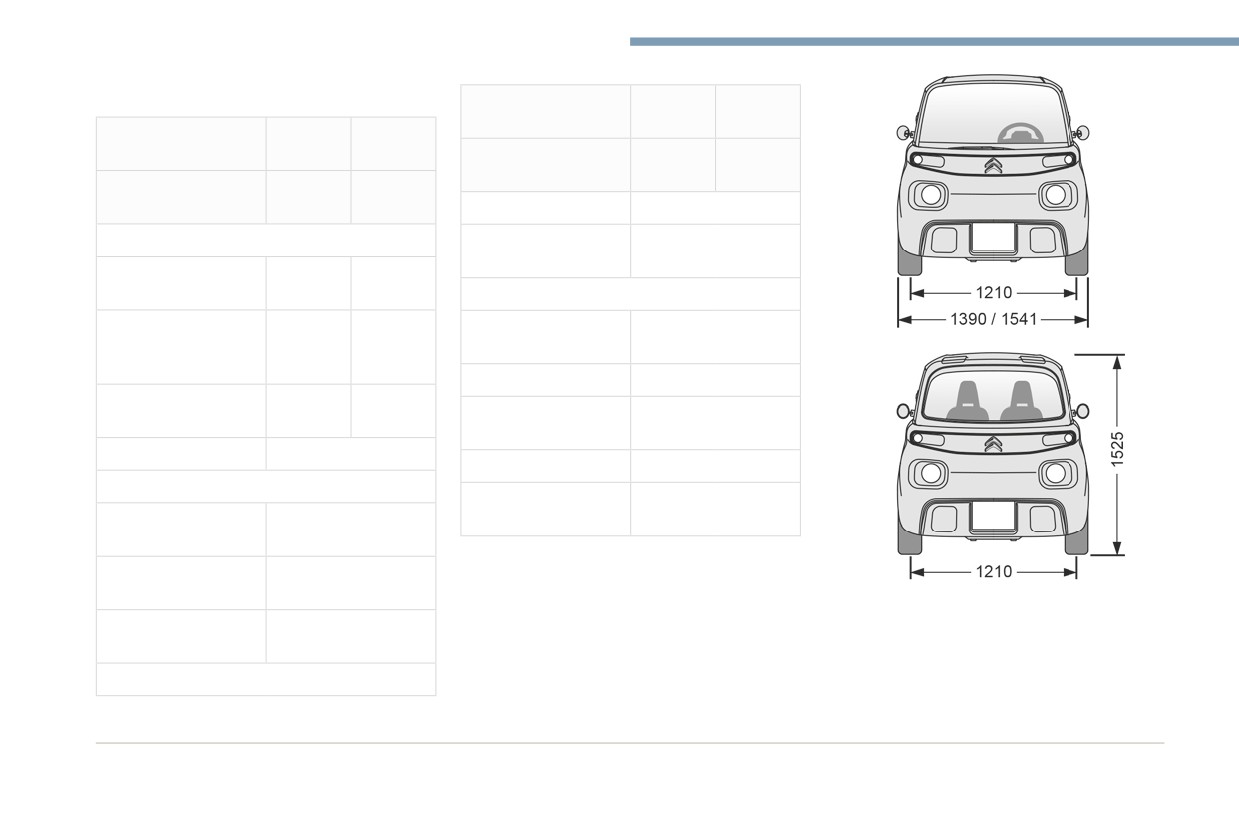
Dimensions (mm)
standard (kW)/(hp)
These dimensions have been measured on an
Max. power: EC
9.4/12.6
unladen vehicle.
standard (kW)/(hp)
Traction battery
* The charging time varies depending on the temperature of the battery, its age, the charge and discharge cycles and the battery version.
36
CarManuals2.co
Technical data
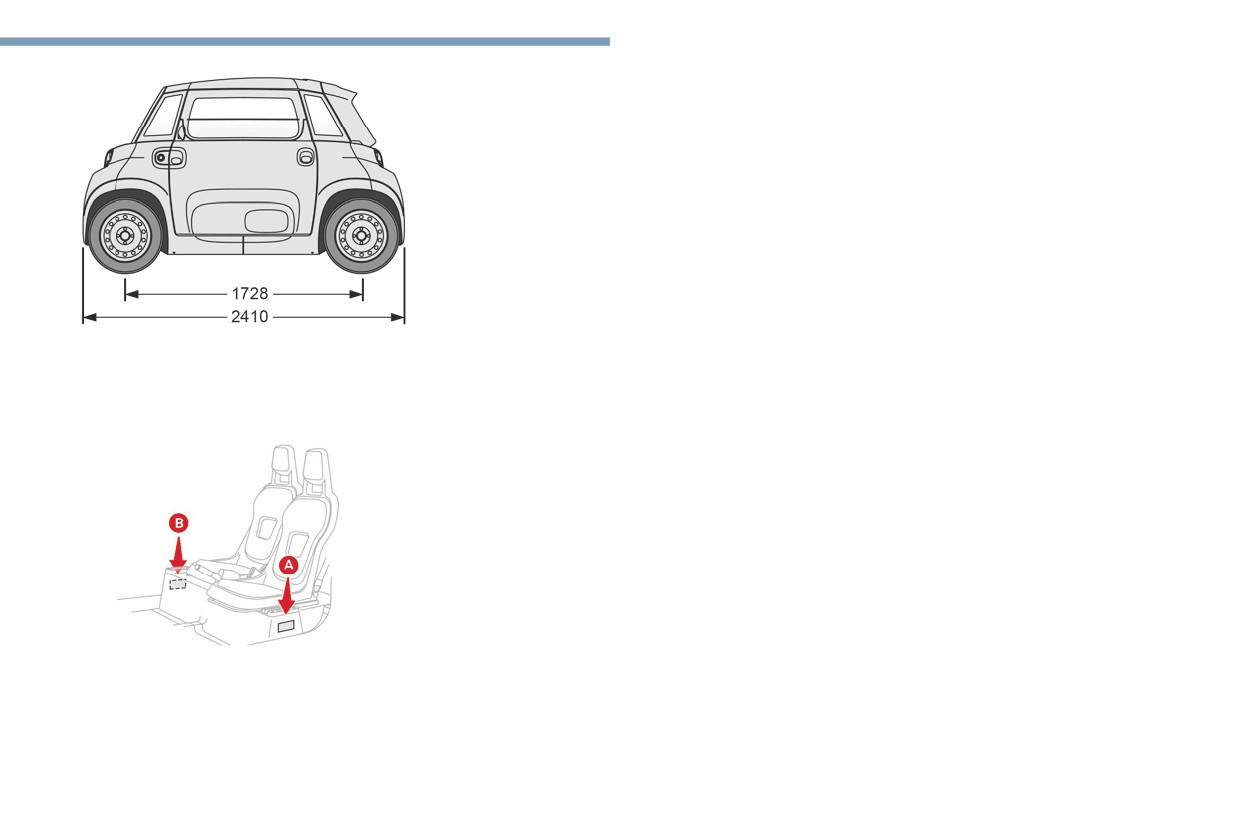
B. Manufacturer's label
9
Attached to the base of the passenger seat.
Bears the following information:
- Manufacturer’s name.
- European whole vehicle type approval
number.
- Vehicle Identification number (VIN).
- Noise level/Rated speed.
- Maximum power/Maximum speed.
- Gross vehicle weight (GVW).
Identification markings
Various visible markings for vehicle
identification and vehicle search.
A. Tyres label
Attached to the base of the driver's seat.
Indicates tyre inflation pressures when cold.
37
CarManuals2.co