Citroen C3 (2023 year). Manual in english
Welcome
Key
Safety warning
Thank you for choosing Citroën C3.
This document presents the key information and recommendations required
Additional information
for you to be able to explore your vehicle in complete safety. We strongly
recommend familiarising yourself with this document and the Warranty and
Environmental protection feature
Maintenance chapter.
Your vehicle will be fitted with only some of the equipment described in this
document, depending on its trim level, version and the specification for the
Location of the equipment / button
country in which it was sold.
described using a black area.
The descriptions and illustrations are for guidance only.
Automobiles CITROËN reserves the right to modify the technical specifications,
equipment and accessories without having to update this guide.
If ownership of your vehicle is transferred, please ensure this Handbook is
passed on to the new owner.
CarManuals2.co
Contents
Overview ■
Lighting and visibility 4
In the event of a breakdown 8
Exterior lighting control stalk
20
Tool kit
42
Direction indicators
20
Spare wheel
42
Driving tips ■
Headlamp beam height adjustment
20
Changing a bulb
45
Wiper control stalk
21
Changing a fuse
48
Changing a wiper blade
21
12 V battery
56
Instruments 1
Towing the vehicle
58
Instrument panel
5
Warning and indicator lamps
5
Safety 5
Indicators
7
General safety recommendations
23
Technical data
9
Trip computer
7
Hazard warning lamps
23
Engines technical data
60
Horn
23
Dimensions
60
Seat belts
24
Identification markings
60
Access 2
Airbags
26
Key
9
Child seats
28
Key with remote control function
9
Child lock
30
10" Touch Screen
10
Central locking
10
Back-up procedures
10
Doors
11
Driving 6
Alphabetical index ■
Boot
11
Driving recommendations
31
Windows
12
Starting / Switching off the engine
31
5-speed manual gearbox
32
6-speed manual gearbox
32
Ease of use and comfort 3
Gear efficiency indicator
33
Front seats
14
Overspeed alert
33
Steering wheel adjustment
15
Parking sensors
33
Rear seats
15
Heating and Ventilation
16
Manual air conditioning
17
Practical information 7
Front demist - defrost
18
Refuelling
35
Interior fittings
18
Bonnet
35
Front courtesy lamps
19
Engine compartment
36
Boot fittings
19
Checking levels
37
Checks
39
Advice on care and maintenance
41
2
CarManuals2.co
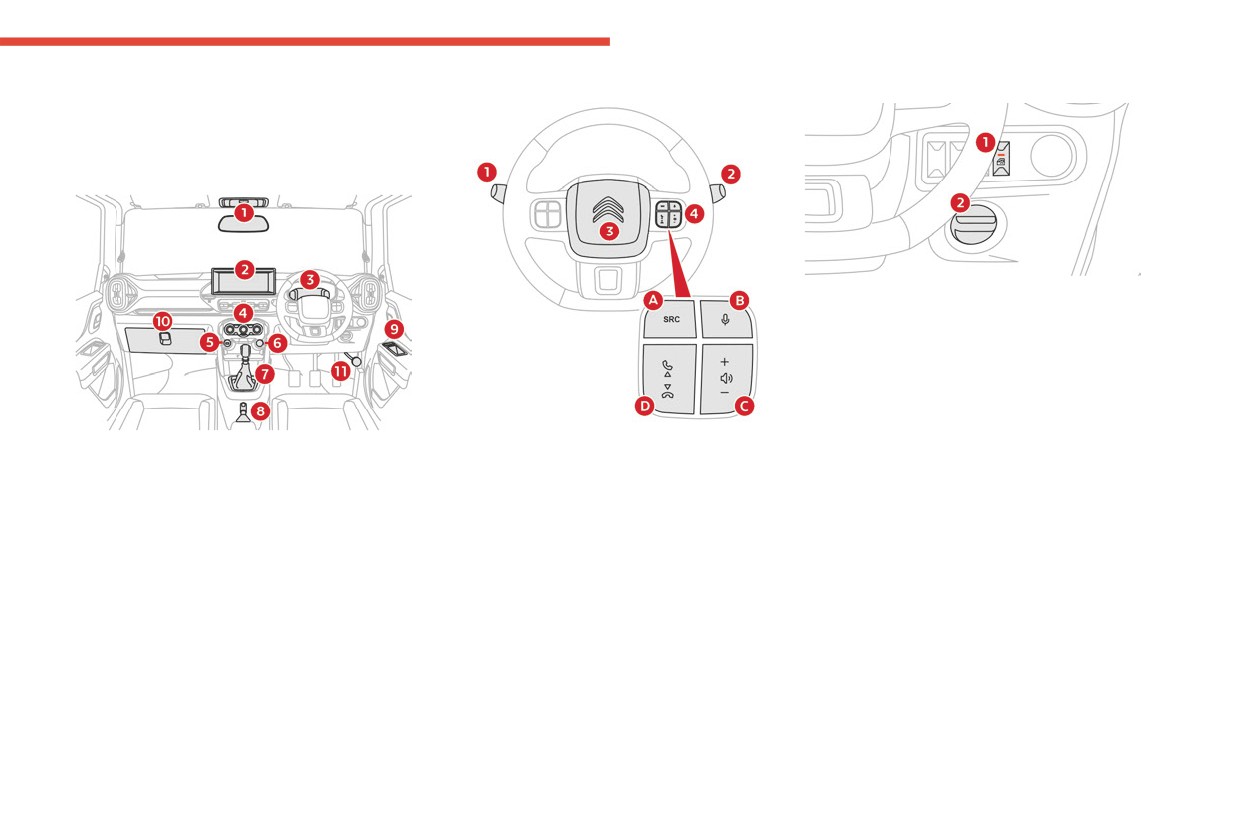
Overview
Steering mounted controls
Side controls
Instruments and controls
These illustrations and descriptions are provided
for information only. The presence and location
of certain elements may vary, depending on the
version or trim level.
1. Rear window control deactivation
2. Headlamp adjustment
1. Interior rear view mirror
1. Wiper control stalk
Courtesy lamp
2. Lighting control stalk
2. Open storage or Touch screen
Direction indicators
3. Instrument panel
3. Horn
4. Manual air conditioning
4. Audio system controls
Front demisting/defrosting
A. Audio source selection
5. USB socket
B. Voice command
6.
12 V socket
C. Short press on the buttons: decrease /
7.
Gear shift lever
increase volume
8.
Parking brake
Long press on the decrease button: mute
9.
Electric windows
audio system
10. Closed storage or Glove box
D. Select previous / next media
11. Bonnet release
Accept / reject incoming call
3
CarManuals2.co
Driving tips
While driving down a hill, never turn off the
Avoid driving into or starting the vehicle
Driving tips
vehicle.
in a heavily water logged area. Vehicle
Improving fuel economy
Try not to hold the brake pedal down too long
may break-down or engine may fail due to:
The following tips will help you in improving fuel
or too often while going down a long hill. This
- Water entry into the engine.
economy.
could cause the brakes to overheat, resulting in
- Short circuiting of the electrical systems.
- Avoid excessive idling.
reduced braking efficiency.
- EVAP (Evaporative Emission Control
- Avoid sudden acceleration.
System) malfunction.
Use the parking brake when parking your
- Avoid unnecessary deceleration and stopping.
If the vehicle is stuck into deep water, do not
vehicle and shift the gear shift lever into
- Keep steady cruise speed as much as
start / crank the vehicle until the level of water
the first gear or reverse gear position for the
possible.
drops below the level of exhaust pipe.
sake of safety.
If the vehicle is submerged in water, report to
Keep the air filter clean
the nearest authorized workshop.
Driving on slippery roads
If the air cleaner is clogged with dust, there
will be greater intake resistance, resulting in
Under wet road conditions, you should drive at
decreased power output and increased fuel
a lower speed than on dry roads due to possible
consumption.
slippage of tires during braking. When driving on
icy, snow-covered, or muddy roads, reduce your
Keep tire pressures correct
speed and avoid sudden acceleration, abrupt
Underinflating of the tires can waste fuel due to
braking, or sharp steering movements.
increased running resistance of the tires. Keep
your tires inflated to the correct pressure shown
Vehicle may break-down, meet with an
on the label on the driver’s door lock pillar.
accident or catch fire due to:
- Installation of:
Do not use tires other than those
• High wattage bulbs
specified by Citroën. Never use different
• Non genuine lamps / horns
sizes or types of tires on the front and rear
• Modified suspension / wheels
wheels.
• Non genuine parts / accessories etc.
- Short circuiting due to tampering of wiring
Driving on hills
harness.
When climbing steep hills, the vehicle may begin
to slow down and show a lack of power. If this
Do not store or carry inflammable
happens, you should shift to a lower gear so that
materials in the vehicle.
the engine will again be operating in its normal
power range
4
CarManuals2.co
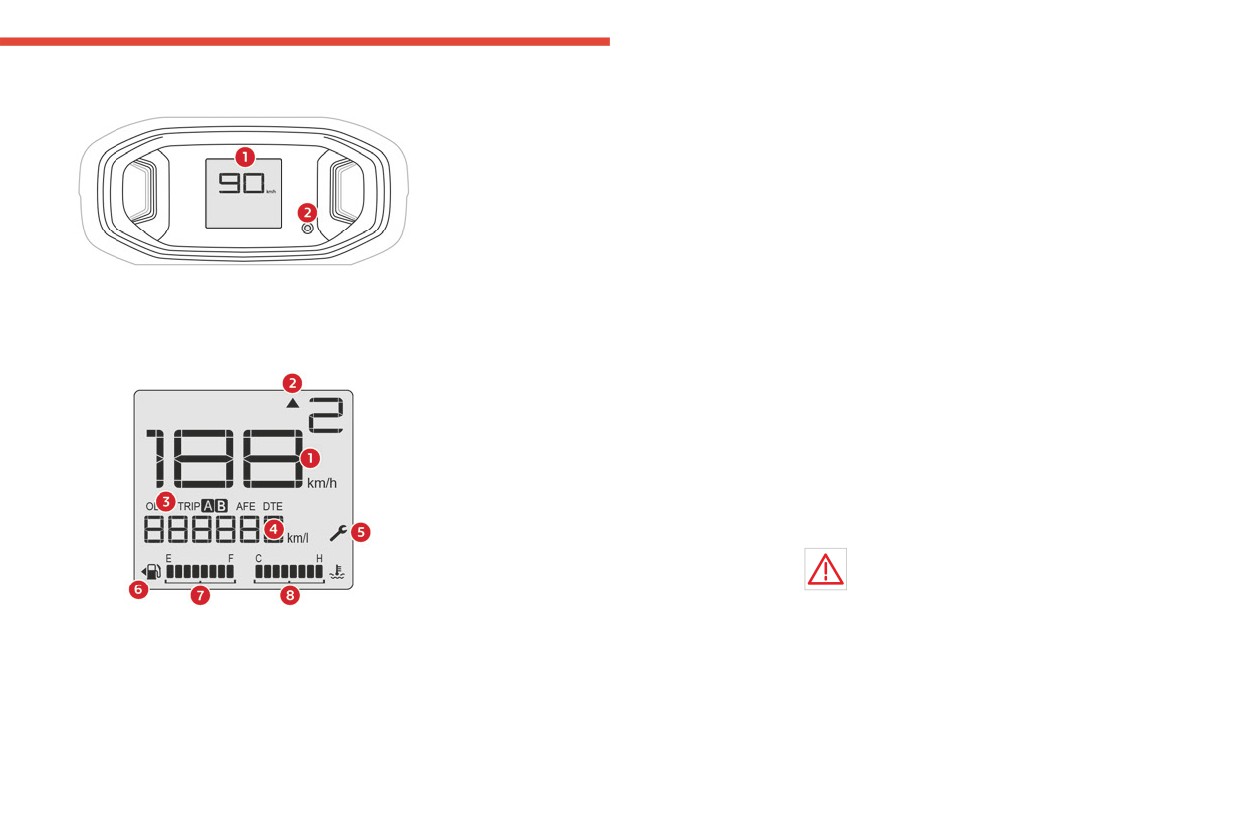
Instruments
Instrument panel
4. Applicable units for displayed information
Warning lamp continuously
1
5. Service indicator
lit
6. Fuel lid cap direction indication
The illumination of a red or orange warning lamp
7. Fuel gauge
may indicate the occurrence of a fault that needs
8. Engine coolant temperature (°C)
further investigation.
If a warning lamp remains lit
Warning and indicator
The references (1), (2) and (3) in the warning
and indicator lamp description indicate whether
lamps
you should contact a qualified professional in
1. Display screen
Displayed as symbols, the warning and indicator
addition to the immediate recommended actions.
2. Trip computer button
lamps inform the driver of the occurrence of a
(1): You must stop the vehicle.
malfunction (warning lamps) or of the operating
Stop as soon as it is safe to do so and switch off
Display screen
status of a system (operation or deactivation
the ignition.
indicator lamps). Certain lamps light up in two
(2): Contact a CITROËN dealer.
ways (fixed or flashing) and/or in several colours.
(3): Visit a CITROËN dealer.
Associated warnings
List of warning and
The illumination of a lamp may be accompanied
by an audible signal and/or a message displayed
indicator lamps
in a screen.
Red warning/indicator lamps
Relating the type of alert to the operating status
of the vehicle allows you to determine whether
STOP
the situation is normal or whether a fault has
Fixed, associated with another warning
occurred: refer to the description of each lamp
lamp, accompanied by an audible signal
for further information.
(single tone buzzer).
1.
Speedometer
When the ignition is switched on
It indicates a serious fault with the engine,
2.
Gear shift indicator
low engine oil & coolant temperature warning,
Certain red or orange warning lamps come on
3.
Trip meter A/B
braking system, airbag malfunction or a major
for a few seconds when the ignition is switched
Odometer (ODO)
electrical fault.
on. These warning lamps should go off as soon
Average Fuel Economy (AFE)
Carry out (1) and then (2).
as the engine is started.
Distance To Empty (DTE)
For more information on a system or a function,
Illumination level
refer to the corresponding section.
5
CarManuals2.co
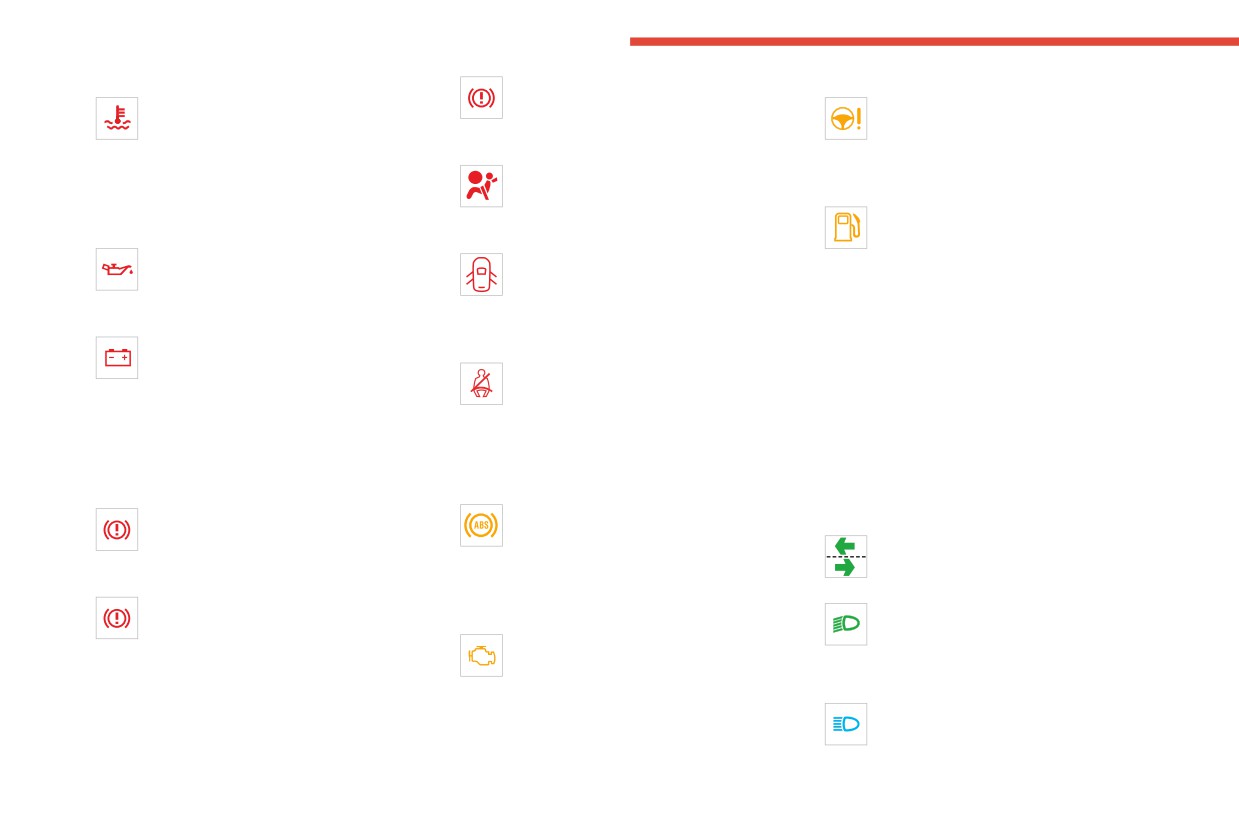
Instruments
Maximum engine coolant temperature
Fixed when driving.
Power steering
Fixed.
The brake system has a fault.
Fixed.
The temperature of the cooling system is
Carry out (1) then (2).
The power steering has a fault.
too high.
Airbags
Drive carefully at moderate speed, then carry
Carry out (1), then wait until the engine has
Fixed.
out (3).
cooled down before topping up the level, if
The airbag system is faulty.
Low fuel level
necessary. If the problem persists, carry out (2).
Carry out (3).
Fixed, with the reserve level shown in
Engine oil pressure
orange, accompanied by an audible
Door(s) open
Fixed.
signal.
Fixed.
Oil pressure is insufficient.
When it first comes on, there are approximately
An audible signal supplements the alert if
Carry out (1) and then (2).
5 litres of fuel remaining in the tank (reserve).
the speed is higher than 5 km/h.
Until the fuel level is topped up, this alert will
12 V battery charge
A door or the boot is not properly closed.
be repeated every time the ignition is switched
Fixed.
Seat belts not fastened/unfastened
on, with increasing frequency as the fuel level
The battery charging circuit has a fault
Fixed or flashing, accompanied by an
decreases and approaches zero.
(dirty terminals, slack or cut alternator belt, etc.).
increasing audible signal.
Refuel without delay to avoid running out of fuel.
Carry out (1).
A seat belt has not been fastened or has been
Never drive until completely empty, as this
Clean and retighten the terminals. If the warning
unfastened.
could damage the fuel pump, the emissions
lamp does not go off when the engine is started,
Orange warning/indicator lamps
control and injection systems.
carry out (2).
Parking brake
Anti-lock braking system (ABS)
Green warning/indicator lamps
Fixed.
Fixed.
Direction indicators
The parking brake is applied or not
The anti-lock braking system has a fault.
Direction indicators with audible signal.
properly released.
The vehicle retains conventional braking.
The direction indicators are on.
Drive carefully at moderate speed, then carry
Brake system
out (3).
Dipped beam headlamps
Fixed when the ignition is ON.
Fixed.
The Electronic Brake Distribution (EBD)
Engine self-diagnostic system
The lamps are on.
or the brake system has a fault or the brake fluid
Fixed.
Blue warning/indicator lamps
level has dropped significantly.
The engine system or emissions control
If necessary, top up with fluid that complies with
system has a fault.
Main beam headlamps
the manufacturer's recommendations. If the
The warning lamp should go off when the engine
Fixed.
problem persists, carry out (2).
is started.
The lamps are on.
Carry out (3) quickly.
6
CarManuals2.co
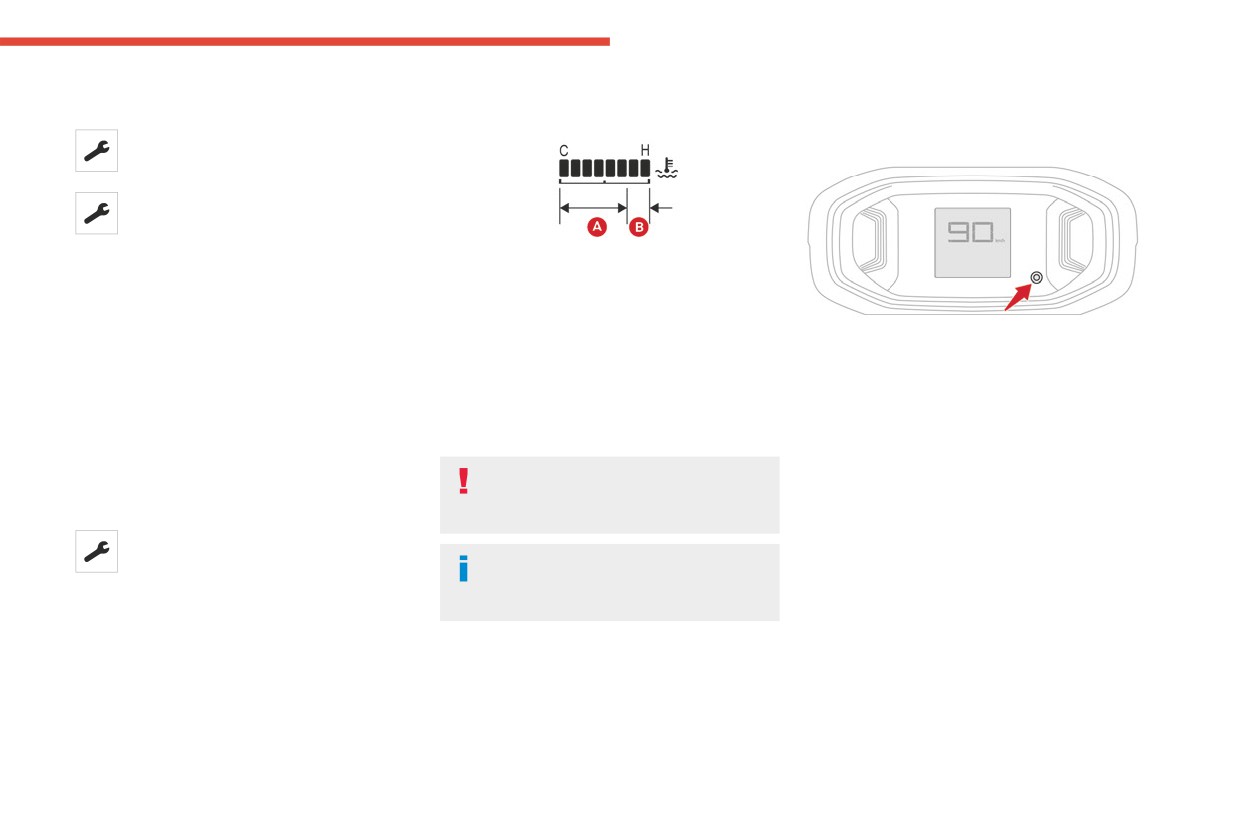
Instruments
Black/white warning lamps
Engine coolant temperature
Trip computer
1
Service
indicator
Flashing.
Data displayed
A fault has been detected.
Carry out (3).
Fixed.
The servicing interval has been
exceeded.
With the engine running:
Your vehicle must be serviced as soon as
- In zone A, the temperature is correct.
possible. Carry out (3).
- In zone B, the temperature is too high; the
associated warning lamp comes on in red on the
Indicators
instrument panel, accompanied by an audible
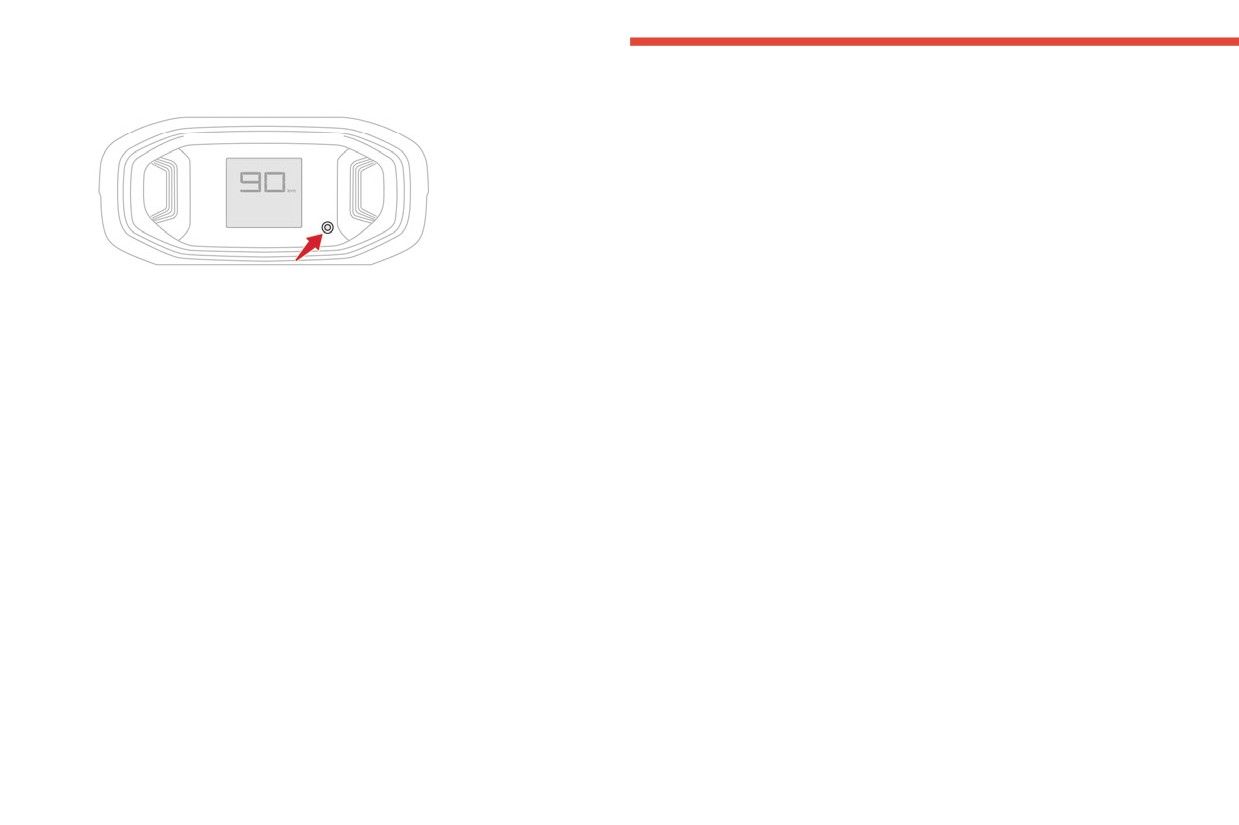
► Make a short press on the button located
signal.
on the instrument panel to display and switch
You must stop the vehicle as soon as it is
between the following information:
Service indicator
safe to do so.
- Odometer
The vehicle servicing must be done according to
Wait a few minutes before switching off the
- Trip A
the distance covered (kilometres or miles) or the
engine.
- Trip B
time elapsed since the last service.
- Average Fuel Economy (AFE)
The servicing alert is given at whichever of these
After switching off the ignition, carefully
- Distance To Empty (DTE)
two terms is reached first.
open the bonnet and check the coolant
- Illumination level (park lamp on then press the
level.
Service indicator
trip button to adjust the illumination level of the
Fixed, when the ignition is switched on.
cluster)
The next service is due.
For more information on Checking
Have your vehicle serviced very soon.
levels, refer to the corresponding
section.
7
CarManuals2.co
Instruments
Resetting data
Average Fuel Economy (AFE)
(km/L)
The average fuel consumption calculated based
on the last trip.
Distance To Empty (DTE)
(km)
The distance which can still be travelled with the
fuel remaining in the tank (based on the current
driving conditions).
► Make a long press (more than 2 seconds)
This value may vary following a change in
on the button located on the instrument panel to
the style of driving or the terrain, resulting
reset the information displayed in the following
in a significant change in the current fuel
screens:.
consumption.
- Trip A
If dashes instead of figures continue to be
- Trip B
displayed when driving, contact a CITROËN
- Average Fuel Economy (AFE)
dealer.
Definitions
Odometer
(km)
The total distance the vehicle has driven.
Trip meter A/B
(km)
The distance travelled in short trips or between
fuel stops.
Trips "A" and "B" are independent and are used
identically.
8
CarManuals2.co
Access
Key
With the key
Key
2
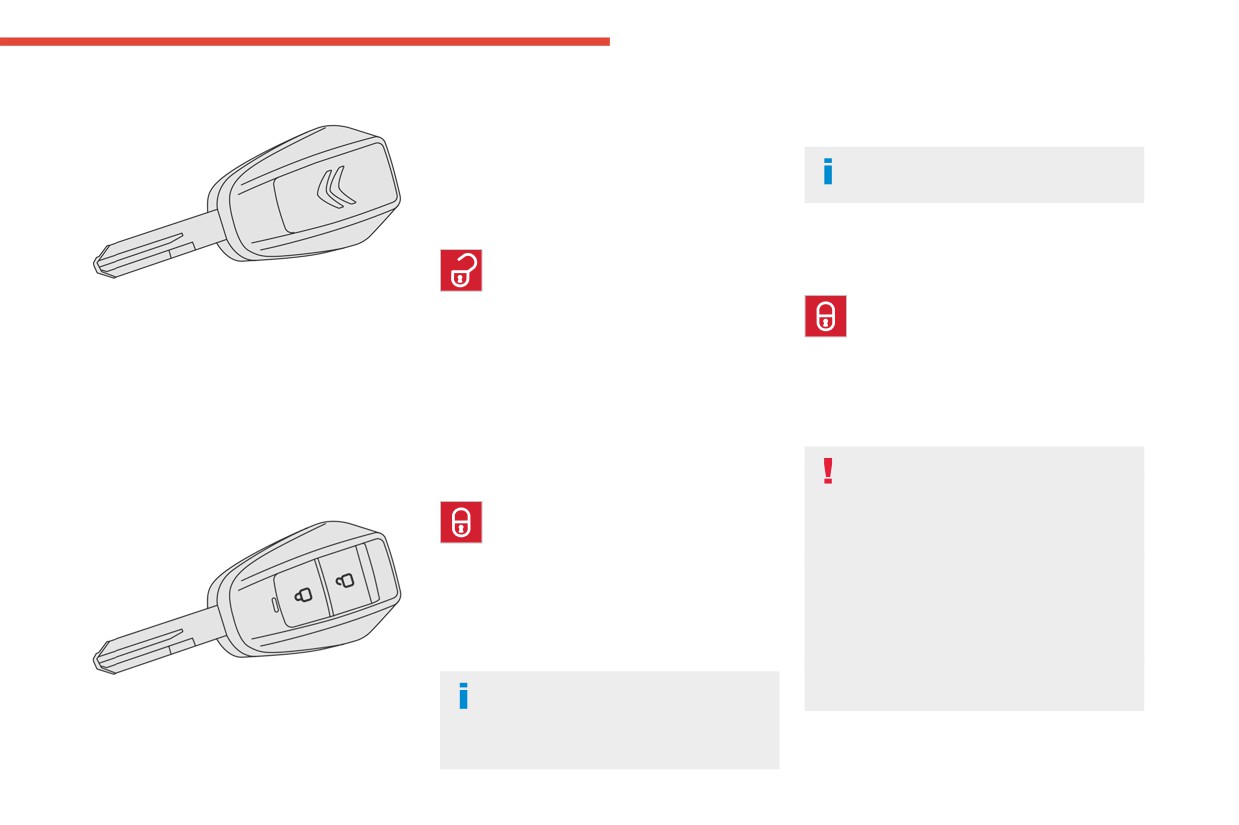
The key allows starting and switching off the
► Turn the key in the driver's door lock
engine. It can also be used to lock/unlock the
anticlockwise to lock.
vehicle.
Check that the doors and boot are fully
closed.
Unlocking the vehicle
With the remote control
Locating the vehicle
► Press this button to unlock the vehicle.
This function helps you to spot your vehicle from
a distance, with the vehicle locked.
The key allows the central locking or unlocking of
The direction indicators blink twice to signal
► Press this button.
the vehicle using the door lock.
unlocking of the vehicle.
It also allows the engine to be started or
The direction indicators or daytime running
switched off.
With the key
lamps/sidelamps, depending on version, flash or
► Turn the key in the driver's door lock
light up for a few seconds.
clockwise to unlock.
Key with remote control
Advice
function
Locking the vehicle
Remote control
With the remote control
The remote control is a sensitive, high-
Remote control function
frequency device; avoid handling it in your
► Press this button to lock the vehicle.
pocket, due to the risk of unintentionally
unlocking the vehicle.
The direction indicators blink once to signal the
Avoid pressing the remote control buttons
locking of the vehicle.
while out of range of the vehicle, due to
If one of the doors or the boot is still open, the
the risk of rendering the remote control
central locking does not work; the vehicle locks,
inoperative. It would then be necessary to
then immediately unlocks, identifiable by the
reset it.
locks making a rebound sound.
The remote control does not work when the
When the vehicle is locked, if it is
key is in the ignition switch.
The remote control can be used for the following
unlocked without the opening of a door
remote functions, depending on version:
or the boot, it will automatically lock itself
- Unlocking / Locking the vehicle.
again after thirty seconds.
– Locating the vehicle.
9
CarManuals2.co
Access
As a safety precaution, remove the key
Driving with the doors locked could make
Driver's door
from the ignition when leaving the
it more difficult for the emergency
► Turn the key anticlockwise to lock it, or
vehicle, even for a short time.
services to enter the vehicle in an emergency.
clockwise to unlock it.
Do not modify the electronic vehicle
All doors
Automatic (anti-intrusion
immobiliser, as this might result in
► Use the manual knob in the driver's door to
malfunctions.
security)
lock in the four doors and close the doors.
Remember to remove the key and turn the
The doors and boot lock automatically when
steering wheel to engage the steering lock.
driving (speed above 4-5 km/h).
Changing the remote
control battery
Back-up procedures
Battery ref.: CR2032/3 Volts.
Central locking
Lost keys, remote control
Manual
Visit a CITROËN dealer with the vehicle's
registration certificate, a personal identification
document and, if possible, the label bearing the
key code.
The CITROËN dealer will be able to retrieve the
key code and the transponder code required to
order a new key.
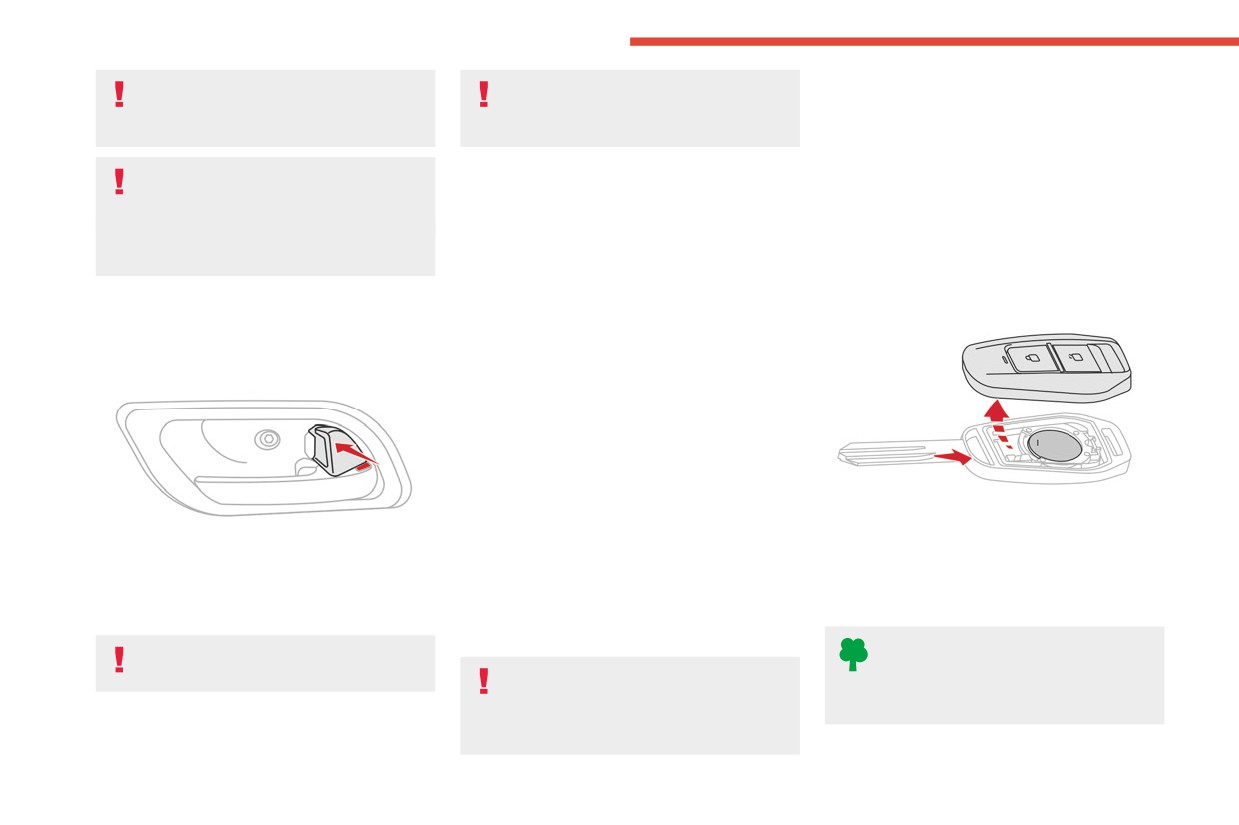
► Hold the key blank and pull the key top cover
in opposite direction.
► Push/pull this knob located on the driver's
Central locking not
► Remove the discharged battery from its
door handle to lock/unlock the doors from inside
housing.
the vehicle.
functioning
► Insert the new battery, observing the polarity,
When the doors are locked, the red indicator is
Use these procedures in the following cases:
and clip the cover onto the housing.
no longer visible.
- Central locking malfunction.
- Battery disconnected or discharged.
Do not throw remote control batteries
The central locking does not take place if
away, as they contain metals that are
one of the doors is open.
In the event of a malfunction of the
harmful to the environment. Take them to an
central locking system, the battery must
approved disposal point.
be disconnected to ensure that the vehicle is
locked fully.
10
CarManuals2.co
Access
Doors
2
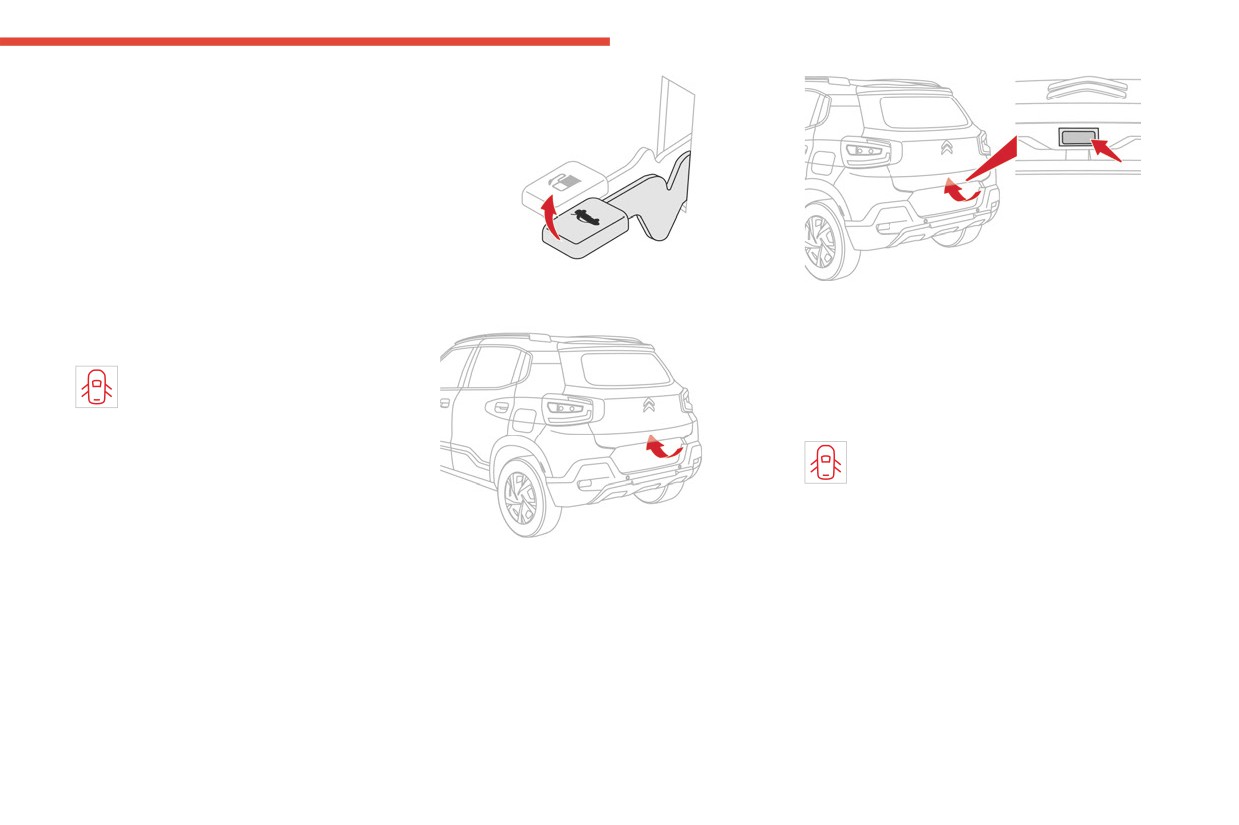
Opening
From outside
► After unlocking the vehicle, pull the door
handle.
From inside
► Lift the opening lever located besides the
► Pull the interior opening control of a door; this
driver's seat to open the tailgate.
► Press the switch located on the tailgate
unlocks the vehicle completely.
bottom to open the tailgate.
► Lift the tailgate.
Closing
If a door is not properly closed, this
Closing
warning lamp comes on accompanied by
► Lower the tailgate using the interior grab
an audible signal when the vehicle is travelling at
handle.
more than 5 km/h.
If the tailgate is not properly closed, this
warning lamp comes on accompanied by
Boot
an audible signal, if the vehicle is travelling at
more than 5 km/h.
Opening
► Lift the tailgate.
Back-up release
Depending on version:
or
To manually unlock the boot in the event of a
battery or central locking failure.
11
CarManuals2.co
Access
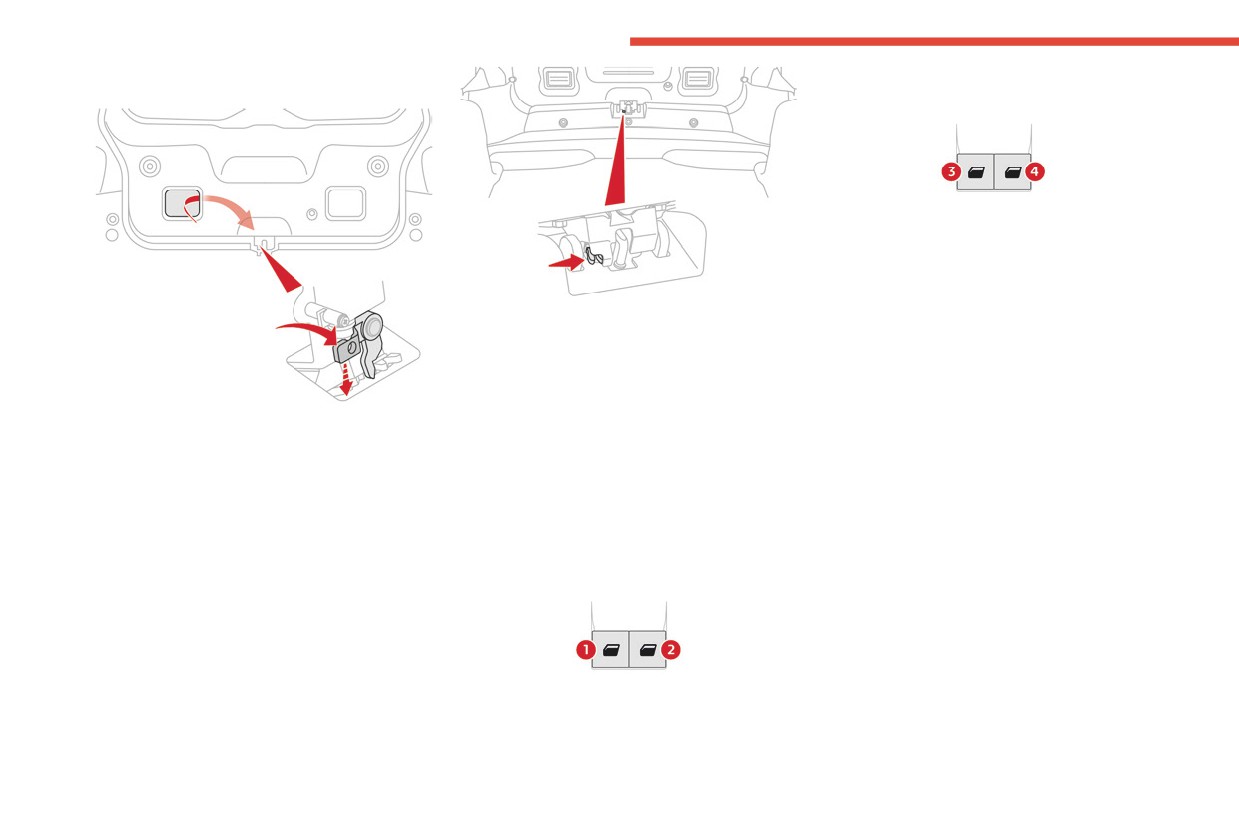
To unlock the boot
Control switch at console (depending on
version)
3. Left-hand rear
4. Right-hand rear
Operation
Opening
► Fold the rear seats to gain access to the lock
from inside the boot.
► Press the switch; the window stops as soon
► Press the lever by following the arrow
as the switch is released.
direction to release the lock.
► One touch-down: press the switch past its
resistance point; the window opens completely
To re-lock the boot
when the switch is released.
► Fold the rear seats to gain access to the lock
If the problem persists, the boot will remain
from inside the boot.
Closing
locked after opening and closing.
► Insert the hand inside the tailgate right cutout
► Pull the switch; the window stops as soon as
area.
the switch is released.
► Press the lever downwards to release the
Windows
lock.
Next option to unlock the boot:
Electric windows
Control switch at driver door
1. Left-hand front
2. Right-hand front
12
CarManuals2.co
Access
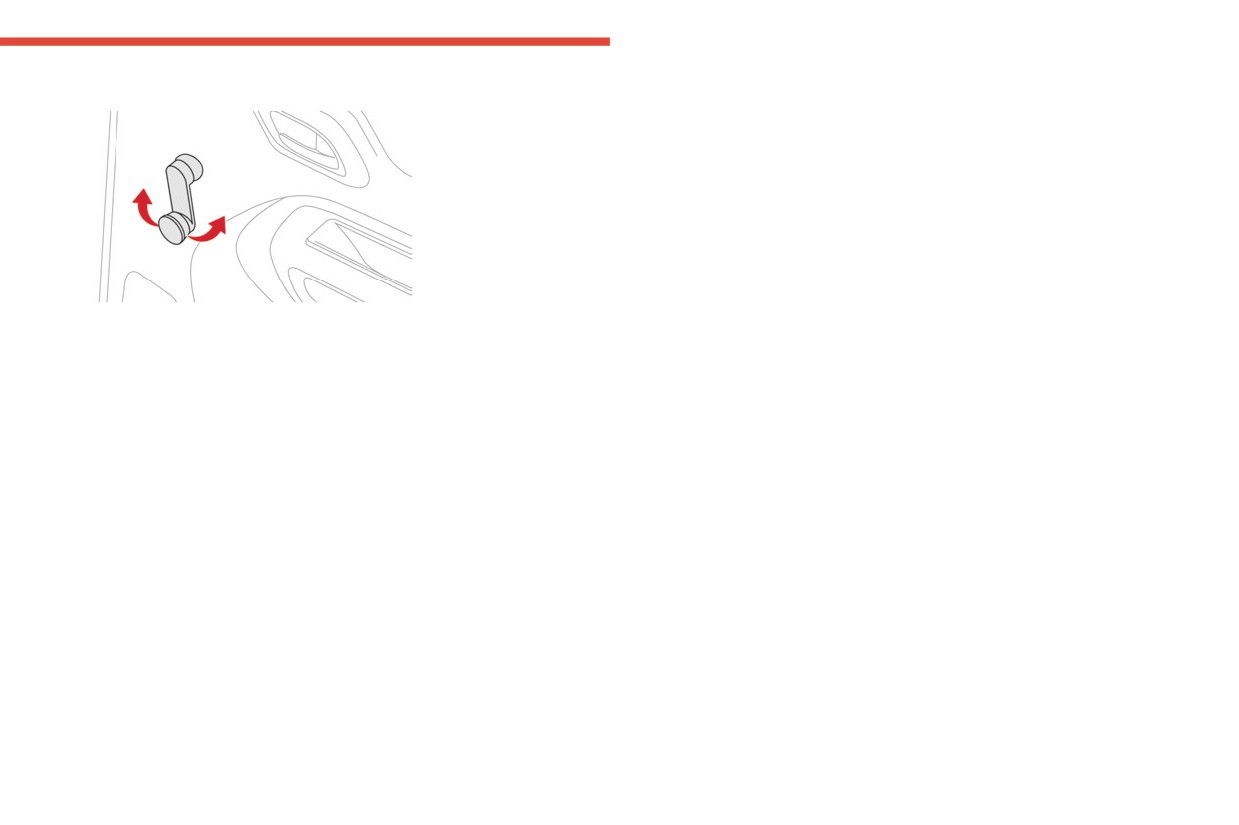
Rear manual windows
2
► Turn the window handle located on the door
panel.
13
CarManuals2.co
Ease of use and comfort
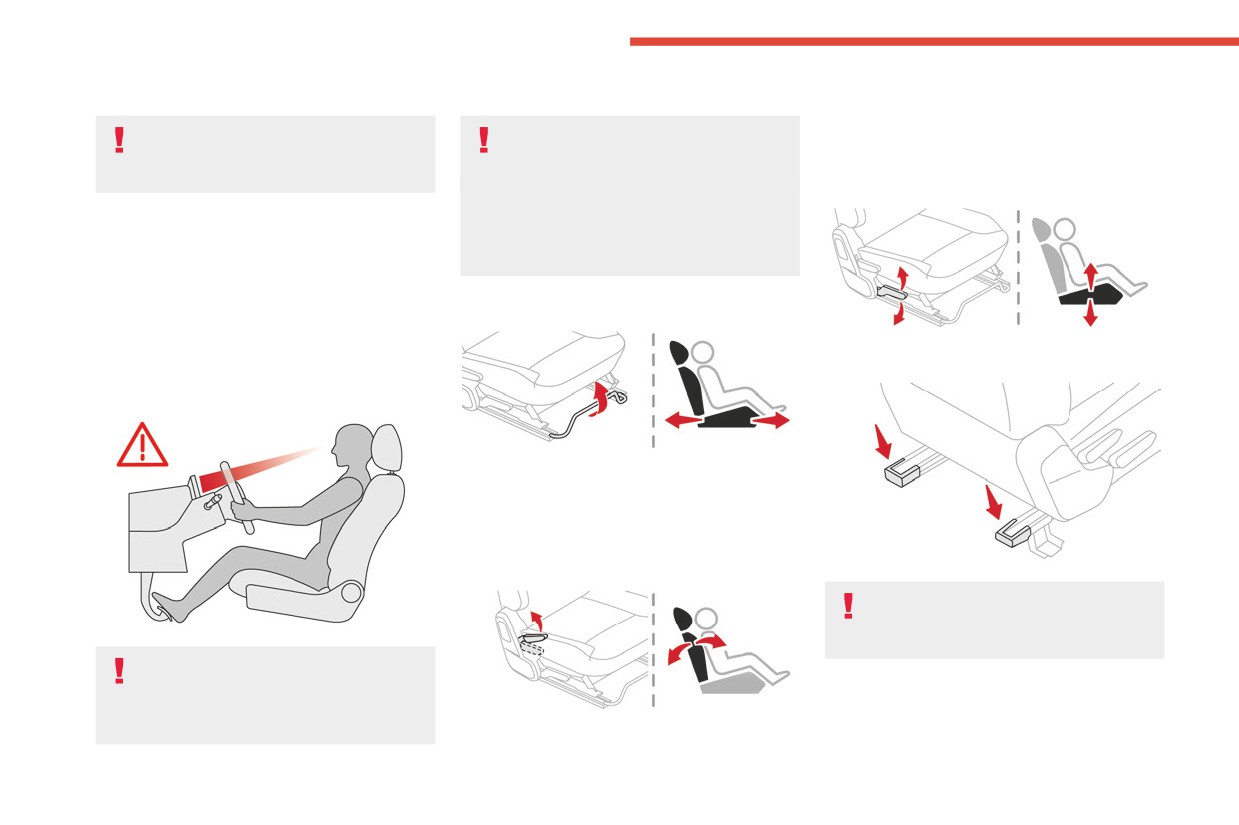
► Raise the control lever to the maximum
Correct driving position
Front seats
height in order to avoid noise and mechanism
For safety reasons, adjustments must
Before moving the seat backwards,
failure.
only be made when the vehicle is
ensure that there is nothing that might
Height adjustment
stationary.
prevent the full travel of the seat.
There is a risk of trapping or pinching
(Driver only, depending on version)
Before taking to the road and to make the most
passengers if present in the rear seats or
of the ergonomic layout of the instruments and
jamming the seat if large objects are placed
controls, carry out these adjustments in the
on the floor behind the seat.
following order:
- seat backrest angle.
- seat cushion height.
Longitudinal adjustment
- longitudinal seat position.
► Raise or lower the control as many times as
- steering wheel height.
needed.
- rear view mirror and door mirrors.
- seat belt fastened.
► Raise the control bar and slide the seat
forwards or backwards.
► Release the bar to lock the seat in position on
one of the runners.
Backrest angle adjustment
Avoid stepping on these plastic parts
- Risk of injury or damaging the
components!
Once these adjustments have been
made, check that the instrument panel
can be viewed correctly from your driving
position.
14
CarManuals2.co
Ease of use and comfort
Steering wheel
your shoulder to properly judge distances to
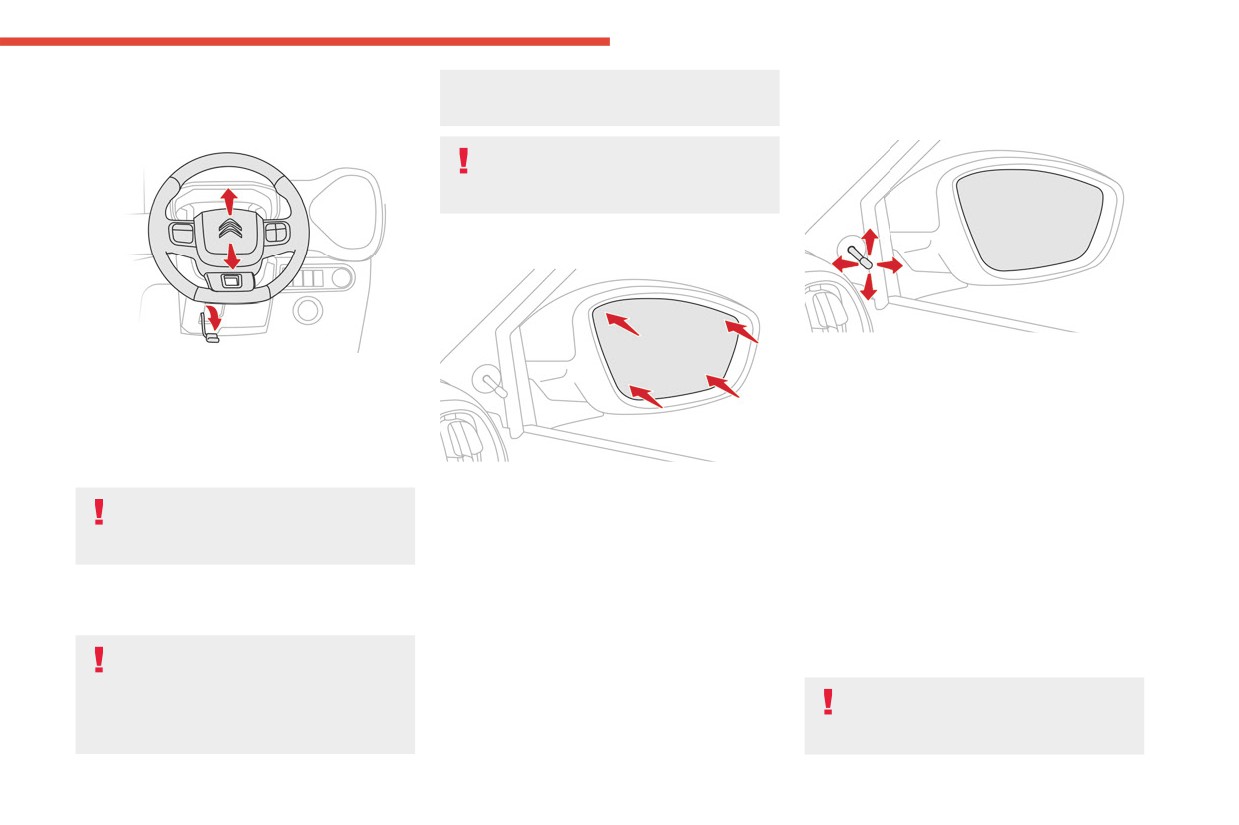
Manual adjustment with the
3
other objects.
adjustment
control
Do not adjust the mirrors while driving.
You could lose control of your vehicle
and cause an accident.
Manual adjustment
► Move the lever in any direction to adjust it.
► When stationary, hold the steering wheel on
If the mirror unit has come out of its initial
one hand and pull the control lever to release the
position, with the vehicle stationary, push it back
steering wheel.
into place manually or use the control.
► Adjust the height to suit your driving position.
There is no risk of breakage, even in frosty
► Push the control lever to lock the steering
weather.
wheel.
► Move directly the mirror in any direction to
Manual folding
As a safety measure, these adjustments
adjust it.
The mirrors can be folded manually (parking
must only be carried out with the vehicle
obstruction, narrow garage, etc.).
stationary.
► Turn the mirror towards the vehicle.
Door mirrors
Rear seats
Objects viewed in the door mirror on the
Folding the backrest
passenger side are closer than they
appear. Be careful when moving to the right.
Manoeuvring the seat backrest should
Using only this mirror could cause an
only be done when the vehicle is
accident. Use the inside mirror or glance over
stationary.
15
CarManuals2.co
Ease of use and comfort
► If necessary, move the front seats forward.
passengers in the event of sudden braking or
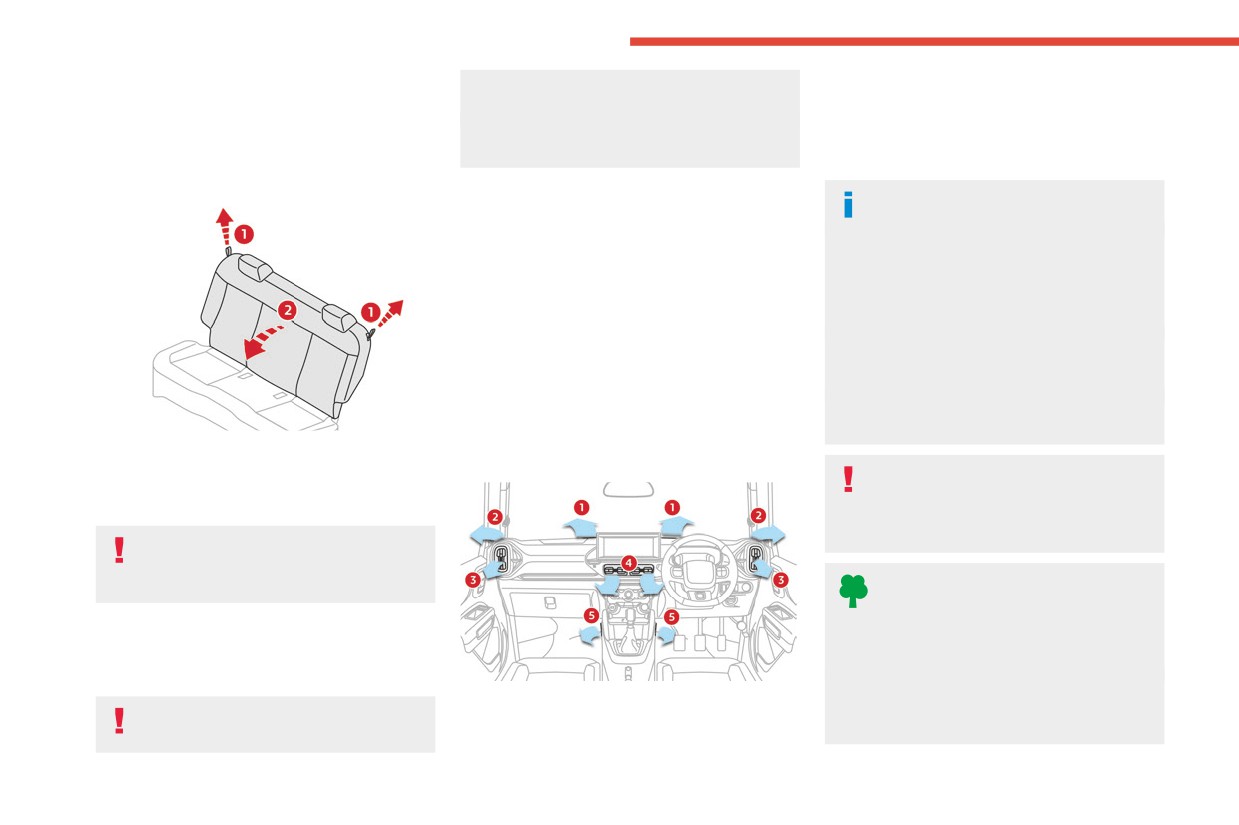
4. Central outlets
► Check that no person or object will interfere
an accident.
5. Floor outlets
with folding down the backrest (clothing,
The contents of the boot may be thrown
luggage, etc.).
forward - risk of serious injury!
Advice
► Check that the outer seat belts are lying flat
on the backrest.
Using the ventilation and air
Heating and Ventilation
conditioning system
► To ensure that air is distributed evenly,
Air intake
keep the external air intake grilles at the base
The air circulating in the passenger compartment
of the windscreen, the nozzles, the vents, the
is filtered and originates either from the
air outlets and the air extractor in the boot
exterior, via the grille located at the base of the
free from obstructions.
windshield, or from the inside in air recirculation
► Operate the air conditioning system for at
mode.
least 5 to 10 minutes once or twice a month to
Controls
keep it in perfect working order.
► If the system does not produce cold air,
The controls are grouped together in the control
switch it off and contact a CITROËN dealer.
panel on the centre console.
► Pull the rope 1 up and fold the backrest 2
Air distribution
inwards to increase boot space.
Avoid driving for too long with the
ventilation off or with prolonged operation
Repositioning the backrest
of interior air recirculation. Risk of misting and
deterioration of the air quality!
First check that the outer seat belts are
lying vertically flat alongside the backrest
latching rings.
If the interior temperature is very high
after the vehicle has stood for a long
► Put the backrest 2 in the upright position and
time in the sunshine, drive with the windows
push it firmly to latch it home.
open for a few moments to air the passenger
► Ensure that the outer seat belts were not
compartment.
trapped during the operation.
Put the air flow control at a setting high
1. Windshield defroster outlets
enough to quickly change the air in the
Please note: an incorrectly latched
2. Side defroster outlets
passenger compartment.
backrest compromises the safety of
3. Side outlets
16
CarManuals2.co
Ease of use and comfort
Condensation created by the air
Temperature adjustment
Heat and defrost
3
conditioning results in a discharge of
► Turn the thumbwheel 1 to adjust the
water underneath the vehicle. This is perfectly
Temperature-controlled air comes out of the floor
temperature to your requirements.
normal.
outlets, the windshield defroster outlets, the side
defroster outlets and the side outlets.
Air flow adjustment
Servicing the ventilation and air
Defrost
► Turn the thumbwheel 2 to choose the speed
conditioning system
of the ventilation fan (from 0 to 4).
► Ensure that the passenger compartment
Temperature-controlled air comes out of the
When the air flow is reduced to a minimum,
filter is in good condition and have the filter
windshield defroster outlets, the side defroster
ventilation stops.
elements replaced regularly.
outlets and the side outlets.
► To ensure correct operation of the
Air distribution adjustment
Air conditioning on / off
air conditioning system, have it checked
You can vary the air distribution turning the
according to the recommendations in the
The air conditioning system is designed to
thumbwheel 3 to the desired position:
Maintenance and Warranty Guide.
operate effectively in all seasons, with the
Ventilation
windows closed.
It is used to:
Temperature-controlled air comes out of the
- lower the temperature in summer,
Manual air conditioning
center and side outlets.
- increase the effectiveness of the demisting in
Bi-level ventilation
winter, above 3°C.
► Press button 4 to activate/deactivate the air
Temperature-controlled air comes out of the floor
conditioning system.
outlets and cooler air comes out of the center
and side outlets. When the temperature selector
Air conditioning does not operate when
1 is in the fully cold or fully hot position, the air
the air flow is disabled.
from the floor outlets and the air from the center
To obtain cool air more quickly, enable interior
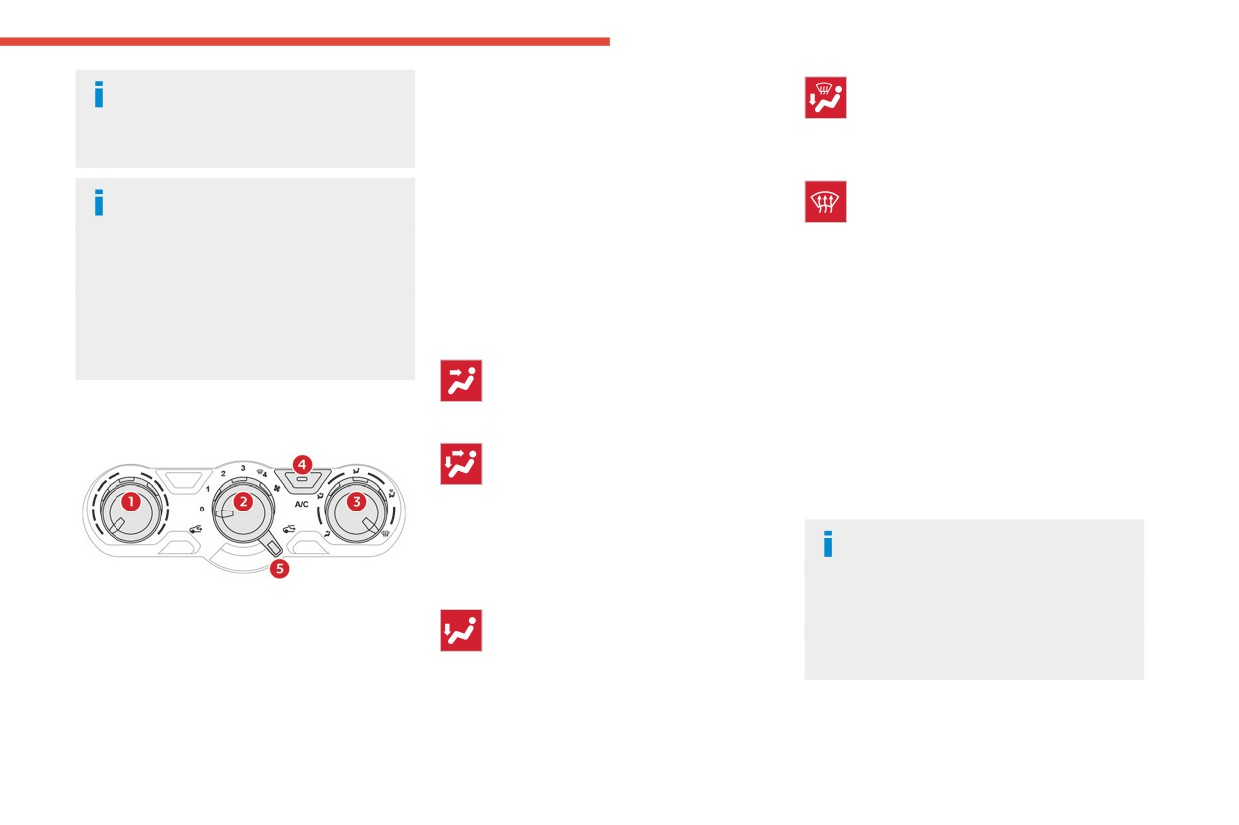
1.
Temperature adjustment
and side outlets will be the same temperature.
air recirculation for a brief period. Then return
2.
Air flow adjustment
Heat
to the intake of exterior air.
3.
Air distribution adjustment
Switching off the air conditioning may result in
4.
Air conditioning on/off
Temperature-controlled air comes out of the floor
some discomfort (humidity or misting).
5.
Interior air recirculation
outlets and the side outlets. a small amount of
air comes out of the windshield defroster outlets
and also comes slightly out of the side defroster
outlets.
17
CarManuals2.co
Ease of use and comfort
Never drive with the glove box open
Interior air recirculation
Interior fittings
when a passenger is at the front. It may
► Place the thumbwheel 5 in this
cause injury during sharp deceleration!
position to activate interior air
recirculation.
When this position is selected, outside air is
USB sockets
shut off and inside air is recirculated. This mode
(Depending on version.)
is suitable when driving through an area with
polluted air such as a tunnel or when attempting
to quickly cool down the vehicle.
► To restore exterior air intake, place the
thumbwheel in any other position.
Outside air is introduced.
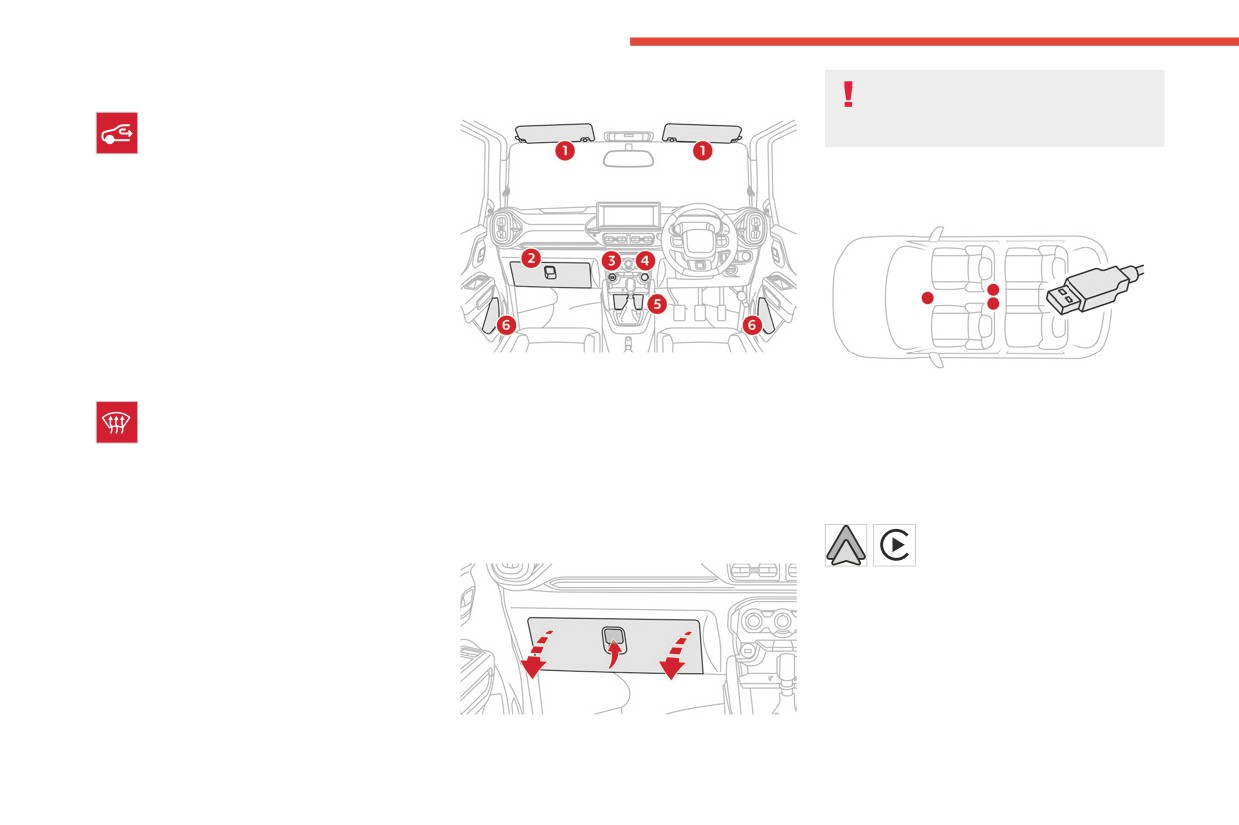
1.
Sun visor
Front demist - defrost
2.
Closed storage or glove box
They allow the connection of a portable device to
Place the air flow adjustment and the air
3.
USB socket
charge the device.
distribution thumbwheels 2 and 3 to the
4.
12 V socket
USB port located at the front allows iPod and
defrost position.
5.
Storage compartment
USB drive to be connected for audio/video.
Cupholders
Two rear USB ports are for charging purpose
6.
Door pockets
only, with quick charge facility on supported
smartphones.
The USB port located at the front
Glove box
allows USB media playback and
smartphone connection for Android Auto® or
CarPlay®, so that certain smartphone
applications can be used on the touch screen.
To achieve the best results, it is necessary to
use a cable made or approved by the device
manufacturer.
These applications can be managed using the
steering mounted controls or those of the audio
► To open the glove box, raise the handle.
system.
18
CarManuals2.co
Ease of use and comfort
12 V socket
Model 2 (with microphone)
3
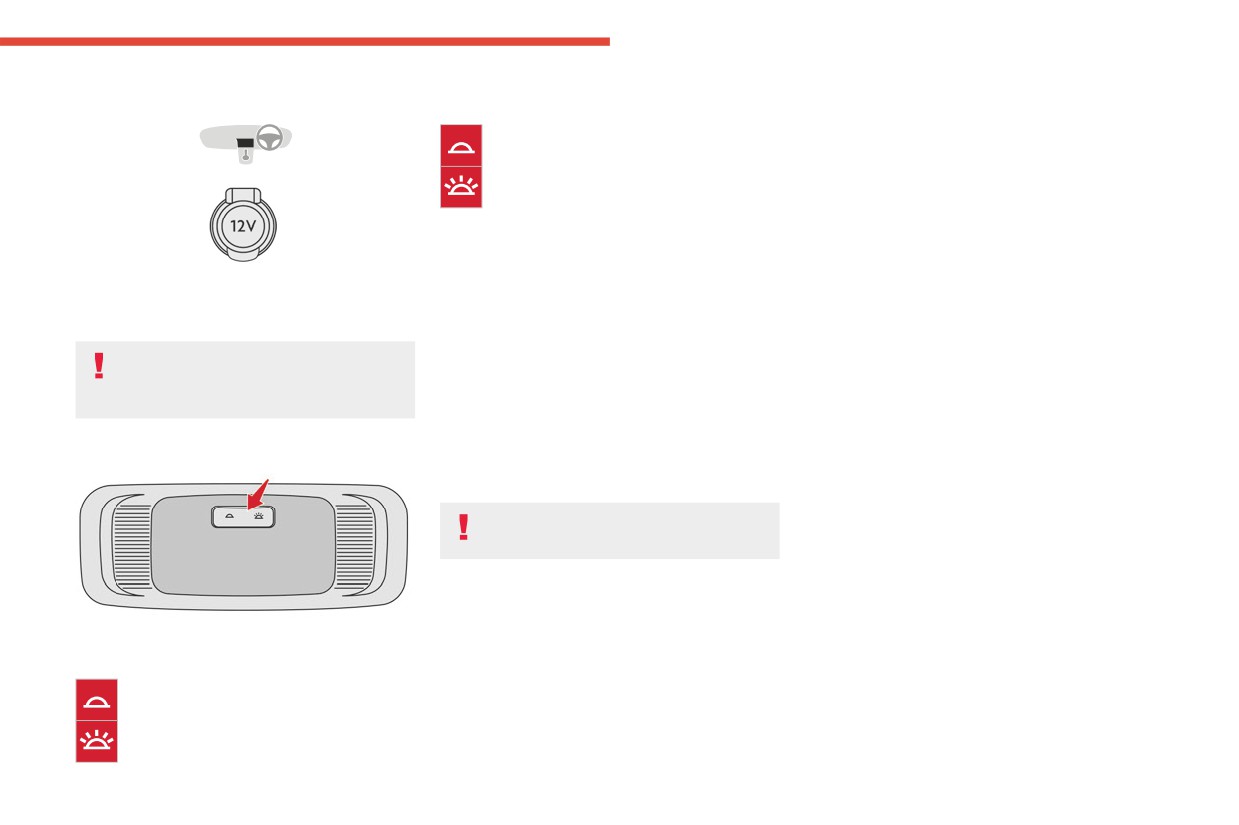
The switch has 3 positions:
Permanently off.
Permanent lighting, irrespective of the
doors status.
When the switch is in the middle position, it is in
AUTO mode:
- The lamp switches ON when any of the doors
► To connect a 12 V accessory (maximum
is open.
power: 120 W), lift the cover and plug in the
- The lamp dims and goes OFF upon closing of
correct adapter.
all doors.
- The lamp goes OFF with ignition ON and all
Do not exceed the maximum power
doors closed properly.
rating of the socket (you may otherwise
damage your portable device).
Boot fittings
Front courtesy lamps
Hooks
They are used to hang shopping bags.
Take care to only hang lightweight bags
(max. 3 kg).
Model 1 (without microphone)
The switch has 2 positions:
Permanently off.
Permanent lighting (with key in "ACC",
"Ignition" or "Start" position)
19
CarManuals2.co
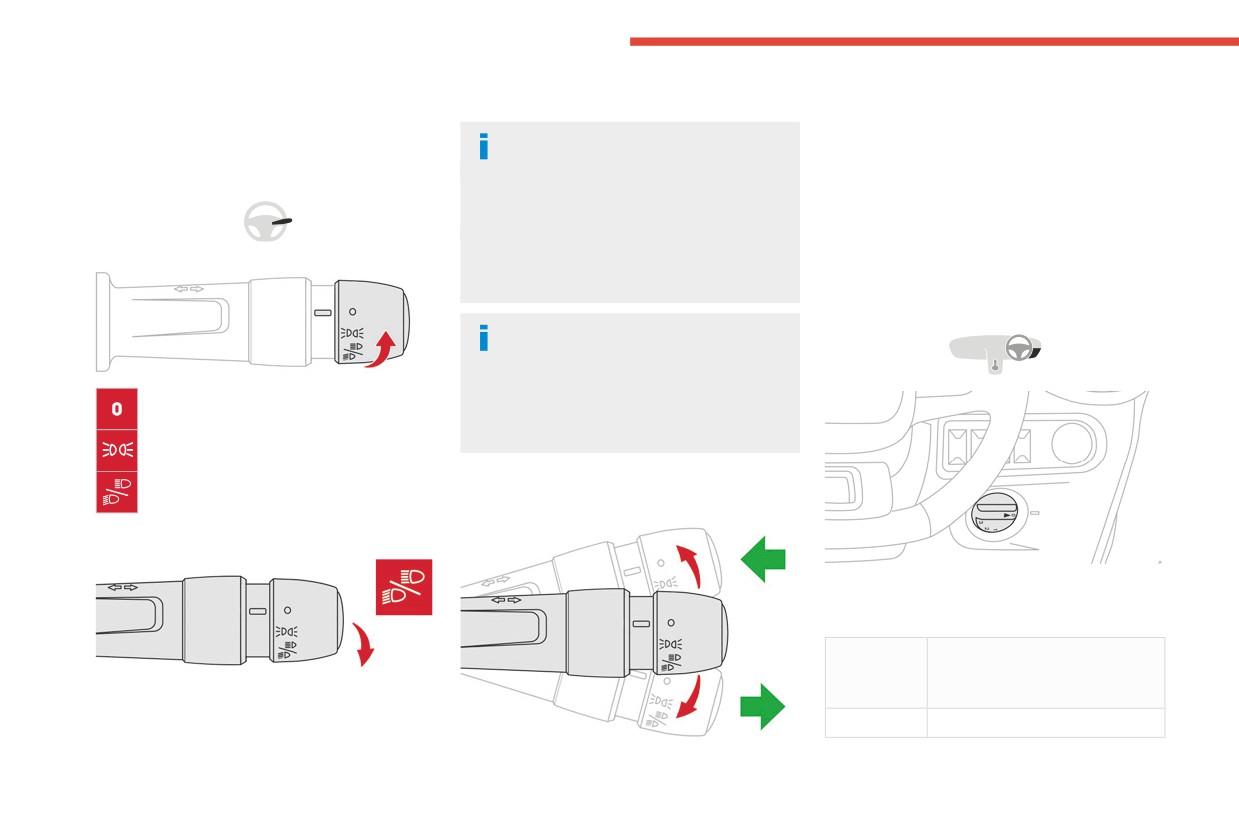
Lighting and visibility
temporarily (“headlamp flash”) by pulling up the
► Left or right: lower or raise the lighting control
Exterior lighting control
stalk.
stalk, beyond the point of resistance.
stalk
Switching on the lamps after
Three flashes
switching off the ignition
Main lighting
► Press briefly upwards or downwards, without
To reactivate the lighting control, rotate the
going beyond the point of resistance; the
ring to the "0" position - lamps off, then to the
direction indicators will flash 3 times.
desired position.
If the driver's door is opened, a temporary
audible signal warns the driver that the lamps
Headlamp beam height
are on.
adjustment
In some weather conditions (e.g. low
temperature or humidity), the presence
of misting on the internal surface of the glass
Lighting off (ignition off)
of the headlamps and rear lamps is normal; it
disappears after the lamps have been on for a
Sidelamps only
few minutes.
Dipped or main beam headlamps
Direction indicators
Headlamp dipping
To avoid disturbing other road users, the height
of the headlamp beams should be adjusted
according to the load in the vehicle.
Knob
Static loading condition
switch
► Turn and align the selection ring to switch
position
between dipped and main beam headlamps.
0
Driver only
In the lighting off and sidelamps modes, the
driver can switch on the main beam headlamps
20
CarManuals2.co
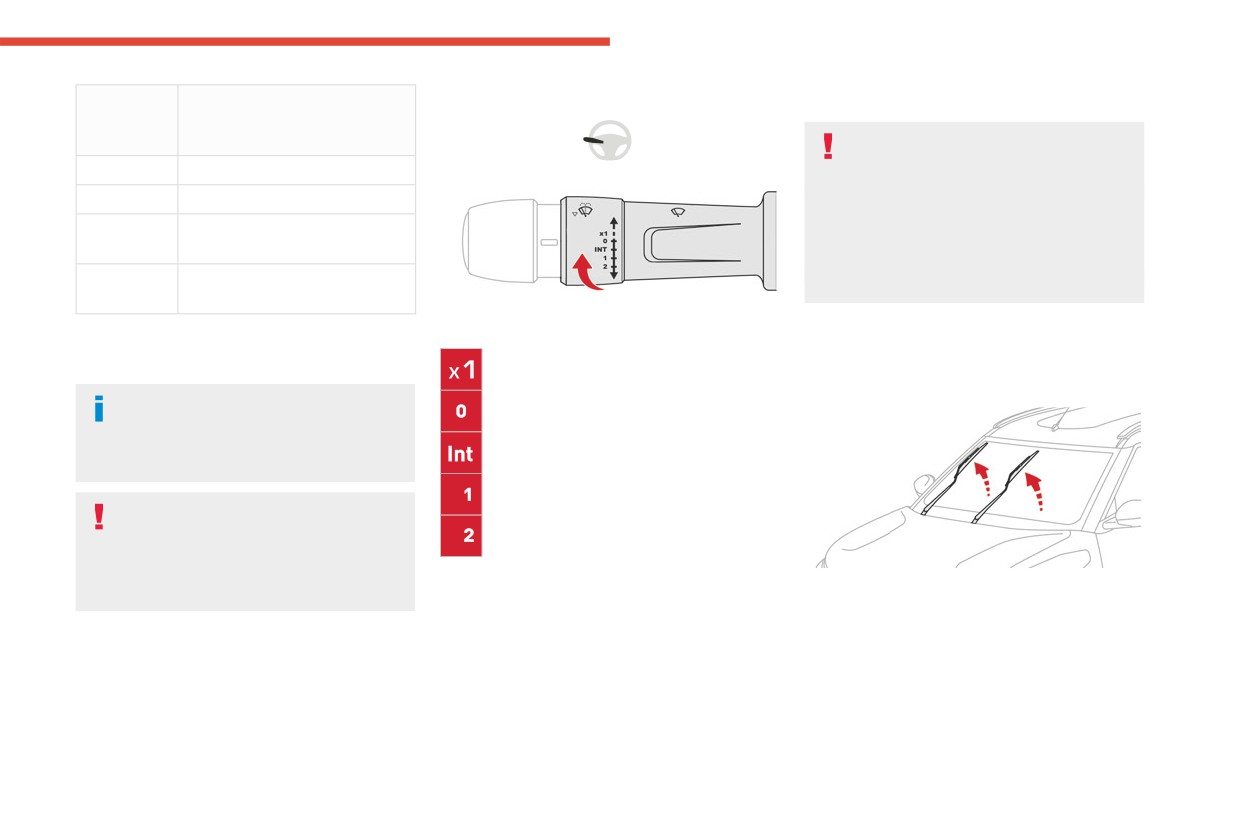
Lighting and visibility
Windscreen wipers
Termination of the screenwash is followed by a
Knob
Static loading condition
4
final wiping cycle.
switch
position
To avoid damaging the wiper blades, do
not operate the screenwash if the
0
Driver + 1 passenger
screenwash reservoir is empty.
1
All the seats occupied
Only operate the screenwash if there is no
risk of the fluid freezing on the windscreen
2
All the seats occupied + load
and hindering visibility. During the winter
evenly distributed in the boot
period, use "very cold climate" rated products.
3
Driver + load evenly distributed
Never top up with water.
in the boot
► To select the wiping speed: raise or lower the
stalk to the desired position.
Changing a wiper blade
Wiper control stalk
Single wiping / Mist
Before removing a front wiper
In wintry conditions, remove snow, ice or
Off
frost present on the windscreen, around
the wiper arms and blades and on the
Intermittent wiping
windscreen seal, before operating the wipers.
Slow wiping
Do not operate the wipers on a dry
Fast wiping
windscreen. Under extremely hot or cold
conditions, ensure that the wiper blades are
not stuck to the windscreen before operating
Single wipe
► Within one minute after switching off the
the wipers.
► Pull the stalk briefly towards you.
ignition, operate the wiper stalk to position the
wiper blades vertically on the windscreen.
Front screenwash
or
► Pull the wiper control stalk towards you and
► A minute after switching off the ignition,
hold.
straighten the arms manually.
The screenwash and windscreen wipers operate
Removing
for as long as the control stalk is pulled.
► Lift the corresponding wiper arm.
21
CarManuals2.co
Lighting and visibility
► Unclip the wiper blade and remove it.
Refitting
► Position and clip the new wiper blade to the
arm.
► Fold down the wiper arm carefully.
After refitting a front wiper
► Switch on the ignition.
► Operate the wiper lever again to park the
wiper blades.
22
CarManuals2.co
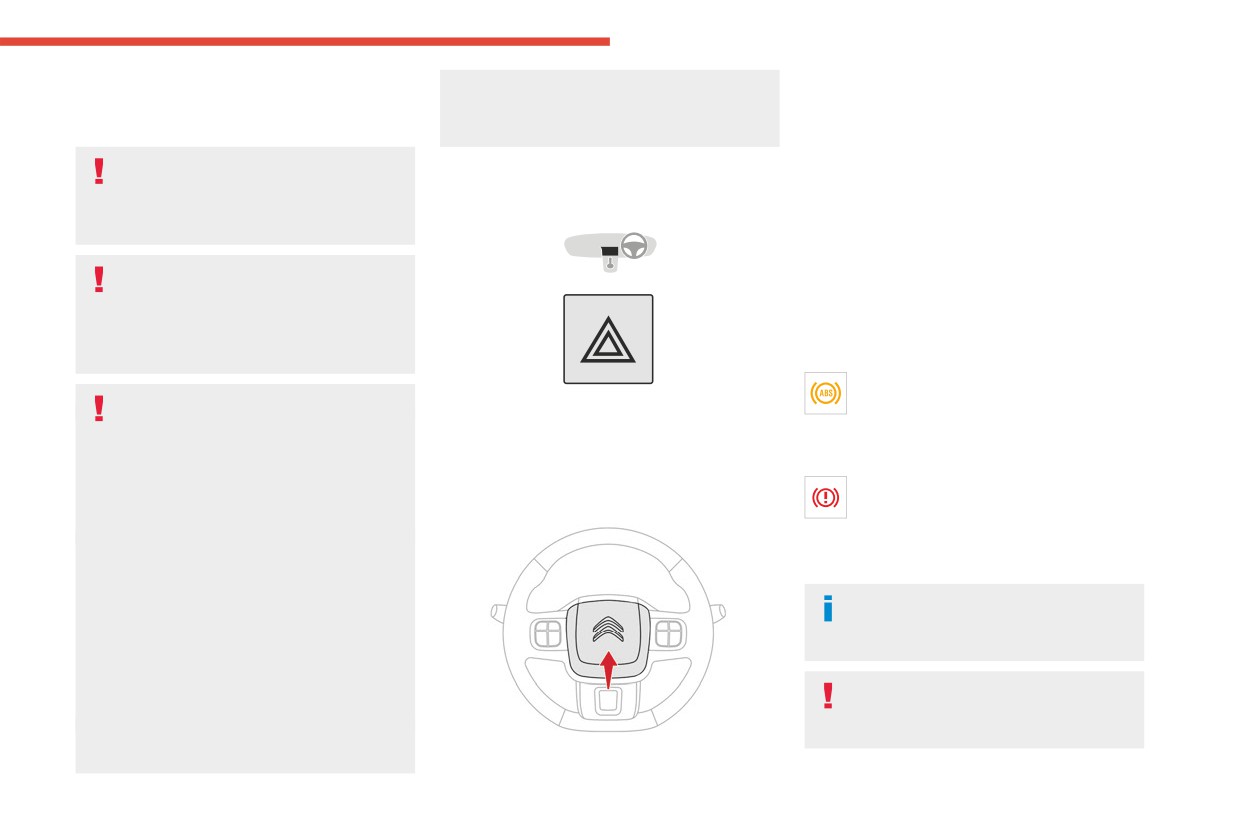
Safety
without meeting the technical requirements
General safety
Anti-lock Braking System
5
defined by the Manufacturer will result in the
recommendations
suspension of the commercial warranty.
(ABS) and Electronic
Brake Force Distribution
Do not remove the labels attached in
different places on your vehicle. They
(EBFD)
Hazard warning lamps
include safety warnings as well as
These systems enhance the vehicle’s stability
identification information for the vehicle.
and handling during braking, and enable greater
control while cornering, particularly on poor or
For all work on your vehicle, use a
slippery road surfaces.
qualified workshop that has the technical
ABS prevents wheel locking in the event of
information, skills and equipment required, all
emergency braking.
of which a CITROËN dealer is able to
EBFD manages the braking pressure wheel by
provide.
wheel.
This warning lamp is continuously on in
Installing electrical accessories:
► Pressing the red button causes all the
the event of an ABS malfunction.
- The fitting of electrical equipment
direction indicators to flash.
The vehicle retains conventional braking. Drive
or accessories not approved by CITROËN
They can operate with the ignition off.
carefully at a moderate speed.
may cause excessive current consumption
Contact a CITROËN dealer as soon as possible.
and failure of the vehicle's electrical system.
This warning lamp, accompanied by an
Horn
Contact a CITROËN dealer for information on
audible signal, indicates an EBFD
the range of approved accessories.
malfunction.
- As a safety measure, access to the
You must stop as soon as it is safe to do so.
diagnostic socket, used for the vehicle's
Contact a CITROËN dealer.
electronic systems, is reserved strictly for
The normal operation of the ABS may
CITROËN dealers, equipped with the special
result in slight vibrations in the brake
tools required (risk of malfunctions of the
pedal.
vehicle's electronic systems that could cause
breakdowns or serious accidents). The
Manufacturer cannot be held responsible if
When braking in an emergency, press
this advice is not followed.
the brake pedal very firmly and
- Any modification or adaptation not intended
maintain this pressure.
or authorised by CITROËN or carried out
► Press the central part of the steering wheel.
23
CarManuals2.co
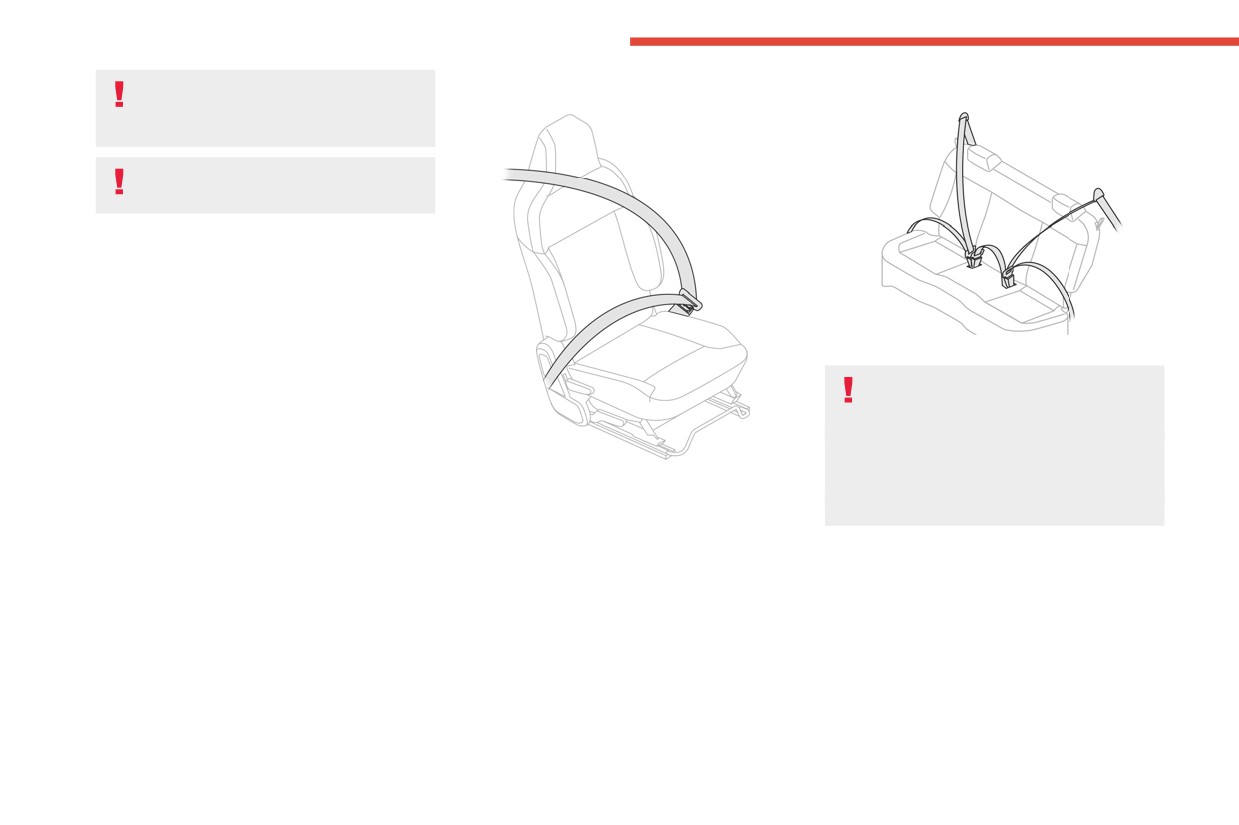
Safety
When changing wheels (tyres and rims),
Front seat belts
Rear seat belts
ensure that these are approved by the
manufacturer for your vehicle.
After an impact, have these systems
checked by a CITROËN dealer.
Seat belts
Inertia reel
The seat belts are equipped with an inertia reel
which allows the strap length to automatically
adjust to your shape. The seat belt returns to its
The outer seats have a belt with inertia reel.
storage automatically when it is not used.
Before performing any operations on the
The inertia reels are fitted with a device which
rear seats, to avoid damage to the seat
automatically locks the strap in the event of a
belts, check that:
collision, emergency braking or if the vehicle rolls
- the outer seat belts are correctly in the
over. It can be released by pulling the strap firmly
storage position, lying vertically along the
and then releasing it so that it reels in slightly.
The front driver seat belt is fitted with inertia reel
pillar,
Force limiter
and a force limiting system.
- the central seat belt is stowed.
This system reduces the pressure of the seat
The front passenger seat belt is equipped with
belt on the chest of the occupant, thus improving
inertia reel.
their protection.
Fastening
► To fasten the seat belt, pull the webbing and
insert the tongue into the buckle.
► Check whether the seat belt is fastened
correctly by pulling the webbing.
If the driver or co-driver seat belt is not fastened
while the ignition is ON, the seat belt warning
lamp chimes and illuminates until the seat belt is
fastened.
24
CarManuals2.co

Safety
Unlocking
shoulder and not touch your face, neck, side
Recommendations for children
5
of your shoulder or pass under your arm.
Use a suitable child seat if the passenger
► To unfasten the seat belt, press the red
An accident or sudden stop could damage
is less than 12 years old or shorter than one
button written “PRESS” on the buckle.
the seat belt, please have your seat belts
and a half metres.
► Allow the belt to retract and make sure the
inspected by authorized dealers after an
Never use the same seat belt to secure more
webbing is not twisted.
accident or sudden stop.
than one child.
Twisted webbing would not allow smooth
Do not use a damaged seat belt which would
Never carry a child on your lap.
retraction of the belt.
result in serious injury.
For more information on Child seats, refer to
the corresponding section.
Seat belt not fastened/
Installation
unfastened alerts
The lower part of the strap must be
Recommendations for pregnant
It comes on in red in the instrument panel
positioned as low as possible on the pelvis.
women
once the system detects that a seat belt is
The upper part must be positioned on the
Pregnant women should use seat belts,
not fastened or is unfastened.
shoulder.
although specific recommendations about
In order to be effective, a seat belt:
driving should be made by the woman's
Advice
- must be tightened as close to the body as
medical advisor. Remember that the lap
possible;
portion of the belt should be worn as low as
The driver must ensure that passengers
- must be pulled in front of you with a smooth
possible across the hips.
use the seat belts correctly and that they
movement, ensuring that it is not twisted;
A pregnant woman should not wear the seat
are all fastened before setting off.
- must only be used to secure one person;
belt across the stomach which would result in
Wherever seated in the vehicle, you must
- must not show signs of tearing or fraying;
serious injury to the fetus and/or the pregnant
always fasten the seat belt, even for short
- must not be changed or modified, in order
mother.
journeys.
to avoid affecting its performance.
Do not interchange the seat belt buckles, as
they will not fulfil their role fully.
Do not wear your seat belt over hard or
Maintenance
Before and after use, ensure that the seat belt
breakable objects in your pockets or on your
In accordance with current safety
is reeled in correctly.
clothing. If an accident occurs, objects such
regulations, for all repairs on your vehicle's
After folding or moving a seat or rear bench
as glasses, pens, etc. under the seat belt can
seat belts, go to a qualified workshop with
seat, ensure that the seat belt is positioned
cause injury.
the skills and equipment needed, which a
and reeled in correctly.
CITROËN dealer is able to provide.
While fastening the seat belt ensure that strap
Have the seat belts checked regularly by a
must pass over your chest and top of your
CITROËN dealer, particularly if the straps
show signs of damage.
25
CarManuals2.co
Safety
Clean the seat belt straps with soapy water or
The seriousness of the impact depends on the
Front airbags
a textile cleaning product, sold by CITROËN
nature of the obstacle and the speed of the
dealers.
vehicle at the moment of collision.
The airbags do not operate when the
ignition is switched off.
Airbags
This equipment will only deploy once. If a
second impact occurs (during the same or a
General information
subsequent accident), the airbag will not be
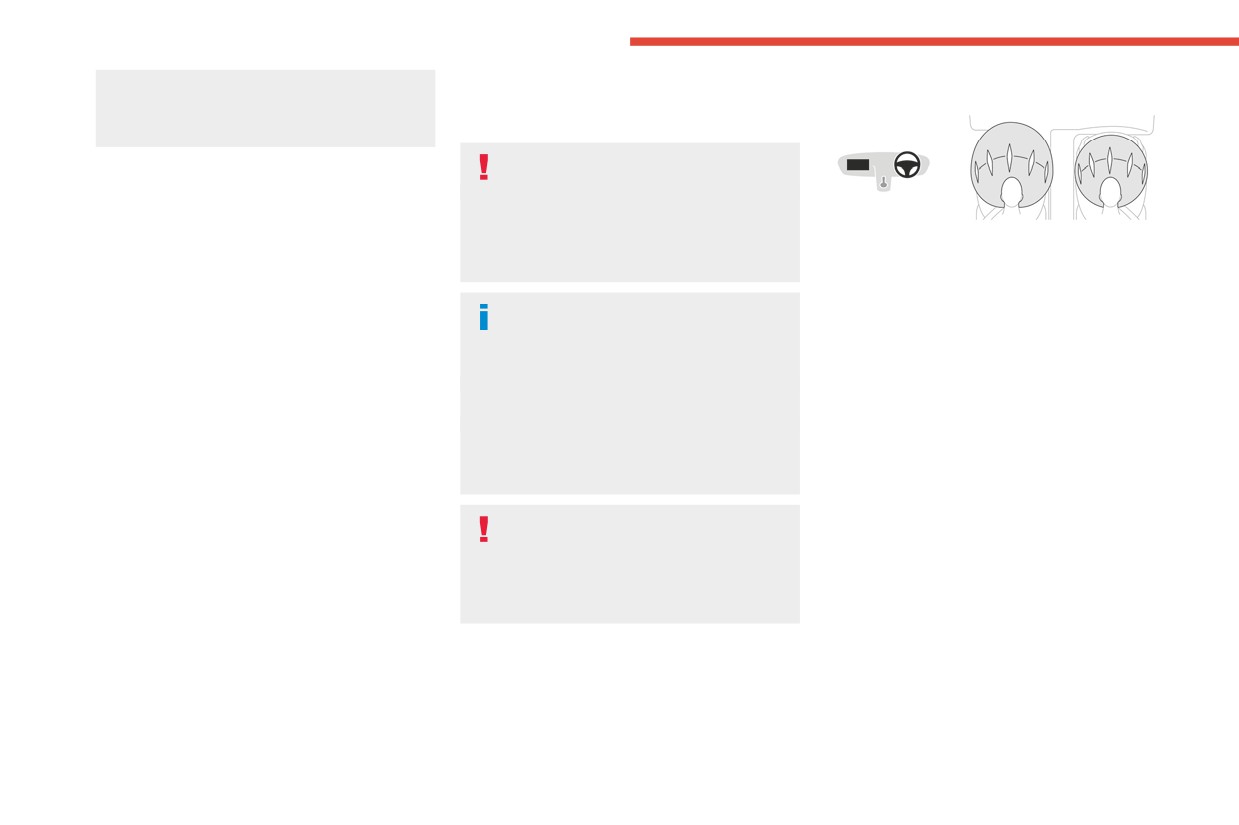
This system protects the driver and front
deployed again.
passenger in the event of a serious front impact,
The airbags have been designed to optimise the
in order to limit the risk of head and chest
safety of the occupants in the event of a violent
injuries.
collision.
When one or more airbags are deployed,
The driver's airbag is fitted in the centre of the
The airbags are supplementary restraint systems
the detonation of the pyrotechnic charge
steering wheel; the front passenger airbag is
(SRS) that help cushion the impact force to the
incorporated in the system makes a noise and
fitted in the dashboard above the glove box.
head and chest during severe frontal collisions.
releases a small quantity of smoke.
The SRS includes Airbags, Seatbelts, Airbag
This smoke is not harmful, but sensitive
Deployment
ECU, Collision sensors and SRS warning lamp.
individuals may experience slight irritation.
1. Frontal collision
Electronic detectors record and analyse the front
The detonation noise associated with the
Airbags may deploy during severe front
impacts sustained in the impact detection zones:
deployment of one or more airbags may result
collision when the crash intensity is above
- In the event of violent impact, the airbags
in a slight loss of hearing for a short time.
the threshold and the angle of impact is less
deploy instantly and help better protect the
than or equal to 30 degrees with respect to
occupants of the vehicle; immediately after the
The airbags will deploy irrespective of
longitudinal axis of vehicle.
impact, the airbags deflate rapidly in order not
whether the seat belt is buckled or not. In
2. Collision with utility poles or trees
to hinder the visibility or the possible exit of the
order to reduce the risk of SERIOUS INJURY
Airbags may deploy when the vehicle hits
occupants.
or DEATH, we recommend occupants to
pole or tree with sufficient intensity to trigger
- In the event of a slight impact, a rear impact
always be buckled.
the airbag. The crash intensity should be
and under certain rollover conditions, the airbags
above the threshold to inflate the airbag.
may not deploy; only the seat belt helps to
3. Underride collision
protect you in these situations.
Airbags may deploy when the vehicle rides
During a frontal crash, children could be fatally
under the trucks or vehicles with higher
injured if they are sitting on driver’s lap/standing
ground clearance. The crash intensity should
very close to the dashboard, as the airbags exert
be above the threshold to inflate the airbag.
severe force levels during deployment.
26
CarManuals2.co
Safety
Non-inflation conditions
7. Curb hits
All work on the airbag systems must only be
5
1.
Low speed front collisions
The airbag may not deploy when the vehicle
performed by a CITROËN dealer.
The airbags may not deploy if the collision is
hits the curbs.
Even if all of the precautions mentioned
not severe and below the design threshold
8. Pedestrian impact
are observed, a risk of injury or of minor
intensity. The force of impact is less in this
Airbags will not inflate when the vehicle hits
burns to the head, chest or arms cannot be
case and much of the protection during low
the pedestrian.
ruled out when an airbag is deployed. The
speed crash is provided by seat belts, if
airbag inflates almost instantly (within a few
properly worn.
milliseconds) then deflates within the same
Malfunction
2.
Rear collisions
time discharging the hot gas via openings
If this warning lamp comes on in the
provided for this purpose.
Frontal airbags are not designed to deploy
instrument panel, you must contact a
when there is a rear crash, since the
CITROËN dealer to have the system checked.
occupants tend to move backwards. In this
Do not drive holding the steering wheel
The airbags may not be deployed in the event of
case, the airbags will not provide any benefit
by its spokes or resting your hands on
a serious impact.
to cushion the force of impact.
the centre part of the wheel.
3.
Side collisions
Passengers must not place their feet on the
Advice
Frontal airbags may not deploy during side
dashboard.
crash, since the occupant moves sideways.
For the airbags to be fully effective,
Do not smoke as deployment of the airbags
4.
Angled collisions
observe the safety recommendations
can cause burns or the risk of injury from a
Airbags may not deploy if the angle of
below.
cigarette or pipe.
collision is beyond 30 degrees with the
Adopt a normal upright sitting position.
Never remove or pierce the steering wheel or
head-on vehicle or the rigid wall or curb or
Fasten the seat belt ensuring it is correctly
hit it violently.
pole.
positioned and adjusted.
Do not fix or attach anything to the steering
5.
Roll over collisions
Do not leave anything between the occupants
wheel or dashboard, as this could cause
Frontal airbags may not deploy in roll over
and the airbags (a child, pet, object, etc.), nor
injuries when the airbags are deployed.
conditions, as the occupant moves sideways
fix or attach anything close to or in the way of
or rolls. Important to wear seat belts in this
the airbag release trajectory; this could cause
case, to avoid floating inside the vehicle and
injuries during their deployment.
risk serious injuries.
Never modify the original definition of your
6.
Speed breakers & pot holes
vehicle, particularly in the area directly around
Airbags may not deploy when crossing speed
the airbags.
breakers even at high speed or when vehicle
After an accident or if the vehicle has been
drops into pot hole or ditch drop.
stolen, have the airbag systems checked.
27
CarManuals2.co
Safety
relative to the child's body to a minimum,
Child seats
even for short journeys.
When installing a child seat using the seat
belt, ensure that the seat belt is tightened
correctly on the child seat and that it secures
the child seat firmly on the seat of the vehicle.
Ensure that the head restraint is stored or
attached securely to prevent it from being
thrown around the vehicle in the event of
sharp braking. Refit the head restraint once
the child seat has been removed.
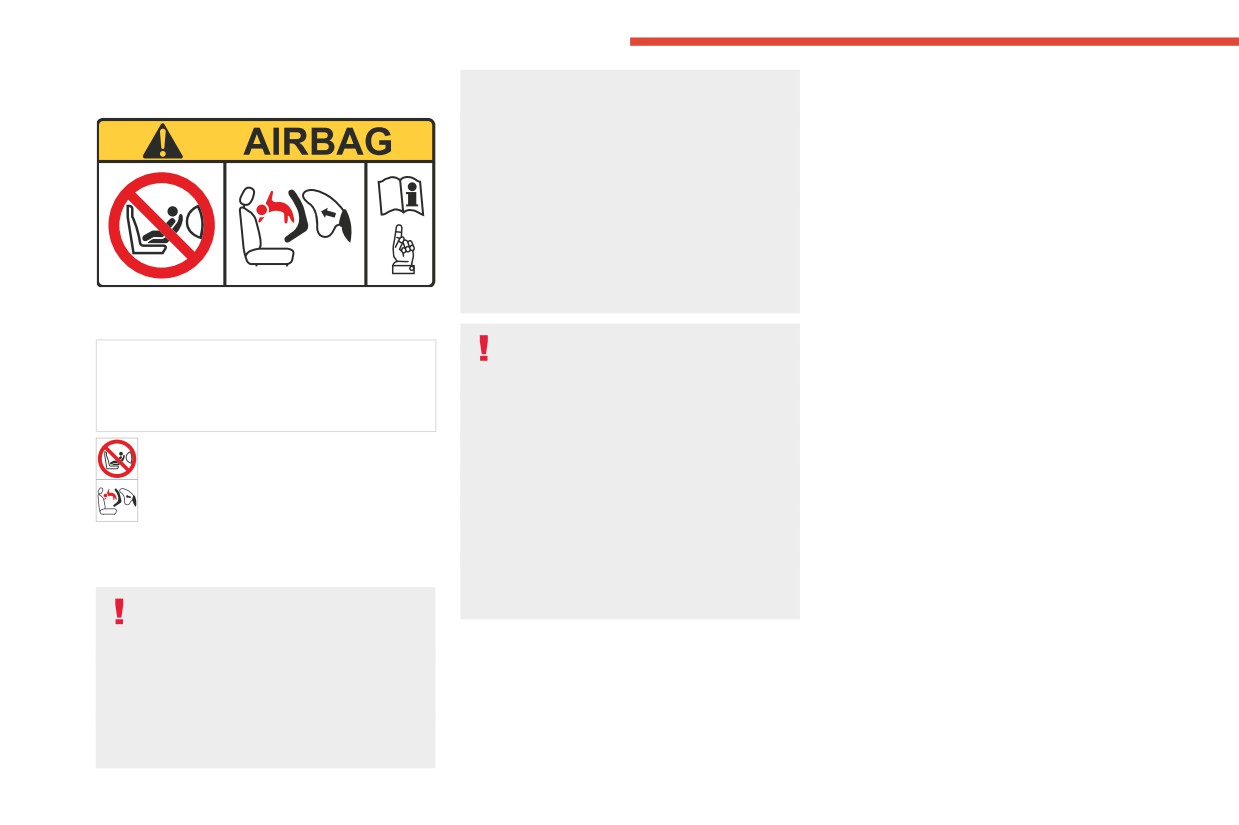
Warning label on the sun visor - Front
passenger airbag
Additional protections
NEVER use a rearward facing child restraint
To prevent accidental opening of the
on a seat protected by an ACTIVE AIRBAG
doors and rear windows, use the "Child lock".
in front of it, SERIOUS INJURY to the CHILD
Take care not to open the rear windows by
may occur.
more than one third.
Do not install a rear-facing child restraint
To protect young children from the rays of the
on the front passenger’s seat.
sun, fit side blinds on the rear windows.
A child in a rear-facing child restraint
As a safety precaution, do not leave:
could be seriously harmed if the
- a child alone and unattended in a vehicle,
passenger's front airbag inflates. The inflated
- a child or an animal in a vehicle which is
airbag would be too close to the back of a
exposed to the sun, with the windows closed,
rear-facing child restraint.
- the keys within reach of children inside the
An incorrectly installed child seat
vehicle.
compromises the child's safety in the
event of an accident.
Ensure that there is no seat belt or seat belt
buckle under the child seat, as this could
destabilise it.
Remember to fasten the seat belts or the
harness of child seats, keeping the slack
28
CarManuals2.co
Safety
Child restraint system
5
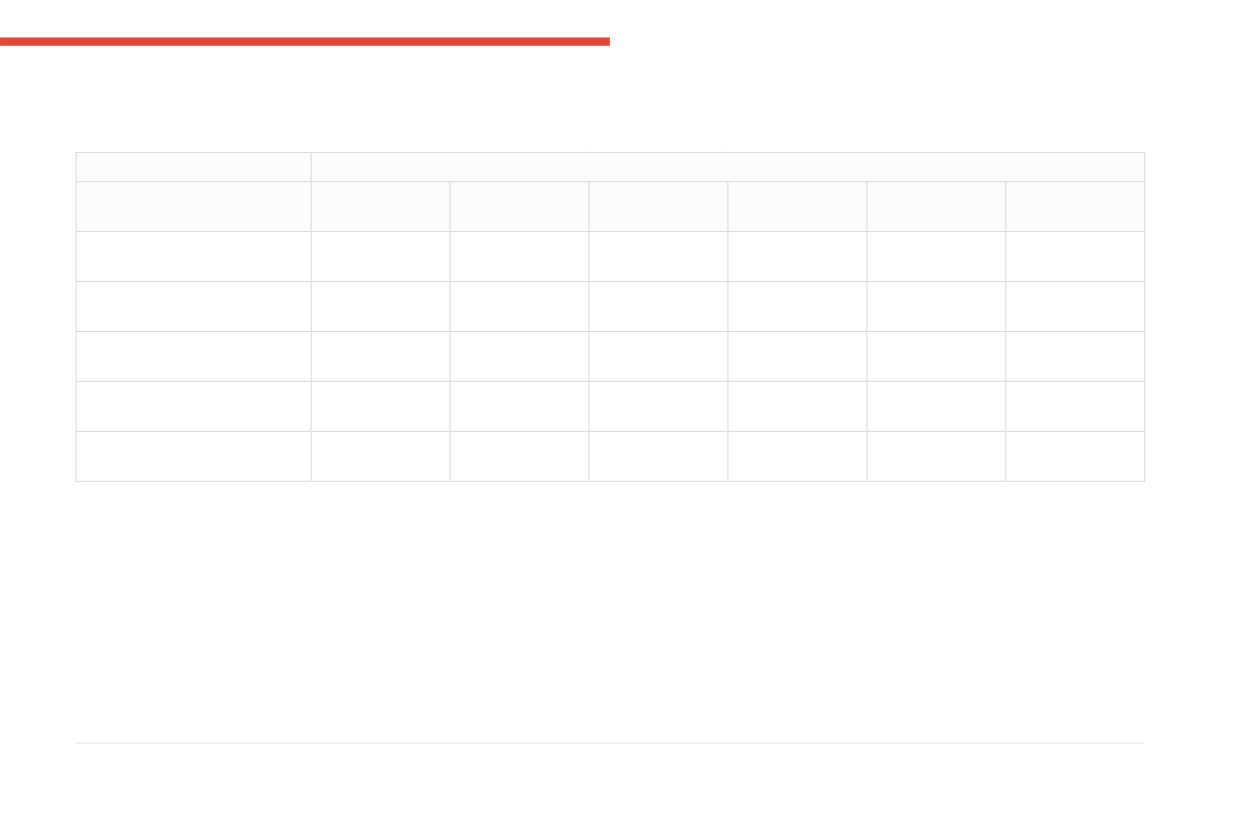
The suitability of each passenger's seat position for carriage of children and fitting of child restraint system is shown below. Whenever you carry children
up to 12 years of age, properly use the child restraints which conform to AIS 072, the standard for child restraints, referring to the table.
Seating position (or other site)
MASS GROUP
Front
Rear outboard
Rear centre
Rear outboard
Intermediate
Intermediate
passenger
LH*
RH*
outboard*
centre
Group 0
X
U
X
X
N.A
N.A
Up to 10 kg
Group 0+
X
U
X
X
N.A
N.A
Up to 13 kg
Group 1
X
U
X
X
N.A
N.A
9 to 18 kg
Group 2
X
U
X
X
N.A
N.A
15 to 25 kg
Group 3
X
U
X
X
N.A
N.A
22 to 36 kg
U Suitable for "universal" category restraints approved for use in this mass group.
Universal is the category in the AIS 072.
X Seat position not suitable for children in this mass group.
N.A Seat position not available for children in this mass group.
Try to move the child restraint system in all
ELR type belt
directions to make sure it is securely installed.
Install your child restraint system according to
the instructions provided by the child restraint
system manufacturer.
Make sure the seat belt is securely latched.
* Outboard indicates window side seat.
29
CarManuals2.co
Safety
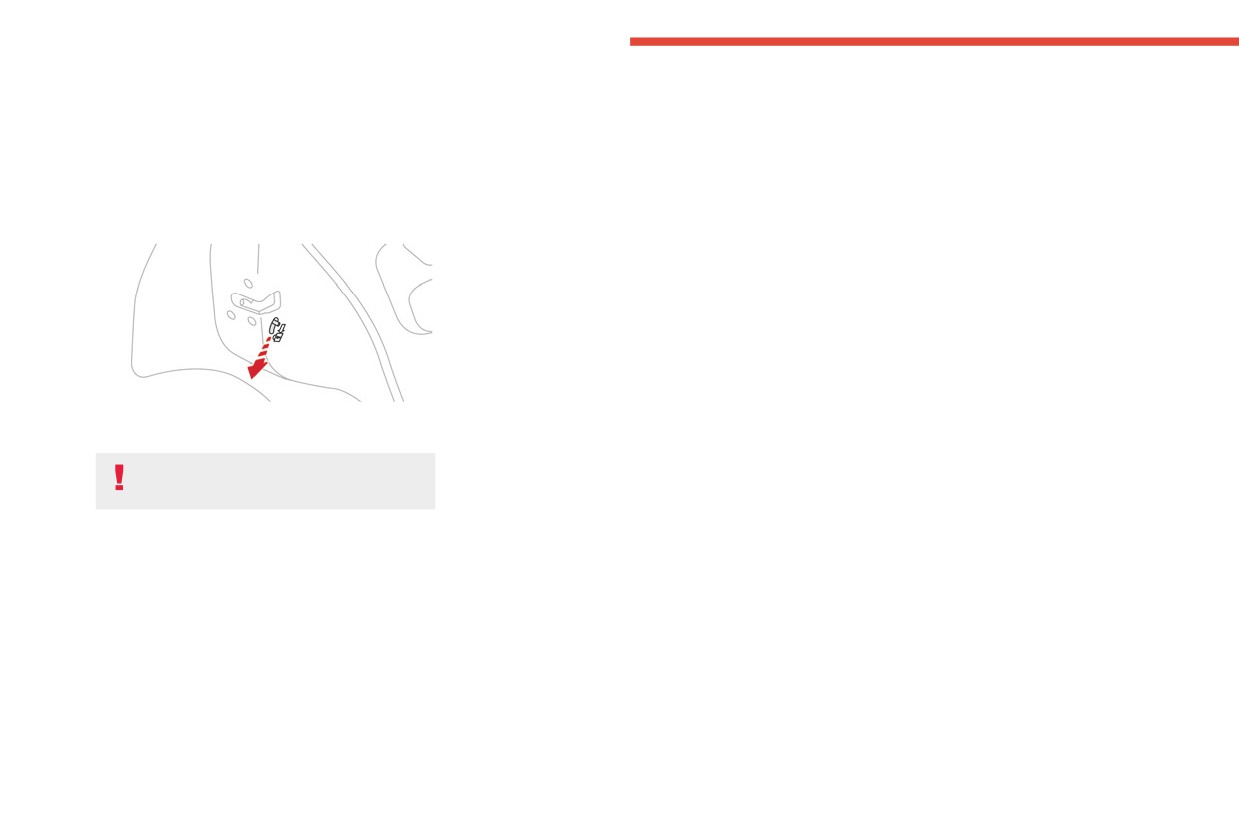
Manual child lock
This system prevents opening of a rear door
using its interior handle.
The control is located on the edge of each rear
door (marked by a label).
Locking / Unlocking
► To lock, pull the lever down.
► To unlock, pull the lever up.
Refer to the legislation in force in your
country before using this system.
30
CarManuals2.co
Driving
Do not park the vehicle or leave the
► do not stop and do not switch off the engine.
Driving recommendations
6
engine running on a flammable
On leaving the flooded road, as soon as safety
► Observe the driving regulations and remain
surface (dry grass, dead leaves, etc.). The
conditions allow, make several light brake
vigilant whatever the traffic conditions.
exhaust system of your vehicle is very hot,
applications to dry the brake discs and pads.
► Monitor your environment and keep your
even several minutes after the engine stops.
If in doubt about the state of your vehicle,
hands on the wheel to be able to react to
Risk of fire!
contact a CITROËN dealer.
anything that may happen any time.
► Drive smoothly, anticipate the need for
Never leave a vehicle unattended with
braking and maintain a longer safety distance,
Starting / Switching off the
the engine running. If you have to leave
especially in bad weather.
your vehicle with the engine running, apply
engine
► Stop the vehicle to carry out operations that
the parking brake and put the gearbox into
require close attention (such as adjustments).
neutral.
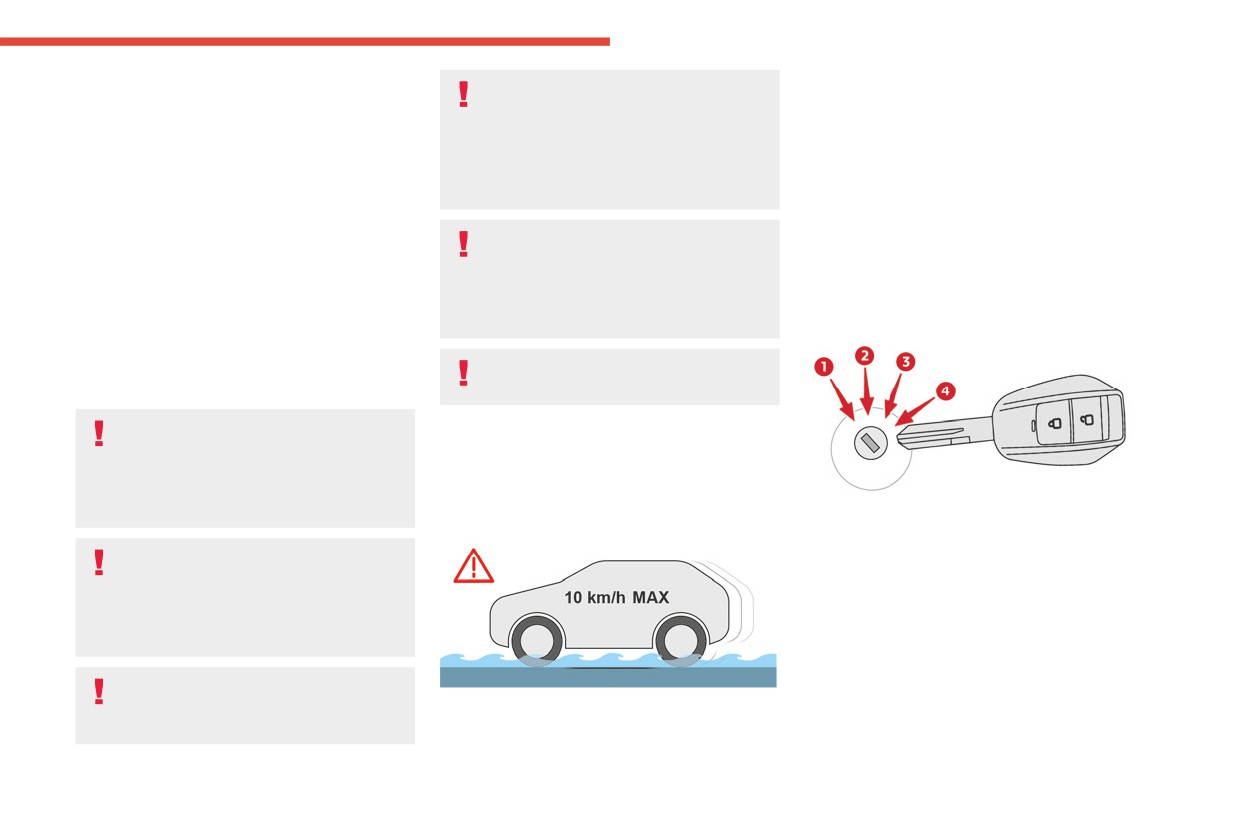
Key ignition switch
► During long trips, take a break every two
hours.
Never leave children inside the vehicle
Important!
unsupervised.
Never leave the engine running in a
On flooded roads
closed space without sufficient
ventilation. Internal combustion engines emit
We strongly advise against driving on flooded
toxic exhaust gases such as carbon
roads, as this could cause serious damage to
monoxide. Danger of poisoning and death!
the engine or gearbox, as well as to the electrical
It has 4 positions:
systems of your vehicle.
1. Stop
In severe wintry conditions, let the engine
Inserting and removing the key, steering
run for 4 minutes before moving off, to
column locked.
ensure the correct operation and durability of
2. ACC
the mechanical components of your vehicle
Steering column unlocked, use of the
(engine and gearbox).
vehicle's electric equipment.
3. ON (Ignition)
Never drive with the parking brake
Steering column unlocked, ignition on, engine
applied. Risk of overheating and
If you have to drive on a flooded road:
running.
damage to the braking system!
► drive as slowly as possible without stalling. In
4. Starting
all cases, do not exceed 10 km/h,
31
CarManuals2.co
Driving
Avoid attaching heavy objects to the key
If the engine does not start straight away,
As a safety precaution and to facilitate
or the remote control. It would weigh
switch off the ignition. Wait a few
starting the engine:
down on its shaft in the ignition switch and
seconds before operating the starter motor
- Always select neutral.
could cause a malfunction.
again. If the engine does not start after a few
- Depress the clutch pedal.
attempts, do not keep trying - risk of
damaging the starter motor, the battery and
Ignition on position
the engine.
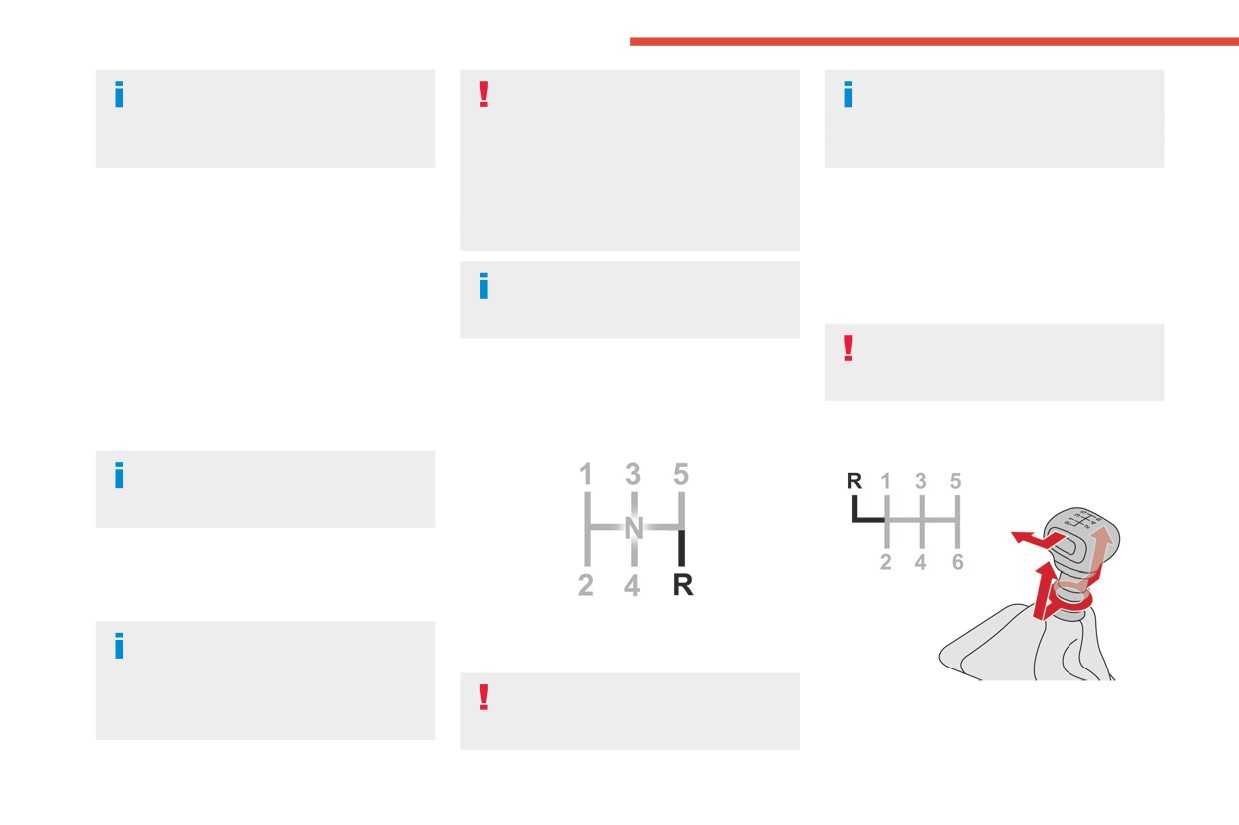
6-speed manual gearbox
It allows the use of the vehicle's electric
Contact a CITROËN dealer.
equipment or portable devices to be charged.
Engaging 5th or 6th gear
In mild conditions, do not leave the
Starting the engine
► Move the gear selector fully to the right to
engine at idle to warm up but move off
With the parking brake applied:
engage 5th or 6th gear.
straight away and drive at moderate speed.
► Place the gear lever in neutral then fully
Failure to follow this instruction could
depress the clutch pedal.
cause permanent damage to the gearbox
► Insert the key into the ignition switch; the
5-speed manual gearbox
(inadvertent engagement of 3rd or 4th gear).
system recognises the code.
► Unlock the steering column by simultaneously
turning the steering wheel and the key.
Engaging reverse gear
Engaging reverse gear
In certain cases, you may have to apply
significant force to move the steering
wheel (wheels on full lock, for example).
► Operate the starter motor by turning the key
to position 3 without pressing the accelerator
pedal, until the engine starts. Once the engine
starts, release the key.
► Fully depress the clutch pedal.
After a cold start, preheating the catalytic
► Push the gear lever fully to the right, then
converter can cause noticeable engine
backwards.
vibrations for anything up to 2 minutes while
Only engage reverse gear when the
stationary with the engine running
► Raise the ring under the knob and move the
vehicle is stationary with the engine at
(accelerated idle speed).
gear selector to the left, then forwards.
idle.
32
CarManuals2.co
Driving
Only engage reverse gear when the
requirements (power, acceleration, braking,
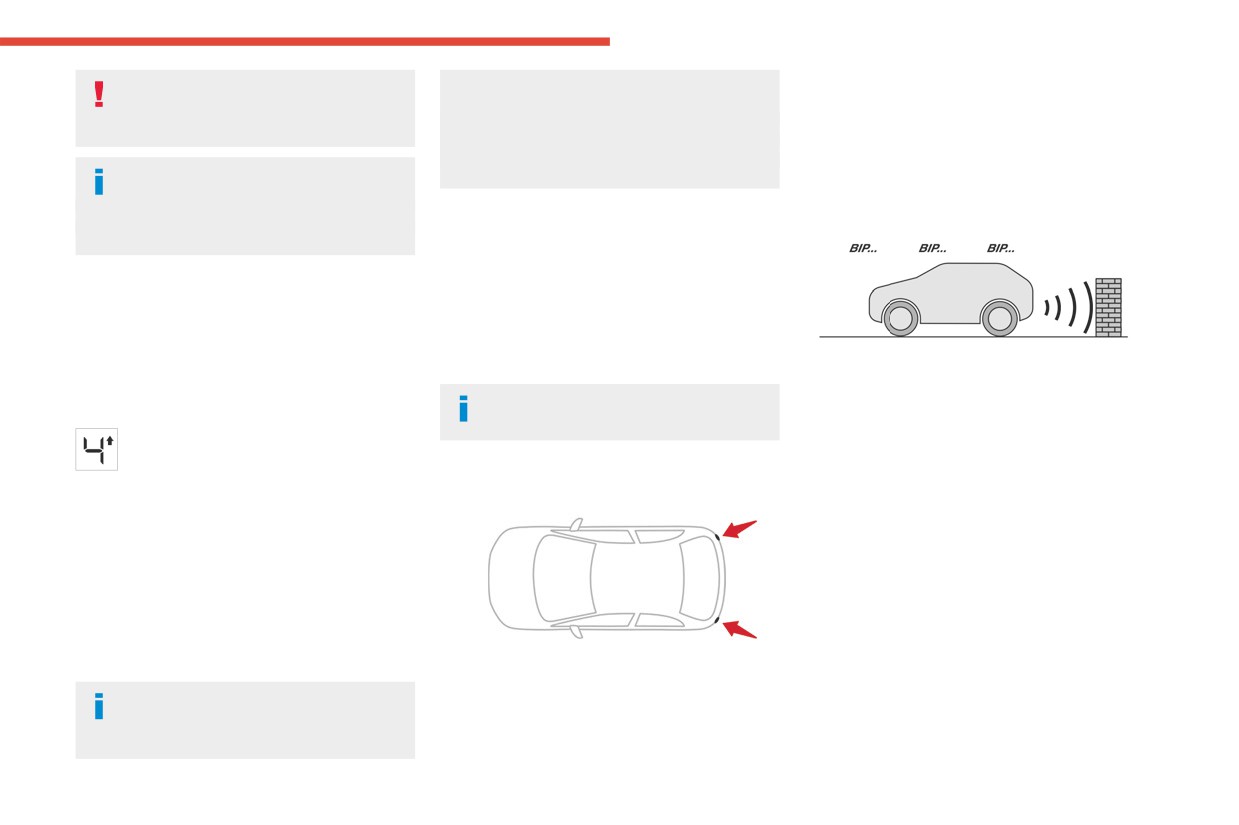
Rear parking sensors
6
vehicle is stationary with the engine at
etc.).
The system is switched on by engaging reverse
idle.
The system never suggests:
gear.
- engaging first gear;
The system is switched off when disengaging
As a safety precaution and to facilitate
- engaging reverse.
reverse gear.
starting the engine:
- Always select neutral.
Audible assistance
- Press the clutch pedal.
Overspeed alert
An audible overspeed alert is triggered when the
vehicle exceeds predefined speed thresholds.
Gear efficiency indicator
When the vehicle speed is greater than 80 km/h,
This system helps reduce fuel consumption by
the alert is emitted every 2 minutes.
recommending the most appropriate gear.
When the vehicle speed is greater than 120
The system signals the presence of obstacles
km/h, the alert is emitted every 2 seconds.
within the sensors’ detection zone.
Operation
This system cannot be modified nor
The proximity information is given by an
The system advises to change gear.
deactivated.
intermittent audible signal, the frequency of
The information appears in the instrument
which increases as the vehicle approaches the
panel in the form of an ascending or
obstacle.
descending arrow.
When the distance between the vehicle
Parking sensors
The number displayed is the current gear.
and the obstacle becomes less than about
Gear shift recommendations should not be
60 centimetres, the audible signal becomes
considered compulsory. In fact, the road layout,
continuous.
the traffic density and safety remain the deciding
factors when choosing the best gear. The driver
Operating limits
therefore remains responsible for deciding
If the boot is heavily loaded, the vehicle may tilt,
whether or not to follow the indications issued by
affecting distance measurements.
the system.
Using sensors located in the bumper, this
This function cannot be deactivated.
system signals the proximity of obstacles
The system adapts its gear shift
(e.g. pedestrian, vehicle, tree, barrier) present in
recommendation according to the driving
their field of detection.
conditions (slope, load, etc.) and the driver’s
33
CarManuals2.co
Driving
Manoeuvring aids cannot, in any
circumstances, replace the need for
vigilance on the part of the driver.
The driver must always check the
surroundings of the vehicle before and during
the whole manoeuvre, in particular using the
mirrors.
34
CarManuals2.co
Practical information
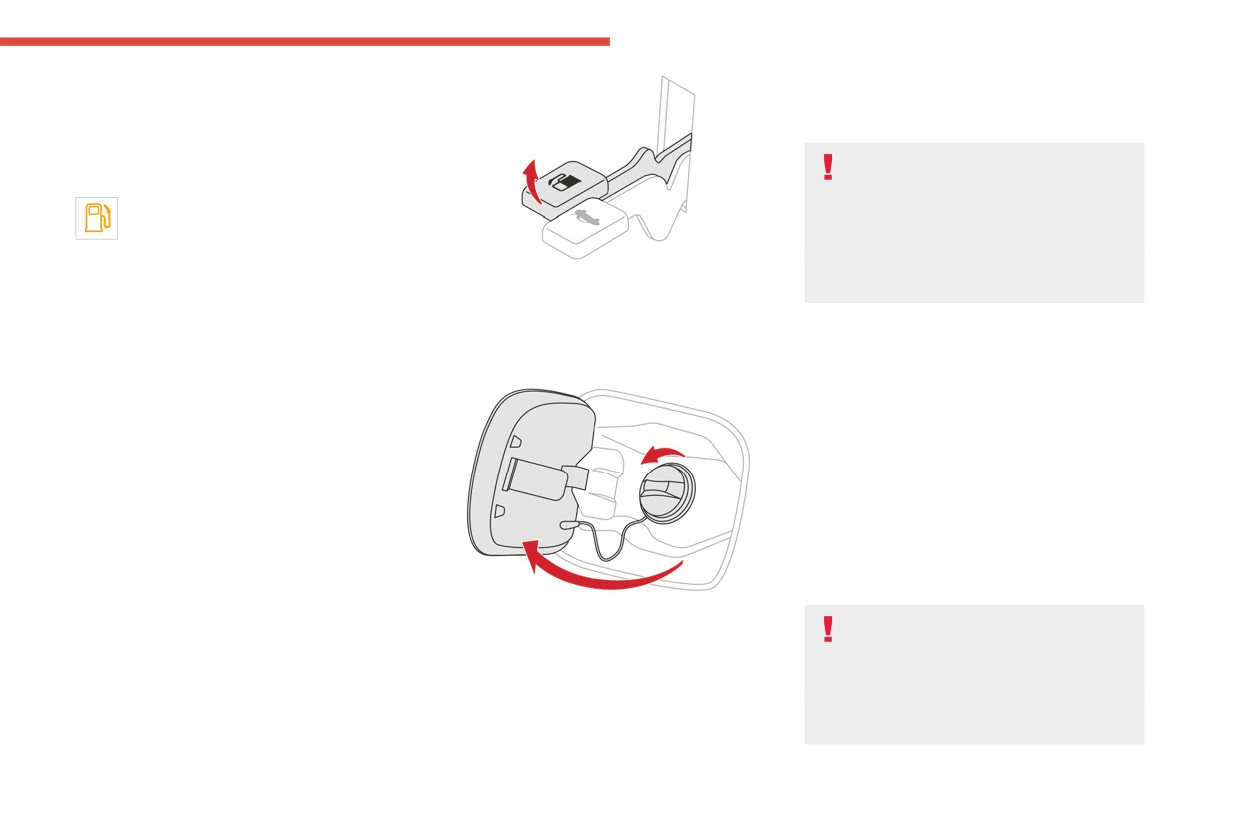
► Refit the filler cap.
Refuelling
7
► Turn it to the right.
Fuel tank capacity: 30 litres.
► Push the filler flap to close it.
Reserve level: approximately 5 litres.
If you have put in wrong/dirty/
Low fuel level
contaminated fuel or H2O mixed fuel in
the vehicle, you must have the fuel tank
When the low fuel level is reached, this
drained and filled with the correct fuel before
warning lamp comes on on the instrument
starting the engine.
panel, accompanied by an audible signal. When
Contact a CITROËN dealer for the fuel
it first comes on, about 5 litres of fuel remain.
► Lift the fuel filler flap lever, located on the
system cleaning.
Until sufficient fuel is added, this warning lamp
floor beside the driver's seat, to open the flap.
appears every time the ignition is switched on,
► Take care to select the pump that delivers the
The vehicle is fitted with a catalytic converter, a
accompanied by an audible signal. When driving,
correct fuel type for the vehicle's engine (see a
device which helps to reduce the level of harmful
the audible signal are repeated with increasing
reminder label on the inside of the filler flap).
emissions in the exhaust gases.
frequency as the fuel level drops towards 0.
You must use unleaded fuel.
You must refuel as soon as possible to avoid
The filler neck is narrower, admitting unleaded
running out of fuel.
petrol nozzles only.
Refuelling
Fuel cut-off
Additions of fuel must be of at least 5 litres, in
Your vehicle is equipped with a safety device
order to be registered by the fuel gauge.
which cuts off the fuel supply in the event of a
Opening the filler cap may create a noise caused
collision.
by an inrush of air. This vacuum is entirely
normal, resulting from the sealing of the fuel
system.
Bonnet
To refuel in complete safety:
► Turn the filler cap to the left and remove it.
► You must switch off the engine.
When the engine is hot, handle the
► Introduce the filler nozzle and push it in as
exterior safety catch and the bonnet stay
far as possible before starting to refuel (risk of
with care (risk of burns), using the protected
blowback).
area.
► Fill the tank.
When the bonnet is open, take care not to
Do not continue past the first cut-off of the
damage the safety catch.
nozzle, as this may cause malfunctions.
35
CarManuals2.co
Practical information
Do not open the bonnet under very windy
Opening
conditions.
Cooling of the engine when stopped
The engine cooling fan may start after
the engine has been switched off.
Take care with objects or clothing that
could be caught in the blades of the fan!
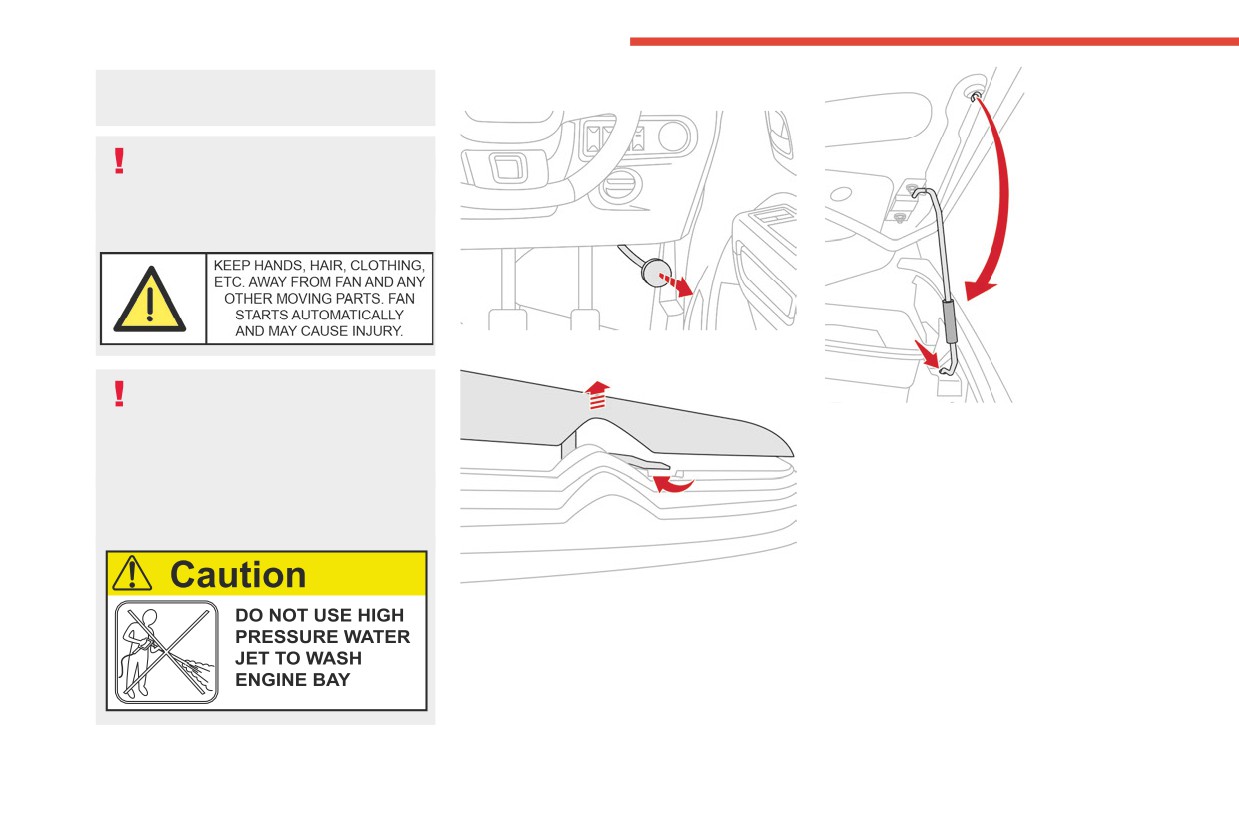
► Pull the release lever towards you.
Water washing in the engine
compartment including high pressure
► Unclip the stay from its housing and place it
water washing may cause the failure of
in the support slot to hold the bonnet open.
electrical circuits located in the engine
compartment.
Closing
Never allow water or other liquids to come in
► Take the stay out of the support slot.
contact with electrical/electronic components
► Clip the stay in its housing.
inside the vehicle as this may damage them.
► Lower the bonnet and release it near the end
of its travel.
► Pull on the bonnet to check that it is locked
► Lift the safety catch and raise the bonnet.
correctly.
Engine compartment
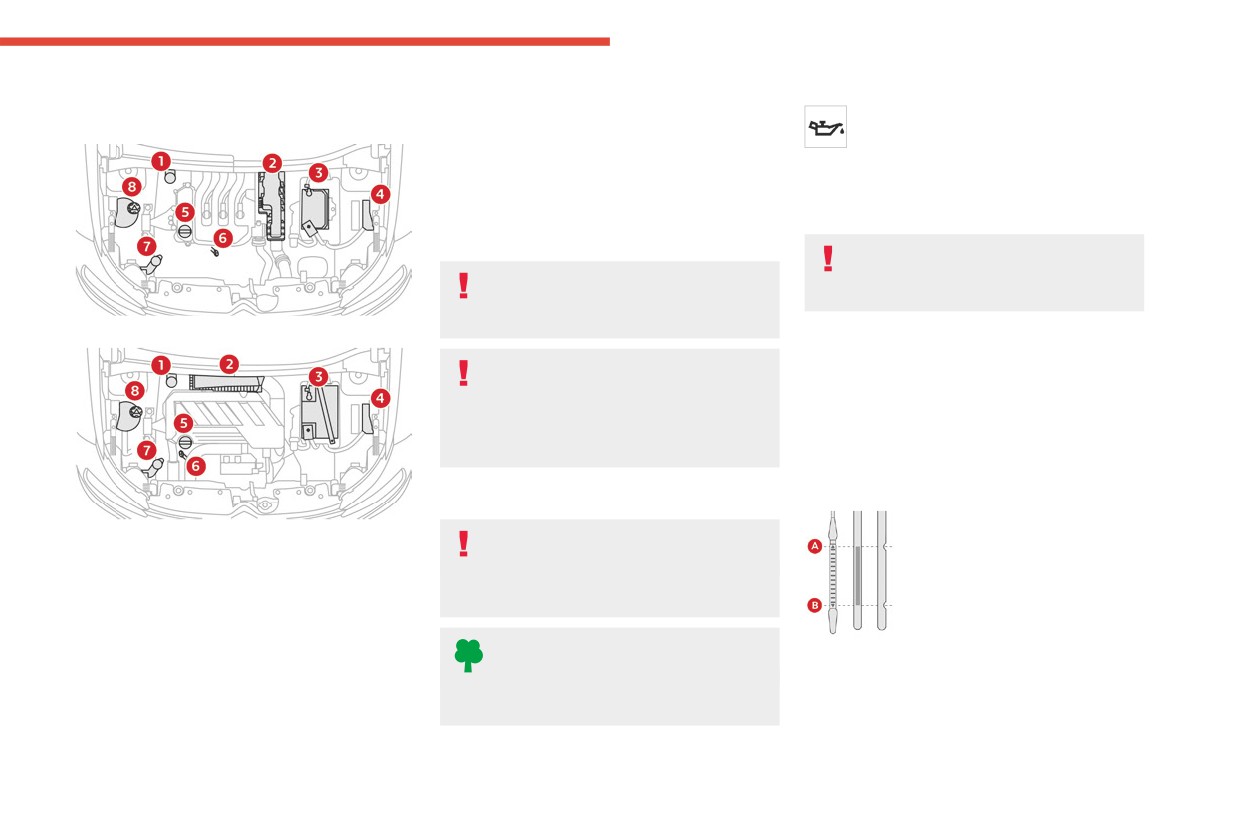
The engines represented are examples given for
illustration purposes only.
The locations of the following elements may
vary:
36
CarManuals2.co
Practical information
- Air filter.
Checking levels
Engine oil
7
- Engine oil dipstick.
The level is checked, with the engine
Check all of the following levels regularly in
- Engine oil filler cap.
having been switched off for at least 30
accordance with the manufacturer's service
minutes and on level ground, using the dipstick.
schedule. Top them up if required, unless
To know how often the engine oil should be
otherwise indicated.
replaced, refer to the manufacturer's servicing
If a level drops significantly, have the
schedule.
corresponding system checked by a CITROËN
dealer.
In order to maintain the reliability of the
engine and emissions control system,
The fluids must comply with the
never use additives in the engine oil.
manufacturer's requirements and with
the vehicle's engine.
NA engine
Checking using the dipstick
Take care when working under the
For the location of the dipstick, please refer
bonnet, as certain areas of the engine
to the illustration of the corresponding engine
may be extremely hot (risk of burns) and the
compartment.
cooling fan could start at any time (even with
► Grasp the dipstick by its coloured grip and
the ignition off).
pull it out completely.
► Wipe the end of the dipstick using a clean,
lint-free cloth.
Used products
Turbo engine
Avoid prolonged contact of used oil or
1. Brake fluid reservoir
fluids with the skin.
2. Air filter
Most of these fluids are harmful to health and
3. Battery
very corrosive.
4. Fusebox
5. Engine oil filler cap
Do not discard used oil or fluids into
► Reinsert the dipstick and push fully down,
6. Engine oil dipstick
sewers or onto the ground.
then pull it out again to visually check the oil
7. Screenwash fluid reservoir
Empty used oil into the containers reserved
level: the correct level is between marks A (max)
8. Engine coolant reservoir
for this purpose at a CITROËN dealer.
and B (min).
Do not start the engine if the level is:
- above mark A: contact a CITROËN dealer.
37
CarManuals2.co
Practical information
- below mark B: top up the engine oil
Brake fluid
Once the pressure has dropped, remove the cap
immediately.
and top up to the required level.
The level of this fluid should be close to
Oil grade
the "MAX" mark. If not, check the leakage
Screenwash fluid
Before topping up or changing the engine
in the circuit and the brake pad wear.
Top up to the required level when
oil, check that the oil is suitable for the engine
To know how often the brake fluid should be
necessary.
and complies with the recommendations in
replaced, refer to the manufacturer's servicing
the service schedule supplied with the vehicle
schedule.
Fluid specification
(or available from your CITROËN dealer).
Clean the cap before removing it to refill.
The fluid must be topped up with a ready-to-use
Use of non-recommended oil may invalidate
Use only DOT3 or DOT4 brake fluid from
mixture.
the contractual warranty in the event of
a sealed container.
In winter (temperatures below zero), a liquid
engine failure.
containing an agent to prevent freezing must
be used which is appropriate for the prevailing
Engine coolant
Topping up the engine oil level
conditions, in order to protect the elements of the
It is normal to top up this fluid between
For the location of the engine oil filler cap, please
system (pump, tank, ducts, jets, etc.).
two services.
refer to the corresponding under-bonnet engine
The check and top-up must only be done with
Filling with pure water is prohibited under
compartment illustration.
the engine cold.
all circumstances (risk of freezing,
► Add oil in small quantities, avoiding any spills
A low level presents a risk of serious damage to
limestone deposits, etc.).
on engine components (risk of fire).
the engine.
► Wait a few minutes before checking the level
The level of engine coolant should be close to
again using the dipstick.
the "MAX" mark but should never exceed it.
► Top up the level if necessary.
If the level is close to or below the "MIN” mark, it
► After checking the level, carefully screw the
is essential to top up.
oil filler cap back on and replace the dipstick in
When the engine is hot, the temperature of
its tube.
engine coolant is regulated by the fan.
Within 30 minutes of adding oil, the oil
As the cooling system is pressurised, wait at
level indication in the instrument panel
least one hour after switching off the engine
when the ignition is switched on is not valid.
before carrying out any work.
In order to avoid the risk of burning, if you need
to top up in an emergency, wrap a cloth around
the cap and unscrew the cap by two turns to
allow the pressure to drop.
38
CarManuals2.co
Practical information
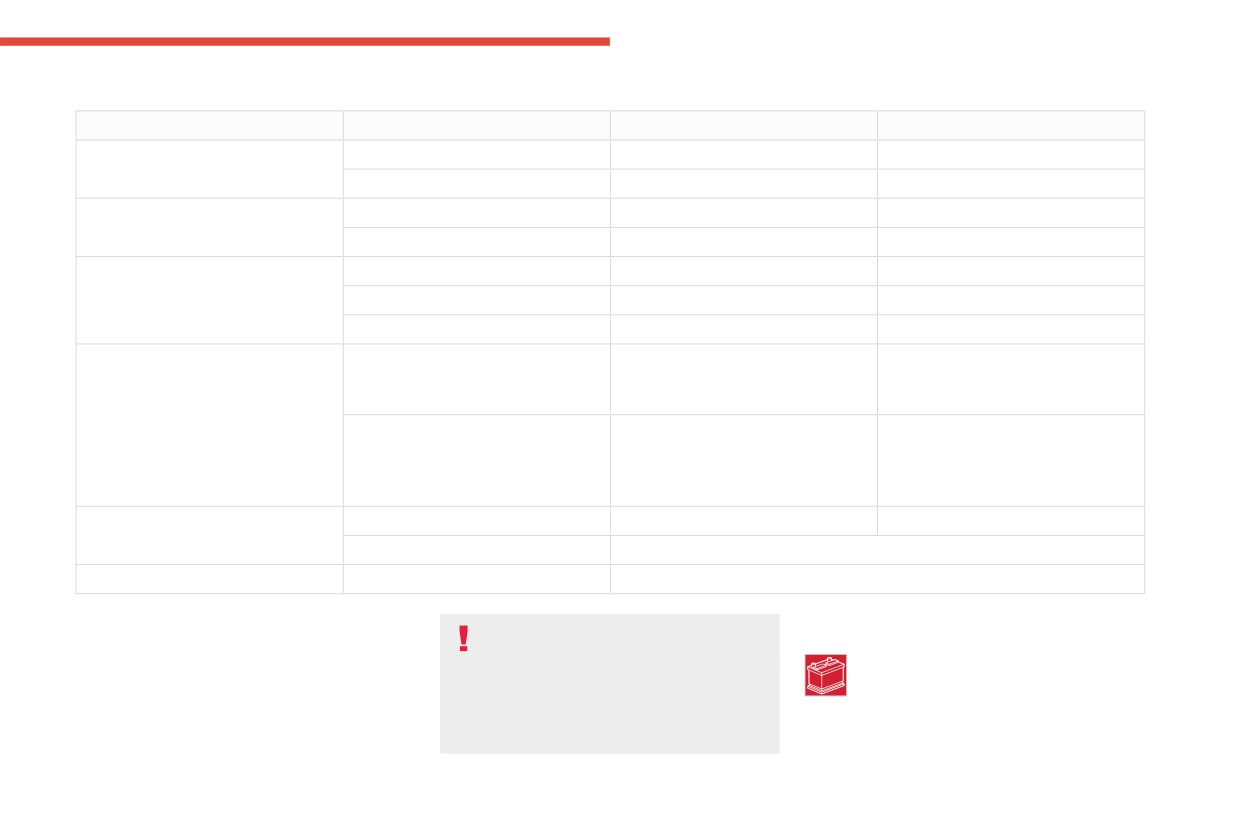
Consumables
7
Designation
Grade/Specs
Quantity
Engine options
EB2 - NA
5W40 B712296 Synthetic
2.55 Lts
EB2 G2 Turbo
5W30 B712297 Synthetic
3.1 Lts
Transmission options
Transmission fluid - MA
75W - 80 B13/0067 API GL-4
2.1 ± 0.2 Lts
Transmission fluid - MB6
75W - 80 B13/0067 API GL-4
1.8 ± 0.2 Lts
HVAC
Compressor Oil
PS R1
120 ml
AC Refrigerant for EB2 - NA
R134A
425 grams
AC Refrigerant for EB2 G2 Turbo
R134A
550 grams
Cooling
Coolant (Premixed) for EB2 NA
GOLDEN CRUISER LONG LIFE
4.65 ± 0.1 Lts
(Antifreeze Coolant 40% + DM / DI
ANTIFREEZE-COOLANT, GC LLC
Water 60%)
2200 NP
Coolant (Premixed) for EB2 G2
GOLDEN CRUISER LONG LIFE
5.7 ± 0.1 Lts
Turbo
ANTIFREEZE-COOLANT, GC LLC
(Antifreeze Coolant 40% + DM / DI
2200 NP
Water 60%)
Brake/Clutch
Brake fluid
DOT3/DOT4
450 ± 50 ml
Clutch fluid
Clutch fluid line connected with brake reservoir
Axle
Axle oil
NA
Only use products recommended by
Checks
12 V battery
CITROËN.
Check regularly during service that the
Unless otherwise indicated, check these
In order to optimise the operation of
terminals and coin plug caps are clean
components in accordance with the
components as important as those in the
and tightened.
manufacturer's service schedule.
braking system, CITROËN selects and offers
Otherwise, have them checked by a CITROËN
very specific products.
dealer.
39
CarManuals2.co
Practical information
The battery electrolyte must be filled. If the level
Manual gearbox
kilometres at over 50 km/h, add 0.3 bar (30 kPa)
is found to be below the “MIN” level line, add
to the values indicated on the label.
The gearbox does not require any
distilled water to the “MAX” level line.
maintenance (no oil change).
Under-inflation increases fuel
For more information on the precautions
consumption. Non-compliant tyre
to take before any work on the 12 V
Brake pads
pressure causes premature wear on tyres and
battery, refer to the corresponding section.
Brake wear depends on the style of
has an adverse effect on the vehicle's road
driving, particularly in the case of vehicles
holding - risk of an accident!
used in town, over short distances. It may be
Passenger compartment
Driving with worn or damaged tyres reduces the
necessary to have the condition of the brakes
braking and road holding performance of the
filter
checked, even between vehicle services.
vehicle. It is recommended to regularly check the
Depending on the environment and the
Unless there is a leak in the circuit, a drop in the
condition of the tyres (tread and sidewalls) and
use of the vehicle (e.g. dusty atmosphere,
brake fluid level indicates that the brake pads
wheel rims as well as the presence of the valves.
city driving), change it twice as often, if
are worn.
When the wear indicators no longer appear set
necessary.
After washing the vehicle, moisture, or in
back from the tread, the depth of the grooves is
A clogged passenger compartment filter
wintry conditions, ice can form on the
less than 1.6 mm; it is imperative to replace the
can adversely affect air conditioning
brake discs and pads: braking efficiency may
tyres.
system performance and generate
be reduced. Gently dab the brakes to dry and
Using different size wheels and tyres from those
undesirable odours.
defrost them.
specified can affect the lifetime of tyres, wheel
rotation, ground clearance, the speedometer
reading and have an adverse effect on road
Air filter
Brake disc and drum wear
holding.
Depending on the environment and the
For information on checking brake disc
Fitting different tyres on the front and rear axles
use of the vehicle (e.g. dusty atmosphere,
and drum wear, contact a CITROËN
can cause ABS and EBFD systems to mistime.
city driving), change it twice as often, if
dealer.
necessary.
Shock absorbers
Wheels and tyres
It is not easy for drivers to detect when
Oil filter
The inflation pressure of all tyres,
shock absorbers are worn. Nevertheless,
Change the oil filter each time the engine
including the spare wheel, must be
the shock absorbers have a major impact on
oil is changed.
checked on "cold” tyres.
road-holding and braking performance.
The pressures indicated on the tyre pressure
For your safety and driving comfort, it is
label are valid for "cold" tyres. If you have driven
important to have them regularly checked by a
for more than 10 minutes or more than 10
CITROËN dealer.
40
CarManuals2.co

Practical information
Timing and accessory kits
(particularly when cleaning areas containing
Bodywork
7
chipped paint, sensors or seals).
Timing and accessory kits are used from
High-gloss paint
Promptly clean up any stains containing
the time the engine is started until it is
chemicals liable to damage the vehicle's paint
switched off. It is normal for them to wear over
Do not use abrasive products, solvents,
(including tree resin, bird droppings, insect
time.
petrol or oil to clean the bodywork.
secretions, pollen and tar).
A faulty timing or accessory kit can damage
Never use an abrasive sponge to clean
If justified by the environment, clean the
the engine, rendering it unusable. Observe the
stubborn stains - risk of scratching the
vehicle more frequently to remove salty
recommended replacement frequency, stated in
paintwork!
deposits (in coastal areas), soot (in industrial
distance travelled or time elapsed, whichever is
Do not apply polish in strong sunshine, or to
areas) and mud (in wet or cold areas). These
reached first.
plastic or rubber parts.
substances can be highly corrosive.
Contact a CITROËN dealer for advice on
Use a soft cloth and soapy water or a pH
Advice on care and
removing stubborn stains requiring special
neutral product.
products (such as tar or insect removers).
maintenance
Gently wipe the bodywork with a clean
Preferably, have paint touch-ups performed
microfibre cloth.
by a CITROËN dealer.
General recommendations
Apply polish with the vehicle clean and dry.
Comply with the instructions for use stated on
Observe the following recommendations to avoid
The versions provided with roof rails are
the product.
damaging the vehicle.
not designed for fitting roof racks. It is
Exterior
only for aesthetic factor.
Do not apply loads on the roof rails.
Never use a high-pressure jet wash in
the engine compartment - risk of
Interior
damaging the electrical components!
Do not wash the vehicle in bright sunshine or
When washing the vehicle, never use a
extremely cold conditions.
water hose or high-pressure jet to clean
the interior.
When washing the vehicle in an
Liquids carried in cups or other open
automatic roller-brush car wash, be sure
containers can spill, presenting a risk of
to lock the doors.
damage if they come into contact with the
When using a pressure washer, hold the
controls in the dashboard and centre console.
lance at least 30 cm from the vehicle
Be vigilant!
41
CarManuals2.co
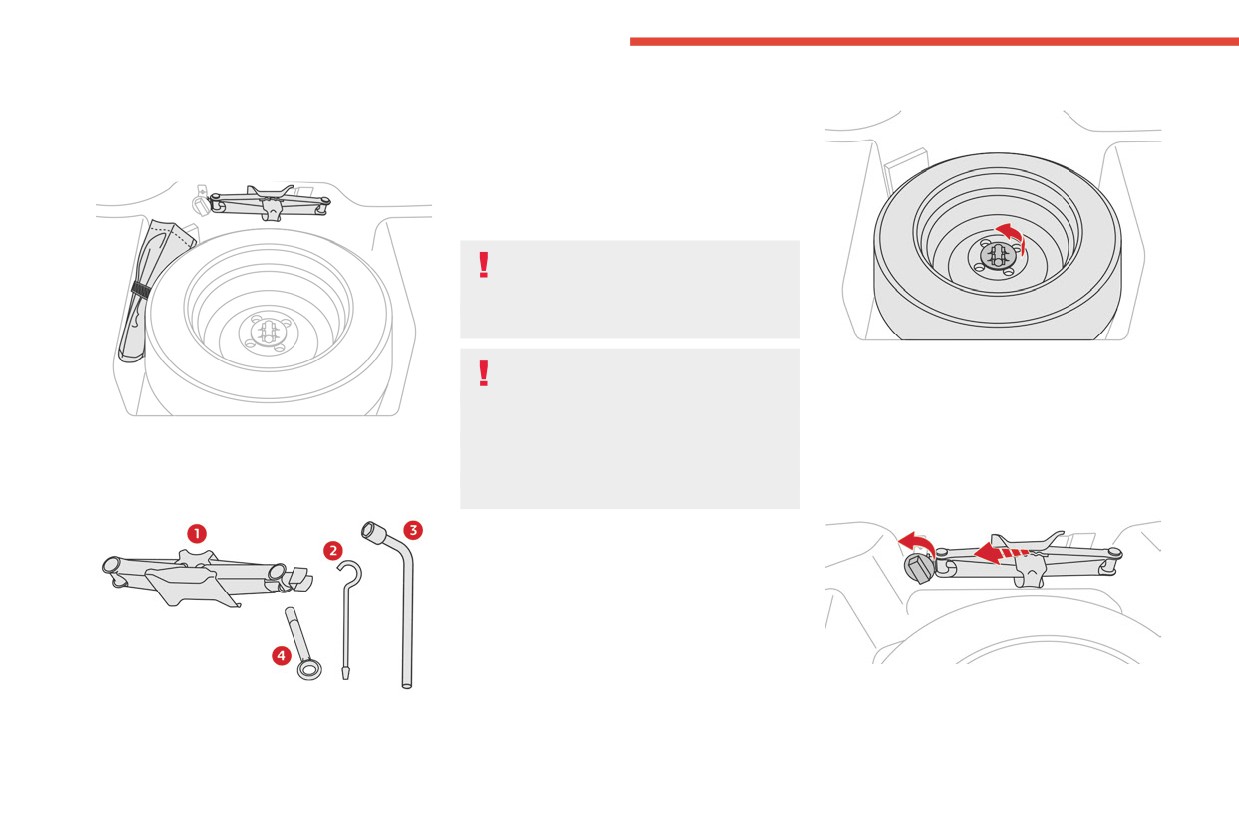
In the event of a breakdown
Tool kit
2. Jack handle
Removing the spare wheel
3. Wheel wrench
Set of tools supplied with the vehicle.
To remove the wheel bolts.
4. Removable towing eye
Accessing the tools
For more information on Towing the vehicle
and using the removable towing eye, refer to the
corresponding section.
These tools are specific to the vehicle
and may vary according to the level of
equipment.
Do not use them for any other purpose.
The jack must only be used to change a
► Rotate the fixing screw to unlock the spare
wheel with a damaged or punctured tyre.
wheel.
Do not use any jack other than the one
► Lift the spare wheel towards you from the
supplied with the vehicle.
rear.
The tools are located under the boot floor carpet,
If the vehicle does not have its original jack,
► Take the wheel out of the boot.
with the spare wheel.
contact a CITROËN dealer.
Removing the jack
List of tools
The jack does not require any maintenance.
Spare wheel
Access to the spare wheel
The spare wheel is installed in the boot, under
the floor carpet.
► Rotate the fixing screw to unlock the jack on
one end.
1. Jack
► Tilt the jack towards the right and lift it from
To raise the vehicle.
the rear.
42
CarManuals2.co
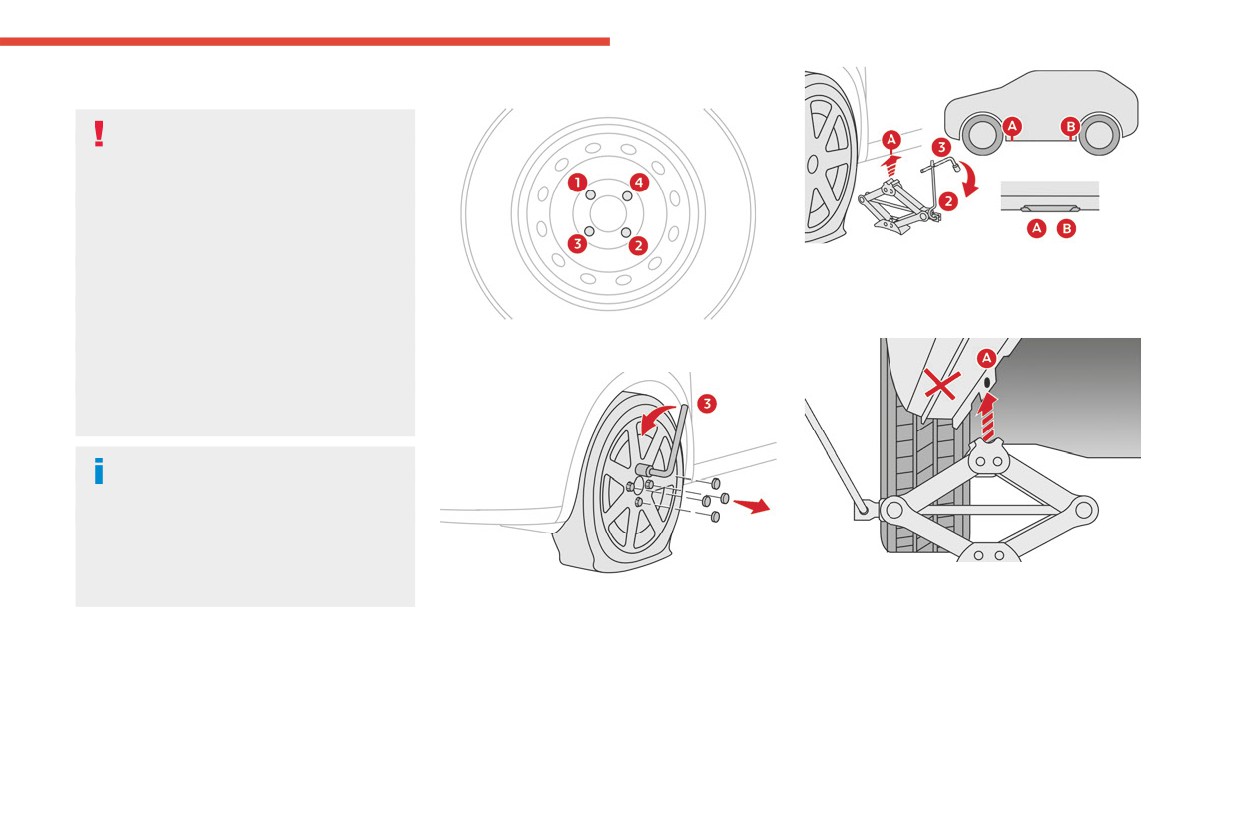
In the event of a breakdown
Removing a wheel
Wheel nuts removing pattern
8
Parking the vehicle
Immobilise the vehicle where it does
not obstruct traffic: the ground must be level,
stable and non-slippery.
With a manual gearbox, engage first gear to
lock the wheels, apply the parking brake and
switch off the ignition.
► Place the foot of jack 1 on the ground and
Check for the fixed illumination of the parking
ensure that it is directly below the front A or
brake indicator lamps in the instrument panel.
rear B jacking point on the underbody, whichever
The occupants must get out of the vehicle
is closest to the wheel to be changed.
and wait where they are safe.
► Loosen the nuts on the wheel in diagonal
If necessary, place a chock under the wheel
sequence. Do not remove wheel nuts.
diagonally opposite the wheel to be changed.
Never go underneath a vehicle raised using a
jack; use an axle stand.
Wheel with wheel trim
When removing the wheel, first remove
the wheel trim by pulling at the valve aperture.
When refitting the wheel, refit the wheel
trim, starting by placing its aperture in line
with the valve and then pushing it into place
► Extend jack 1 with the jack handle 2 and
all round its edge with the palm of your hand.
► Slacken the bolts using the wheel wrench 3
wheel wrench 3 until its head comes into contact
only.
with jacking point A or B; contact area A or B
on the vehicle must be properly inserted into the
central part of the head of the jack.
► Raise the vehicle until there is sufficient
space between the wheel and the ground to
admit the spare (not punctured) wheel easily.
43
CarManuals2.co
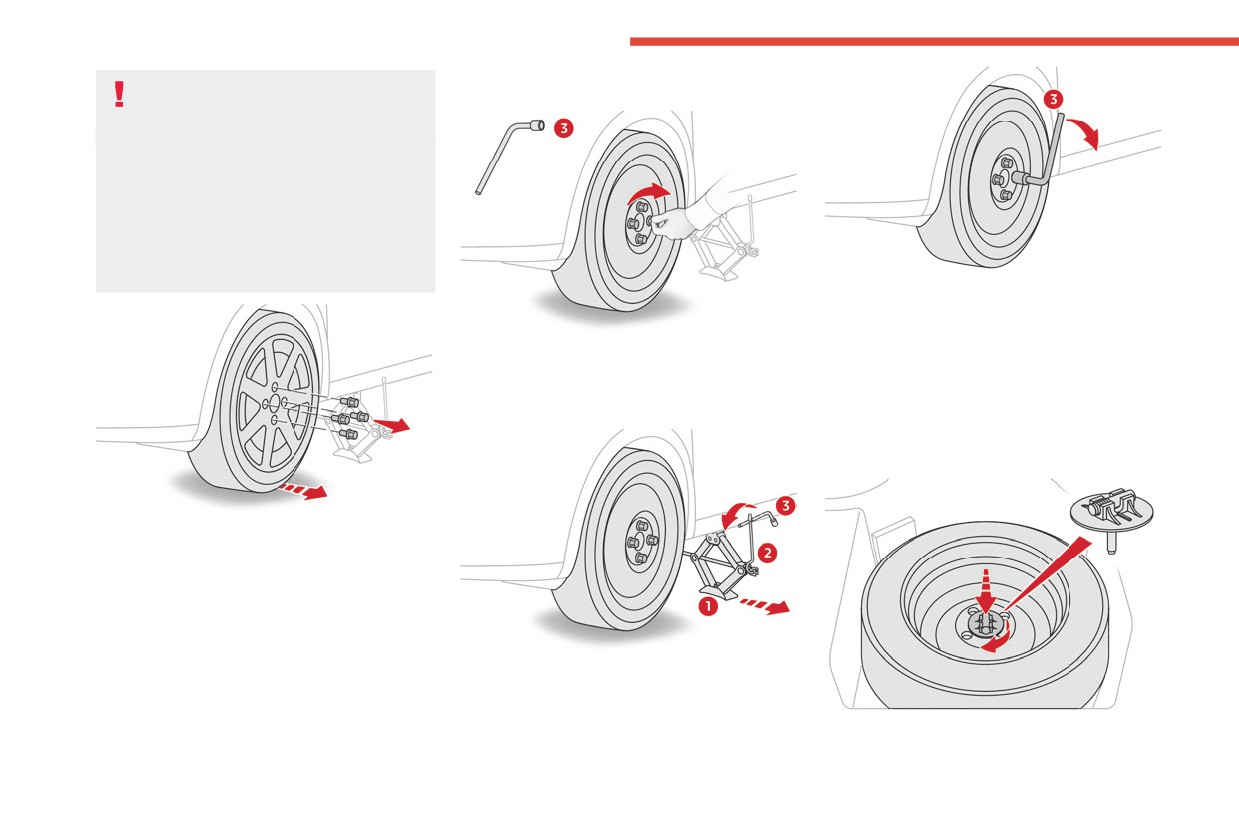
In the event of a breakdown
Ensure that the jack is stable. If the
Fitting a wheel
ground is slippery or loose, the jack may
slip or collapse - risk of injury!
Take care to position the jack strictly at
one of the jacking points A or B under the
vehicle, ensuring that the head of the jack is
centred under the contact area of the vehicle.
Otherwise, there is a risk of damage to the
vehicle and/or of the jack collapsing - risk of
injury!
► Tighten the bolts using the wheel wrench 3
only.
► Fit the wheel on the hub.
► Refit the bolt cover (depending on
► Screw in the bolts by hand as far as possible.
equipment).
► Pre-tighten the bolts using the wheel wrench
► Store the tools.
3 only.
Putting the spare wheel
back in place
► Remove the bolts and store them in a clean
place.
► Remove the wheel.
► Lower the vehicle again fully.
► Fold jack 1 and remove it.
► Put the spare wheel back in its housing.
44
CarManuals2.co
In the event of a breakdown
► Tighten the spare wheel fixing screw by a few
the same time, check that the tire is stored
lamp has been switched off for several
8
turns.
securely. If it is not, tighten it.
minutes - risk of serious burns!
Note that two or more temporary spare
Do not touch the bulb directly with your
After changing a wheel
wheels should not be used on one vehicle
fingers; use a lint-free cloth.
simultaneously.
It is essential only to use anti-ultraviolet
The temporary spare wheel is only
(UV) type bulbs, so as not to damage the
intended for temporary emergency use,
headlamp.
until the conventional wheel can be repaired
Changing a bulb
Always replace a failed bulb with a new bulb
or replaced.
of the same type and specification. To avoid
Continuous use of this spare can result in tire
In some weather conditions (e.g. low
lighting imbalance, replace the bulbs in pairs.
failure and loss of control. Always observe
temperature or humidity), misting on the
these precautions when using this spare:
internal surface of the glass of the headlamps
Refitting the lamp units
- Your vehicle will respond differently with
and rear lamps is normal, and will disappear
Perform the operations in the reverse
this temporary spare.
after the lamps have been on for a few
order to dismantling.
- Do not exceed 80 km/h speed.
minutes.
- Replace this spare with a standard tire and
wheel as soon as possible.
Opening the bonnet / Accessing the
The headlamps have polycarbonate
bulbs
- Use of this spare will reduce ground
lenses with a protective coating:
With the engine warm, proceed with caution -
clearance.
- Do not clean them with a dry or abrasive
risk of burns!
- Set the specified tire pressure indicated
cloth, nor with detergent or solvent
Take care with objects or clothing that could
on the tire information label located on the
products.
be caught in the blades of the cooling fan -
driver's door lock pillar.
- Use a sponge and soapy water or a pH
risk of strangulation!
- Do not use tire chains on the temporary
neutral product.
spare. If you must use tire chains, rearrange
- When using a high-pressure washer on
the wheels so standard tires and wheels are
persistent marks, do not keep the lance
fitted to the front axle.
directed towards the headlamps, lamps or
- The temporary spare wheel has a much
their edges for too long, so as not to damage
shorter tread life than the conventional wheels
their protective coating and seals.
on your vehicle. Replace the tire as soon as
possible as the tread wear indicator appears.
Halogen bulbs (Hx)
The inflation pressure of the temporary spare
Changing a bulb must only be done with
To ensure good quality lighting, check
wheel should be checked at least monthly. At
the ignition off and after the headlamp /
that the bulb is correctly positioned in its
housing.
45
CarManuals2.co
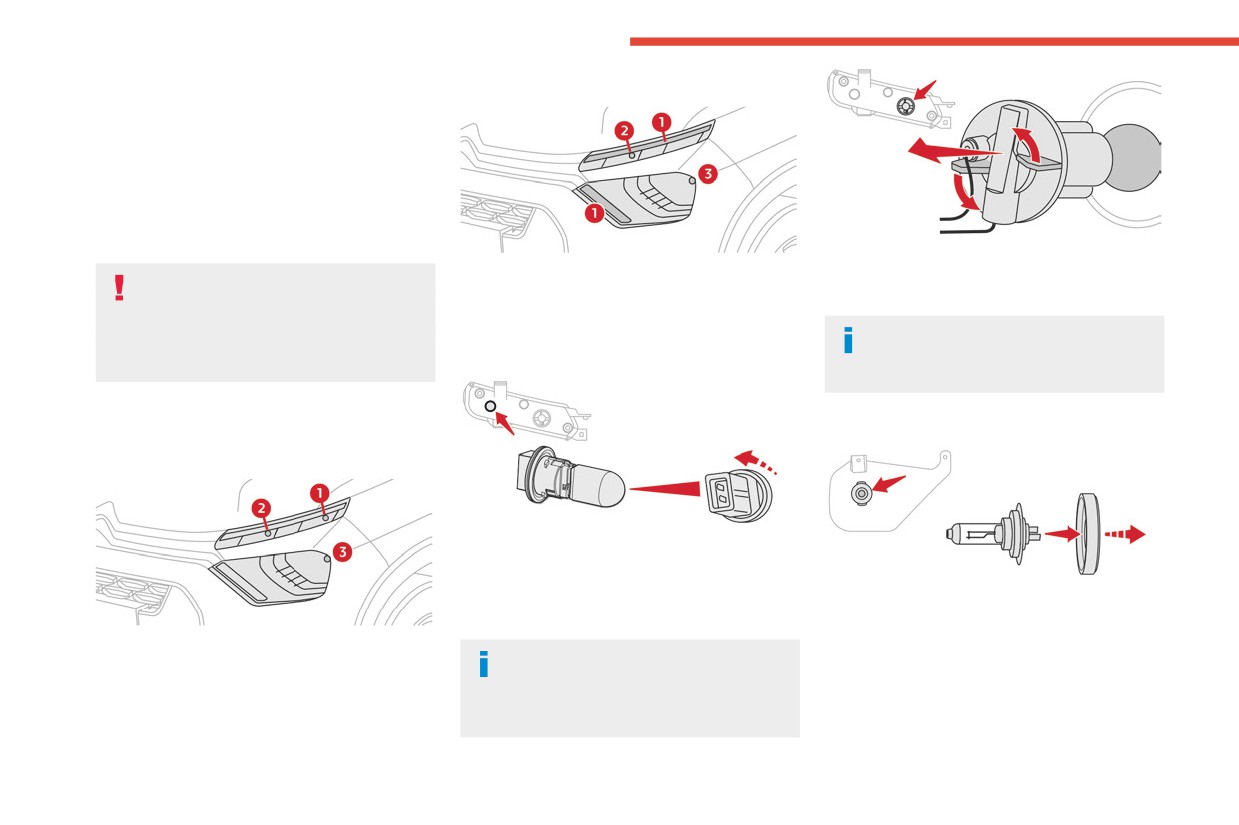
In the event of a breakdown
Light-emitting diode (LED)
Model 2
headlamps and lamps
Depending on version, the affected types of
headlamps / lamps are:
- Daytime running lamps / sidelamps.
- Direction indicator side repeaters.
- Third brake lamp.
- Number plate lamps.
► Turn the bulb holder a eighth of a turn anti-
1. Daytime running lamps/sidelamps (LED)
Light emitting diodes (LED)
clockwise and remove it.
2. Direction indicators (PY21W - 12V - 21W)
For the replacement of this type of bulb,
► Remove the bulb and replace it.
3. Beam headlamps (H4 - 12V - 60/55W)
you must contact a CITROËN dealer.
Amber coloured bulbs, such as the
Do not touch the LED technology lamps - risk
Daytime running lamps/sidelamps
direction indicators, must be replaced by
of electrocution!
bulbs with identical colour and specifications.
Front lamps
Beam headlamps
Model 1
► Turn the bulb holder a quarter of a turn and
pull it out.
► Pull the bulb out and change it.
► Remove the protective cover by pulling on
Direction indicators
the tab.
1. Daytime running lamps/sidelamps (W5W
► Disconnect the bulb connector.
Rapid flashing of a direction indicator
► Release the retaining tab.
bulb)
lamp (left or right) indicates that one of
► Change the bulb taking care to align the
2. Direction indicators (PY21W - 12V - 21W)
the bulbs on the corresponding side has
metal part with the grooves on the lamp.
3. Beam headlamps (H4 - 12V - 60/55W)
failed.
► Reposition the retaining tab.
► Reconnect the bulb connector.
46
CarManuals2.co
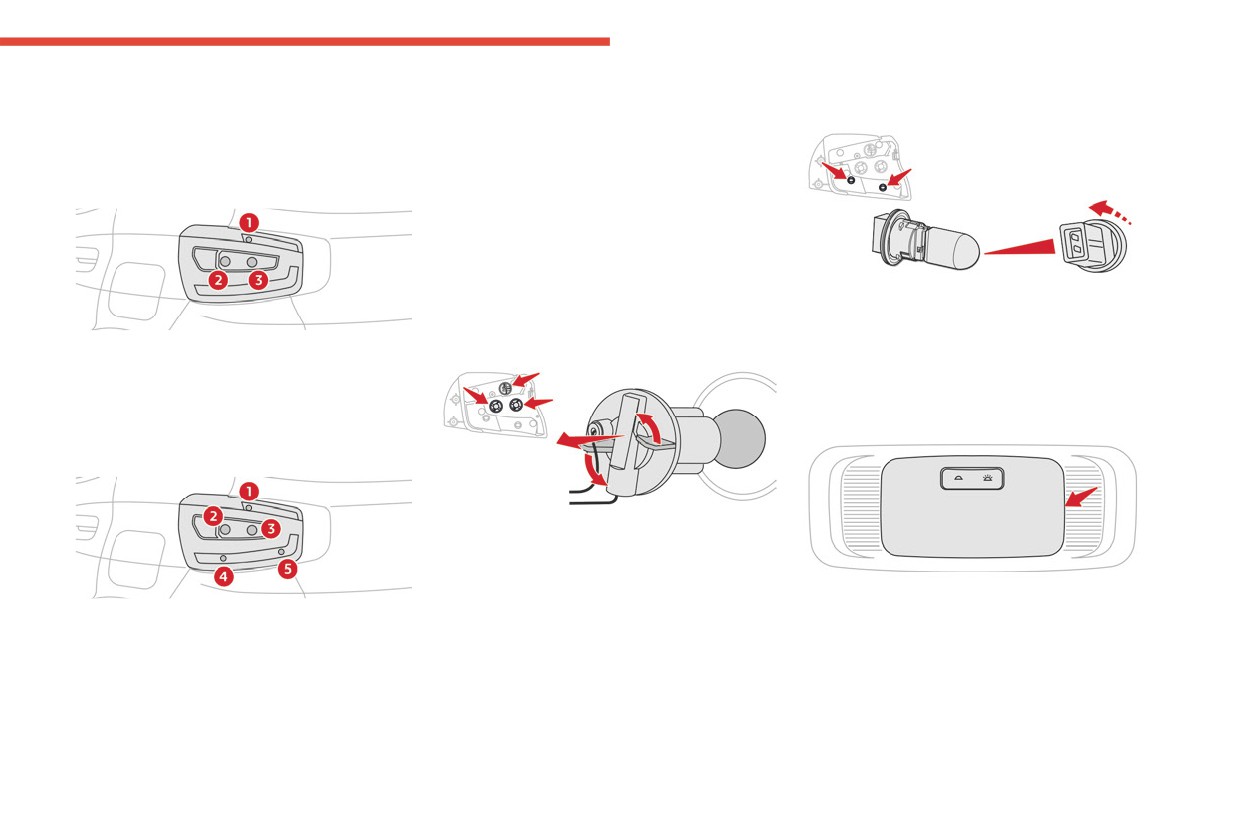
In the event of a breakdown
► Ensure that the cover is refitted correctly all
Changing bulbs
Additional sidelamps / Connecting tail
8
around to ensure correct sealing.
These bulbs are changed after removing the tail
lamps (if equipped)
lamp assembly.
Rear lamps
► Open the boot.
► Unscrew the nut and remove it. Be careful
Model 1
not to drop it inside the wing.
► Unclip the lamp unit and carefully extract it
pulling straight towards the outside.
A standard pair of pliers or the wheel wrench
(depending on equipment) may be necessary to
► Turn the bulb holder a quarter of a turn and
remove the nut.
pull it out.
Sidelamps/Brake lamps / Reversing lamp /
► Pull the bulb out and change it.
1. Sidelamps / Brake lamps
Direction indicators
(P21/5W - 12V - 21W/5W)
Interior lighting
2. Direction indicators (PY21W - 12V - 21W)
3. Reversing lamp (P21W - 12V - 21W)
Courtesy lamp (10W - 12V - 10W)
Model 2
► Turn the bulb holder a eighth of a turn anti-
clockwise and remove it.
► Remove the bulb and replace it.
► Using a thin, flap tip screwdriver, unclip the
1. Sidelamps / Brake lamps
entire console surrounding the courtesy lamp.
(P21/5W - 12V - 21W/5W)
► Remove the defective bulb and replace it.
2. Direction indicators (PY21W - 12V - 21W)
► Fit the console back into place around the
3. Reversing lamp (P21W - 12V - 21W)
courtesy lamp and clip it correctly.
4. Additional sidelamps (W3W - 12V - 3W)
5. Connecting tail lamps (W3W - 12V - 3W)
47
CarManuals2.co
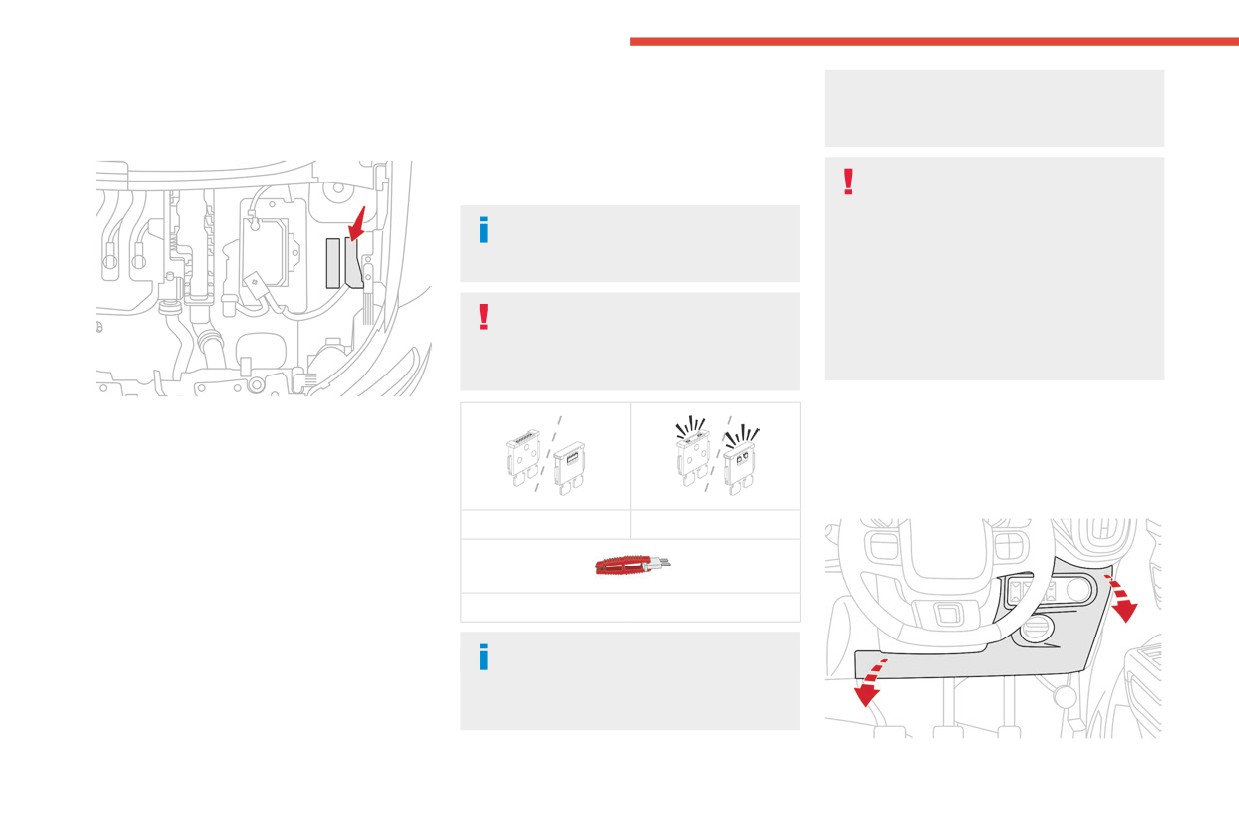
In the event of a breakdown
► Always replace the failed fuse with a fuse of
Before installing other electrical equipment
Changing a fuse
the same rating (same colour); use of a different
or accessories to your vehicle, contact a
rating may cause malfunctions - risk of fire!
CITROËN dealer.
Access to the tools
If the fault recurs soon after replacing a fuse,
have the electrical system checked by a
CITROËN accepts no responsibility for
CITROËN dealer.
the cost incurred in repairing the vehicle
or for rectifying malfunctions resulting from
The fuse allocation tables and the
the installation of accessories not supplied or
corresponding diagrams are available
not recommended by CITROËN and not
from a CITROËN dealer.
installed in accordance with its
recommendations, in particular when the
The replacement of a fuse not shown in
combined power consumption of all of the
the allocation tables may cause a serious
additional equipment connected exceeds 10
malfunction of the vehicle. Contact a
milliamperes.
CITROËN dealer.
The puller is located inside the engine fuse box.
Dashboard fuses
► Open the bonnet.
The fusebox is placed in the lower dashboard
► Disengage the cover completely.
(right-hand side).
► Take the puller from its housing.
Access to the fuses
Changing a fuse
Good
Faulty
Before changing a fuse:
► Identify the cause of the fault and fix it.
► Switch off all power consumption.
► Identify the defective fuse using the current
Puller
allocation tables and diagrams.
To replace a fuse, it is essential to:
Installing electrical accessories
► Use the special puller to extract the fuse
The vehicle's electrical system is
from its housing and check the condition of its
designed to operate with standard or optional
filament.
equipment.
48
CarManuals2.co

In the event of a breakdown
► Unclip the cover by pulling at the top left, then
8
right.
Version 1
Fuse No.
Colour
Rating (A)
Functions
FF01
Red
10
On-board diagnosis (OBD-II) / Spare connector
FF02
Yellow
20
Body control and cluster module 1 (BCCM-1)
FF03
Green
30
Body control and cluster module 2 (BCCM-2)
FF04
Yellow
20
Body control and cluster module 3 (BCCM-3)
FF07
Blue
15
12 V Socket
FF08
Tan
5
Cabin lamp / Spare connector
FF09
Blue
15
Front wiper and washer
FF10
Tan
5
ECU's ignition
FF12
Tan
5
Airbag ECU
FF10
Tan
5
Switches ignition
FF
Tan
5
Service
FF
Red
10
Service
FF
Blue
15
Service
FS01
Pink
30
Body Control & Cluster Module 5 (BCCM-5)
Relays
Relay
Colour
Rating (A)
Functions
MICRO
Brown
20
Ignition Loads
49
CarManuals2.co

In the event of a breakdown
Version 2
Fuses
Fuse No.
Colour
Rating (A)
Functions
FF01
Red
10
On-board diagnosis (OBD-II)
FF02
Yellow
20
Body control and cluster module 1 (BCCM-1)
FF03
Green
30
Body control and cluster module 2 (BCCM-2)
FF04
Yellow
20
Body control and cluster module 3 (BCCM-3)
FF05
Green
30
Body control and cluster module 4 (BCCM-4)
FF06
Blue
15
Audio system
FF07
Blue
15
12V Socket
FF08
Tan
5
Spare connector / USB
FF09
Red
10
Front washer
FF10
Tan
5
ECU's ignition
FF11
Tan
5
Airbag ECU
FF12
Tan
5
Switches ignition
FF
Tan
5
Service
FF
Red
10
Service
FF
Blue
15
Service
FS01
Pink
30
Body control and cluster module 5 (BCCM-5)
FS02
Pink
30
Body control and cluster module 6 (BCCM-6)
50
CarManuals2.co
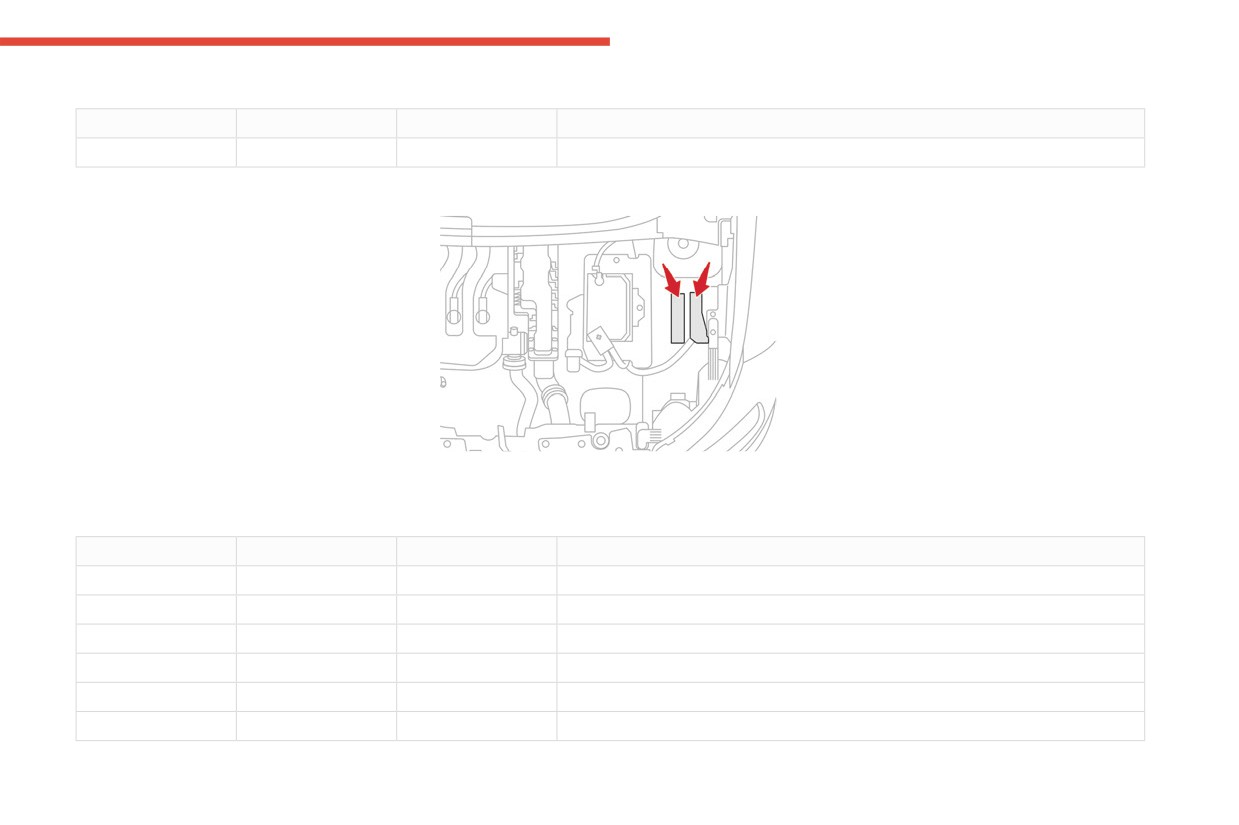
In the event of a breakdown
Relays
8
Relay
Colour
Rating (A)
Functions
MICRO
Brown
20
Ignition Loads
Access to the fuses
► Remove the cover.
Engine compartment fuses
► Change the fuse.
The fusebox is placed in the engine
► When you have finished, close the cover
compartment near the battery.
carefully then engage the two latches, to ensure
correct sealing of the fusebox.
Version 1
Engine fuse cum relay box
Fuse No.
Colour
Rating (A)
Functions
FF01
Green
30
ABS ECU
FF02
Red
10
HVAC Compressor
FF03
Red
10
Horn
FF04
Green
30
ECM Loads (Ignition Coil / Injectors / Fuel Pump)
FF05
Blue
15
ECM Loads (Canister Valve / O2 Sensors)
FF06
Tan
5
ECM Loads (VVT Valve)
51
CarManuals2.co

In the event of a breakdown
Fuse No.
Colour
Rating (A)
Functions
FF07
Yellow
20
ECM Power Supply
FF08
Tan
5
Radiator Fan Relay Coil Supply
FS01
Yellow
60
Cabin Fuse Bow Loads (CFB-1)
FS02
Yellow
60
Electric Power Steering (EPS) Motor
FS03
Green
40
ABS Motor
FS04
Green
40
Radiator fan
FS05
Green
40
Accessory load (HVAC Blower/Wiper/Washer)
FF
Green
30
Service
FF
Blue
15
Service
FF
Red
10
Service
Relay
Colour
Rating (A)
Functions
MICRO
Brown
20
HVAC Compressor
MICRO
Brown
20
Horn
MICRO
Brown
20
Starter Solenoid
MICRO
Grey
35
ECM Main
Version 2
Engine fuse cum relay box
Fuse No.
Colour
Rating (A)
Functions
FF01
Green
30
ABS ECU
FF02
Red
10
HVAC Compressor
52
CarManuals2.co

In the event of a breakdown
Fuse No.
Colour
Rating (A)
Functions
8
FF03
Red
10
Horn
FF04
Green
30
ECM Loads (Ignition Coil / Injectors / Fuel Pump)
FF05
Blue
15
ECM Loads (Canister Valve / O2 Sensors)
FF06
Tan
5
ECM Loads (VVT Valve)
FF07
Yellow
20
ECM Power Supply
FF08
Tan
5
Radiator Fan Relay Coil Supply
FS01
Black
80
Cabin Fuse Box Loads (CFB-1)
FS02
Yellow
60
Electric Power Steering (EPS) Motor
FS03
Green
40
ABS Motor
FS04
Green
40
Radiator Fan
FS05
Green
40
Accessory Load (HVAC Blower/Washer)
FF
Green
30
Service
FF
Blue
15
Service
FF
Red
10
Service
Relay
Colour
Rating (A)
Functions
MICRO
Brown
20
HVAC Compressor
MICRO
Brown
20
Horn
MICRO
Brown
20
Starter Solenoid
MICRO
Grey
35
ECM Main
53
CarManuals2.co

In the event of a breakdown
Engine fuse cum relay box turbo
Fuse No.
Colour
Rating (A)
Functions
FF01
Green
30
ABS ECU
FF02
Red
10
HVAC Compressor
FF03
Red
10
Horn
FF04
Green
30
ECM Loads (Ignition Coil / Fuel Pump)
FF05
Blue
15
ECM Loads (Canister Valve / O2 Sensors)
FF06
Blue
15
ECM Loads (VVT / Thermostat / Oil Pump Valve)
FF07
Yellow
20
ECM Power Supply & Injectors
FF08
Tan
5
Radiator Fan Relay Coil Supply
FS01
Black
80
Cabin Fuse Box Loads (CFB-1)
FS02
Yellow
60
Electric Power Steering (EPS) Motor
FS03
Green
40
ABS Motor
FS04
Yellow
60
Radiator Fan
FS05
Green
40
Accessory Load (HVAC Blower/Washer)
FF
Green
30
Service
FF
Blue
15
Service
FF
Red
10
Service
Relay
Colour
Rating (A)
Functions
MICRO
Brown
20
HVAC Compressor
MICRO
Brown
20
Horn
MICRO
Brown
20
Starter Solenoid
MICRO
Grey
35
ECM Main
54
CarManuals2.co

In the event of a breakdown
Engine relay box
8
Version 1
Fuse No.
Colour
Rating (A)
Functions
FS06
Green
40
Cabin Fuse Box Loads (CFB-2)
Relay
Colour
Rating (A)
Functions
MINI
Grey
40
Radiator Fan
MINI
Grey
40
Accessory load (HVAC Blower/Wiper/Washer)
MAXI
Grey
70
ECM Power
Version 2
Fuse No.
Colour
Rating (A)
Functions
FS06
Green
40
Cabin Fuse Box Loads (CFB-2)
Relay
Colour
Rating (A)
Functions
MINI
Grey
40
Radiator Fan
MINI
Grey
40
Accessory load (HVAC Blower/Washer)
MAXI
Grey
70
ECM Power
Engine relay box turbo
Fuse No.
Colour
Rating (A)
Functions
FS06
Green
40
Cabin Fuse Box Loads (CFB-2)
FF09
Blue
15
ECM Loads (Electric Dump Valve / Blow-by Heater)
FF10
Tan
5
Battery Sensor (BECB)
FF11
Black
1
ECM Main Relay Coil Control (Diode)
55
CarManuals2.co
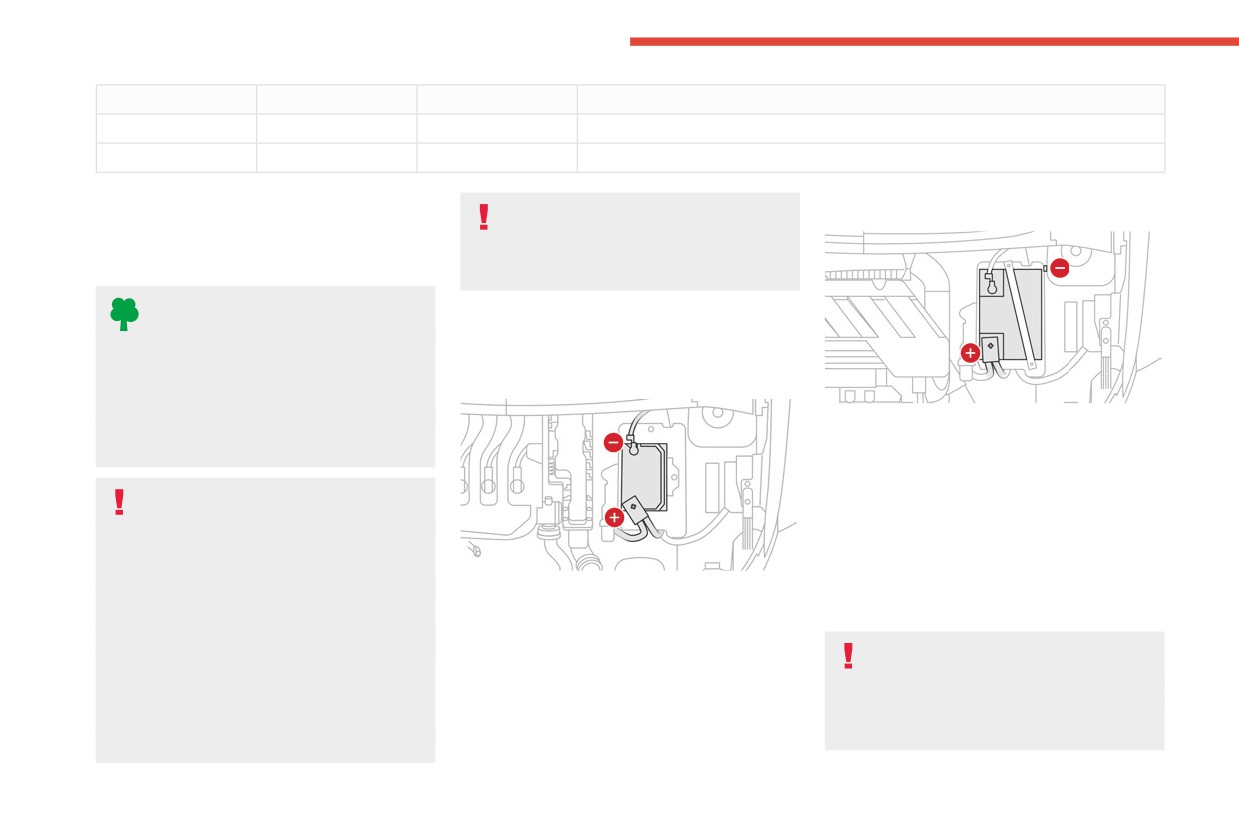
In the event of a breakdown
Relay
Colour
Rating (A)
Functions
MINI
Grey
40
Accessory load (HVAC Blower/Washer)
MAXI
Grey
70
ECM Power
If the battery fails (after warranty
Turbo engine version
12 V battery
coverage), replace it with a battery of the
same specification as the one used in the
Lead-acid starter batteries
vehicle.
These batteries contain harmful
substances (sulphuric acid and lead).
Access to the battery
They must be disposed at authorized dealer/
The battery is located under the bonnet.
battery shop in accordance with regulations
Naturally Aspirated engine version
and must never under any circumstances be
discarded with household waste.
(+) Positive terminal.
Take used remote control batteries and
(-) Negative terminal.
vehicle batteries to a special collection point.
A remote earth point is located near the battery.
Protect your eyes and face before
Starting using another
handling the battery.
battery
Use goggles and gloves while working with
the battery. Diluted sulphuric acid spilled from
If the vehicle's battery is flat/drain/discharged,
battery can cause blindness or severe burns.
the engine can be started using a backup battery
(+) Positive terminal.
Flush eyes or body with ample water and get
(either external or from another vehicle) and
(-) Negative terminal.
medical care immediately if suffered.
jump leads or using a battery booster.
Keep batteries out of the reach of children.
Never start the engine by connecting a
All operations on the battery must be carried
battery charger.
out in a well ventilated area and away from
Never use a 24 V or higher battery booster.
naked flames and sources of sparks, so as to
Check beforehand that the backup battery
avoid any risk of explosion or fire.
has a nominal voltage of 12 V and a capacity
Wash your hands afterwards.
56
CarManuals2.co
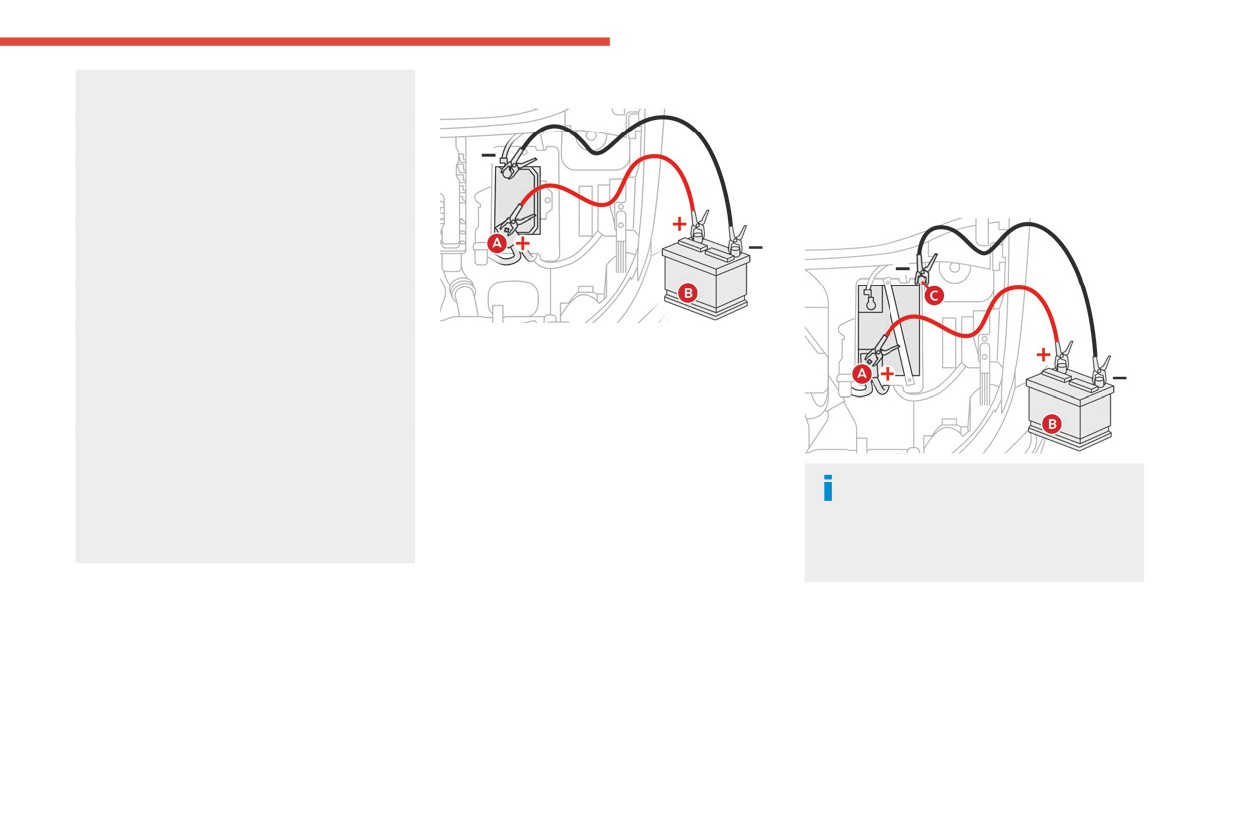
In the event of a breakdown
at least equal to that of the discharged
For Naturally Aspirated engine version
► Refit the cover to the (+) terminal, if the
8
battery.
vehicle has one.
The two vehicles must not be in contact with
► Allow the engine to run for at least
each other.
30 minutes, with the vehicle stationary, so that
Switch off all electricity-consuming equipment
the battery reaches an adequate state of charge.
on both vehicles (audio system, wipers,
For Turbo engine version
lighting, etc.).
Make sure that the jump leads are well away
from the engine’s moving parts (fan, belt,
etc.).
Do not disconnect the (+) terminal while the
engine is running.
During jump start, extra care should be taken
► Lift the cover on the (+) terminal, if the vehicle
to ensure right terminals are connected. If
has one.
terminal connections are reversed, it will
► Connect the red cable to the (+) terminal
lead to failure of alternator & other electrical,
of flat battery A, then to the (+) terminal of the
electronic components.
backup battery B or of the booster.
Never power electrical or electronic
► Connect one end of the green or black cable
components directly from battery terminals
to the (-) terminal of the backup battery B or of
as it will lead to poor battery charging, poor
the booster (or to an earth point on the assisting
The negative cable must be connected to
performance of components and battery
vehicle).
the car ground (not to the battery
sensor malfunction, which will impact fuel
► Connect the other end of the green or black
negative terminal) so that the battery sensor
economy.
cable to the (-) terminal of flat battery A.
can detect all charging and discharging
► Start the engine on the assisting vehicle and
currents.
leave it running for a few minutes.
► Lift the cover on the (+) terminal, if the vehicle
► Operate the starter on the broken down
has one.
vehicle and let the engine run.
► Connect the red cable to the (+) terminal of
If the engine does not start immediately, switch
flat battery A (at the metal elbow), then to the
off the ignition and wait a few moments before
(+) terminal of the backup battery B or of the
trying again.
booster.
► Wait for it to return to idle.
► Connect one end of the green or black cable
► Disconnect the jump leads in reverse order:
to the (-) terminal of the backup battery B or of
first remove (-) terminal then (+) terminal.
57
CarManuals2.co
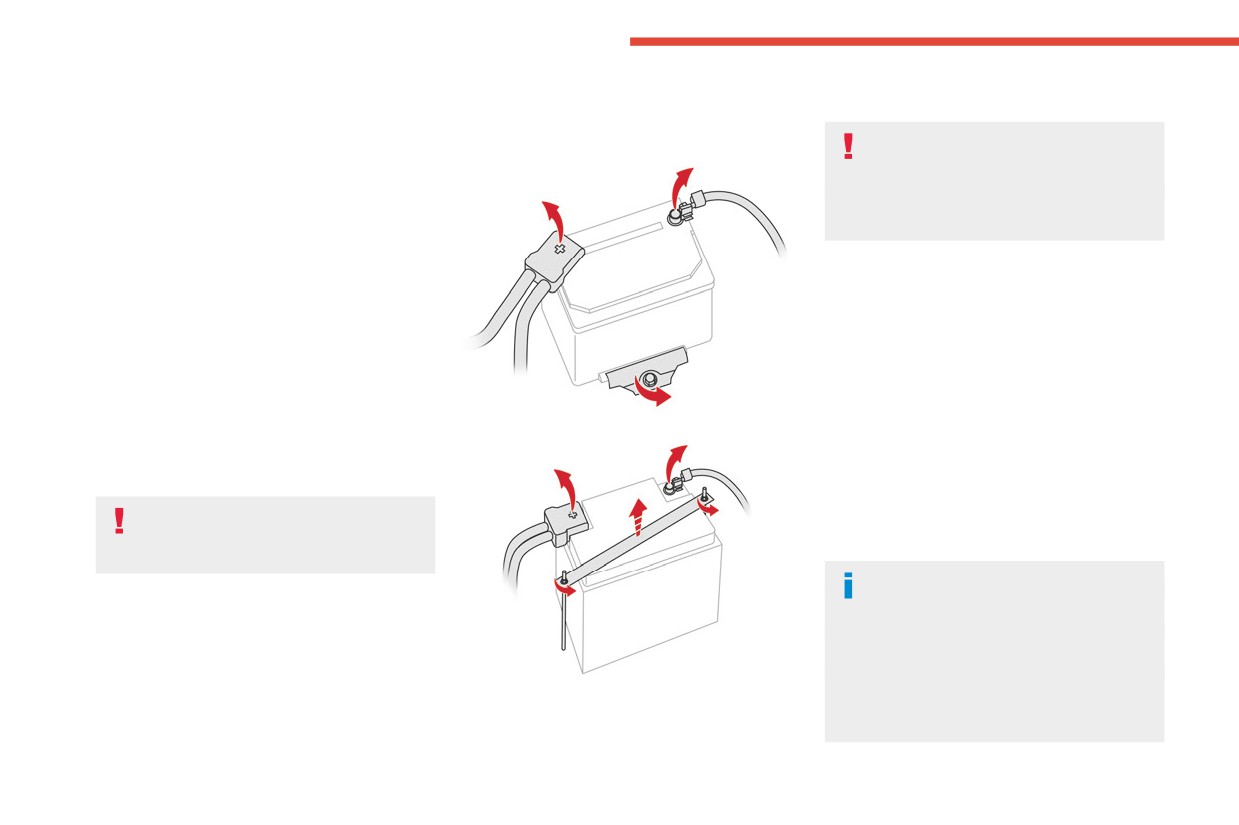
In the event of a breakdown
the booster (or to an earth point on the assisting
► Close all openings (doors, boot, windows).
► Remove the mounting bracket if you need to
vehicle).
► Switch off all electrical consumers (audio
remove the battery.
► Connect the other end of the green or black
system, wipers, lighting, etc.).
Be careful not to cause accidental short
cable to the earth point C on the broken down
► Switch off the ignition and wait for 4 minutes.
circuits between the positive and
vehicle.
negative battery terminals.
► Start the engine on the assisting vehicle and
Do not allow smoking, sparks or flames
leave it running for a few minutes.
around fuel or the battery.
► Operate the starter on the broken down
vehicle and let the engine run.
If the engine does not start immediately, switch
After reconnection
off the ignition and wait a few moments before
After reconnecting the battery, turn on the
trying again.
ignition and wait 1 minute before starting the
► Wait for it to return to idle.
engine, to enable the electronic systems to
► Disconnect the jump leads in reverse order:
initialise.
first remove (-) terminal then (+) terminal..
If minor problems nevertheless persist following
► Refit the cover to the (+) terminal, if the
this operation, contact a CITROËN dealer.
vehicle has one.
Referring to the relevant section, initialise or
Naturally Aspirated engine version
► Allow the engine to run for at least
reset certain equipment:
30 minutes, with the vehicle stationary, so that
- Date and time.
the battery reaches an adequate state of charge.
- Preset radio stations.
Driving immediately without having
reached a sufficient level of charge may
Towing the vehicle
affect some of the vehicle's functionalities.
General recommendations
Observe the legislation in force in the
Disconnecting/removing the
country where you are driving.
battery
Ensure that the weight of the towing vehicle is
In order to maintain an adequate state of charge
higher than that of the towed vehicle.
for starting the engine, it is recommended that
The driver must remain at the wheel of the
Turbo engine version
the battery be disconnected if the vehicle is
towed vehicle and must have a valid driving
► Disconnect the negative cable.
taken out of service for a long period.
licence.
► Disconnect the positive cable.
Before disconnecting the battery:
58
CarManuals2.co
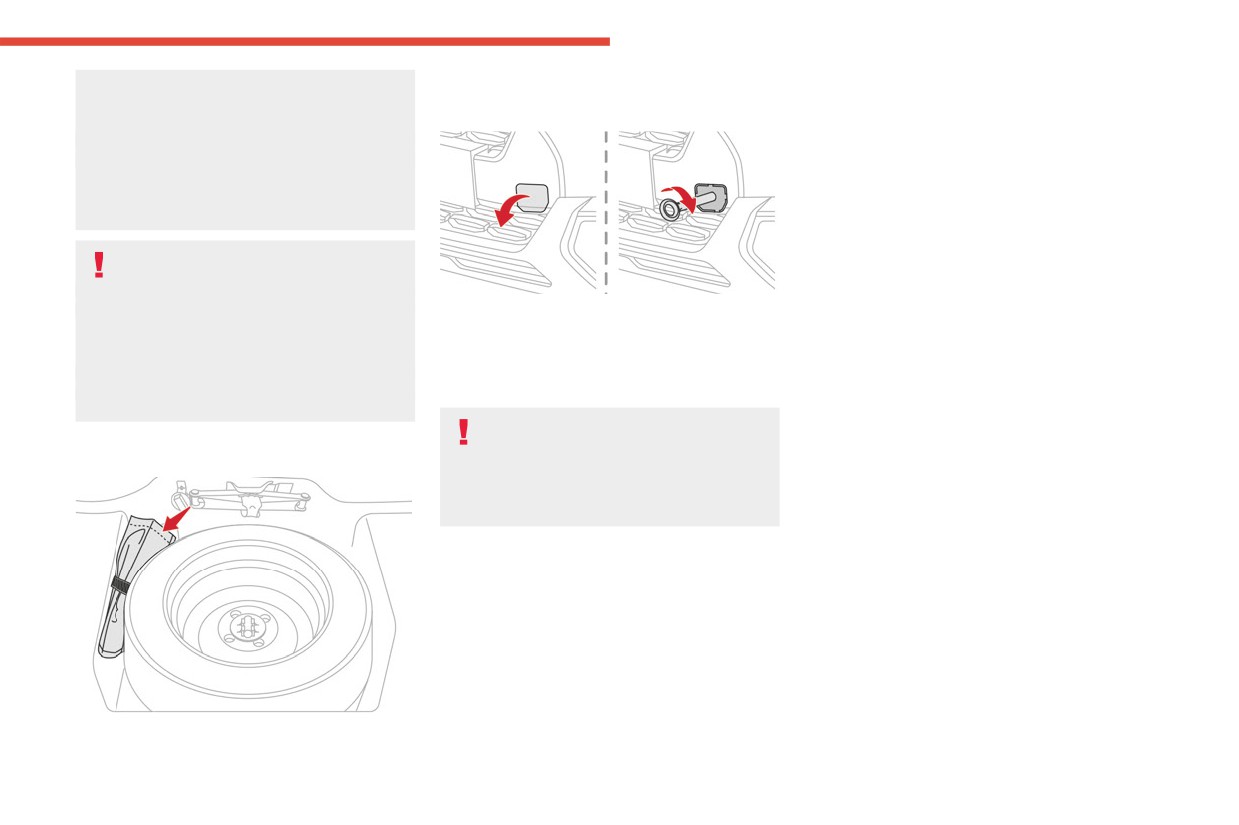
In the event of a breakdown
When towing a vehicle with all four wheels on
Towing your vehicle
8
the ground, always use an approved towing
To access the front screw thread:
arm; rope and straps are prohibited.
The towing vehicle must move off gently.
When the vehicle is towed with its engine
off, there is no longer braking and steering
assistance.
A professional towing service must be
called if:
- Broken down on a motorway or main road.
► Remove the cover.
- Not possible to put the gearbox into neutral,
To be towed:
unlock the steering, or release the parking
► Screw the towing eye in fully.
brake.
► Install the towbar.
- Towing with only two wheels on the ground.
► Put the gearbox into neutral.
- No approved towbar available.
Failure to observe this instruction could
result in damage to certain components
Access to the tools
(braking, transmission, etc.) and to the
absence of braking assistance the next time
the engine is started.
► Unlock the steering and release the parking
brake.
► Switch on the hazard warning lamps on both
vehicles.
► Move off gently, drive slowly and only for a
short distance.
The towing eye is stored under the boot floor
carpet.
59
CarManuals2.co
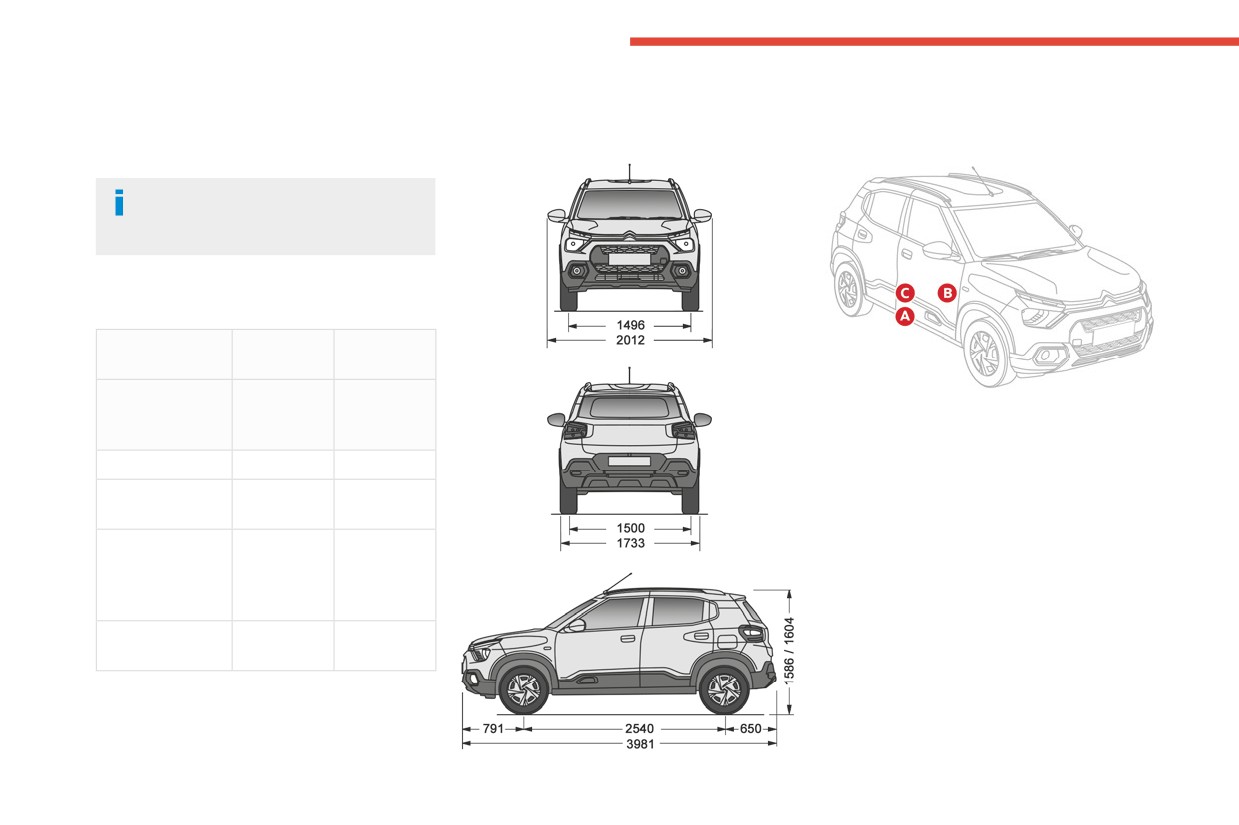
Technical data
Engines technical data
Dimensions (mm)
Identification markings
The engine characteristics are given in the
These dimensions have been measured on an
Various visible markings for the identification and
vehicle's registration document, as well as in
unladen vehicle.
research of your vehicle.
sales brochures.
The maximum power corresponds to the
value type-approved on a test bed, under
conditions defined as per AIS 137 (Part 5).
For more information, contact a CITROËN
dealer.
Engine
EB2NA
EB2ADTM
engine
engine
Gearbox
MA5
MB6
(Manual
(Manual
A. Vehicle identification number (VIN), BSO
5-speed)
6-speed)
(Body Side Outer) Front Panel RH
Stamped on BIW.
Cubic capacity
1 199 cc
1 199 cc
Bears the following information:
Max. power
60 kW at
81 kW at
- Manufacturer's name.
5750 rpm
5500 rpm
- VIN number.
- Model.
Fuel
BSVI
BSVI
- Engine number.
Commercial
Commercial
B. Chassis number, Seat Cross Member
Gasoline
Gasoline
Panel RH
Fuel
Fuel
Below driver seat.
Curb weight
L1-939 kg
L2-1035 Kg
L2-964 kg
60
CarManuals2.co
Technical data
C. Tyres label
9
Tyre Size
Tyre Position
Tyre Pressure
Normal Load
Full Load (GVW)
1 to 3 persons
4 to 5 persons
195/65 R15
Front
32 psi
36 psi
Rear
32 psi
36 psi
185/65 R15
Spare tyre 1 (Turbo)
36 psi
36 psi
165/80 R14
Spare tyre 2 (NA)
36 psi
36 psi
Fixed at the driver-side door.
Bears the following information about the tyres:
- Tyre pressures, unladen and laden.
- Tyre specification, made up of the dimensions
and type as well as the load and speed indices.
- Spare tyre inflation pressure.
The vehicle may be originally equipped
with tyres with higher load and speed
indices than those indicated on the label,
without affecting tyre pressure (on cold tyres).
61
CarManuals2.co
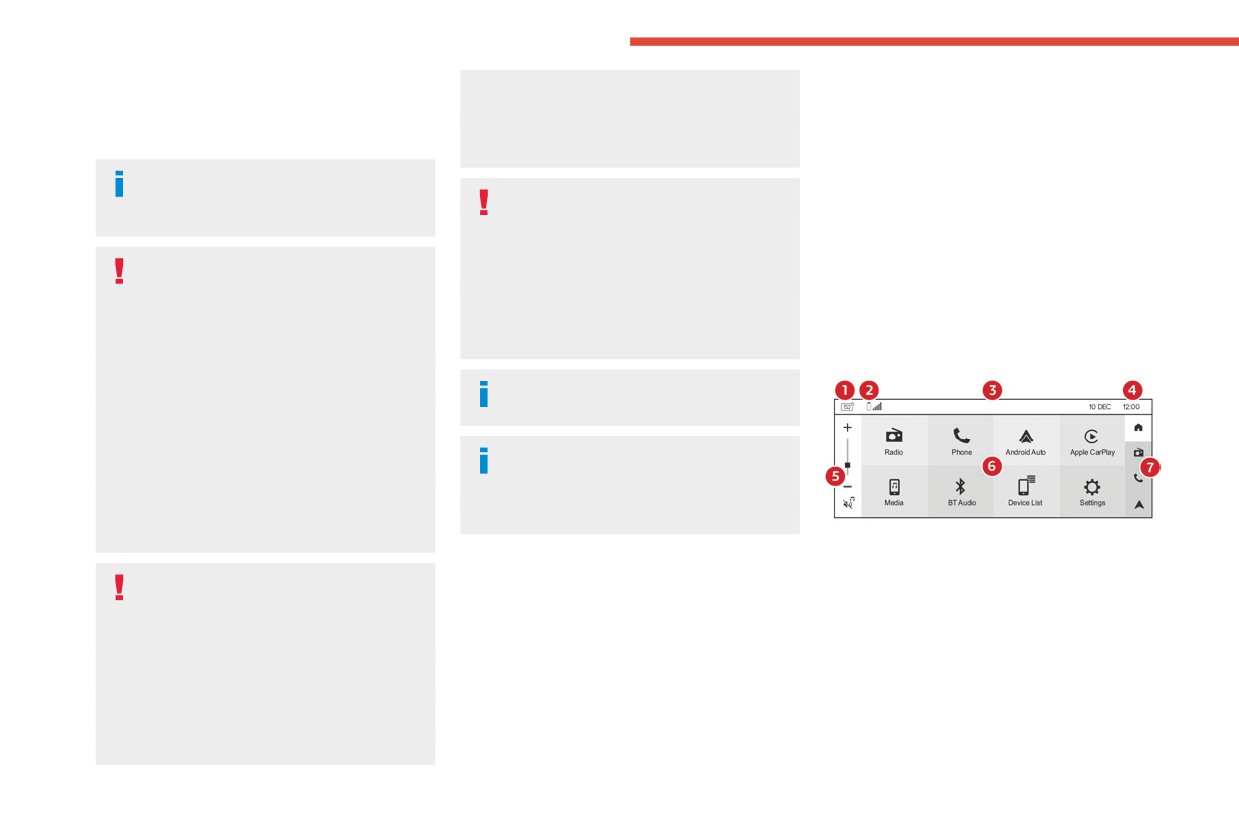
10" Touch Screen
- Changing the system settings and
By integrating with your Bluetooth®-enabled
10" Touch Screen
configuration.
phone, the touch screen provides easy
Some functions are not accessible when
interaction with audio, multimedia, navigation,
Multimedia audio system
driving.
and your phone's compatible applications.
Your system is equipped with a feature that
The functions and settings described
may vary according to the vehicle version
Overheating
allows you to access and control audio features
and configuration.
In very hot conditions, operation may be
for 60 minutes after you switch the ignition off
limited to protect the system (e.g. volume may
(until the doors are locked using the remote
be reduced). A warning message is displayed
control).
Driving while distracted can result in loss
on the screen.
of vehicle control, crash and injury. We
Layout of the touch screen
The system will resume normal operation
strongly recommend that you use extreme
when the temperature in the passenger
To operate the touch screen, simply touch the
caution when using any device that may take
compartment has dropped.
item or option that you want to choose. The
your focus off the road.
button changes colour when you select it.
Your primary responsibility is the safe
operation of your vehicle.
The system is protected in such a way
We recommend against the use of any hand-
that it will only operate in the vehicle.
held device while driving and encourage
the use of voice-operated systems when
For more information about smartphones
possible.
and OS compatibility, refer to the
Make sure you are aware of all applicable
following website:
local laws that may affect the use of electronic
devices while driving.
1.
Display off (short press)
Power off (long press)
For safety reasons and because they
General information
2.
Connected device status with battery and
require sustained attention by the driver,
signal strength (when mobile phone is
the following operations must be carried out
connected)
Getting to know your
with the vehicle stationary and the ignition on:
3.
Status bar
- Pairing the smartphone with the system in
system
This bar displays icons and messages
Bluetooth® mode.
The system allows you to interact with a variety
pertaining to current system activities.
- Connection to the Apple CarPlay® or
of features using the touch screen and voice
4.
Date and time
Android Auto applications.
commands.
5.
Global volume control
– Using the smartphone.
6.
Menus
62
CarManuals2.co
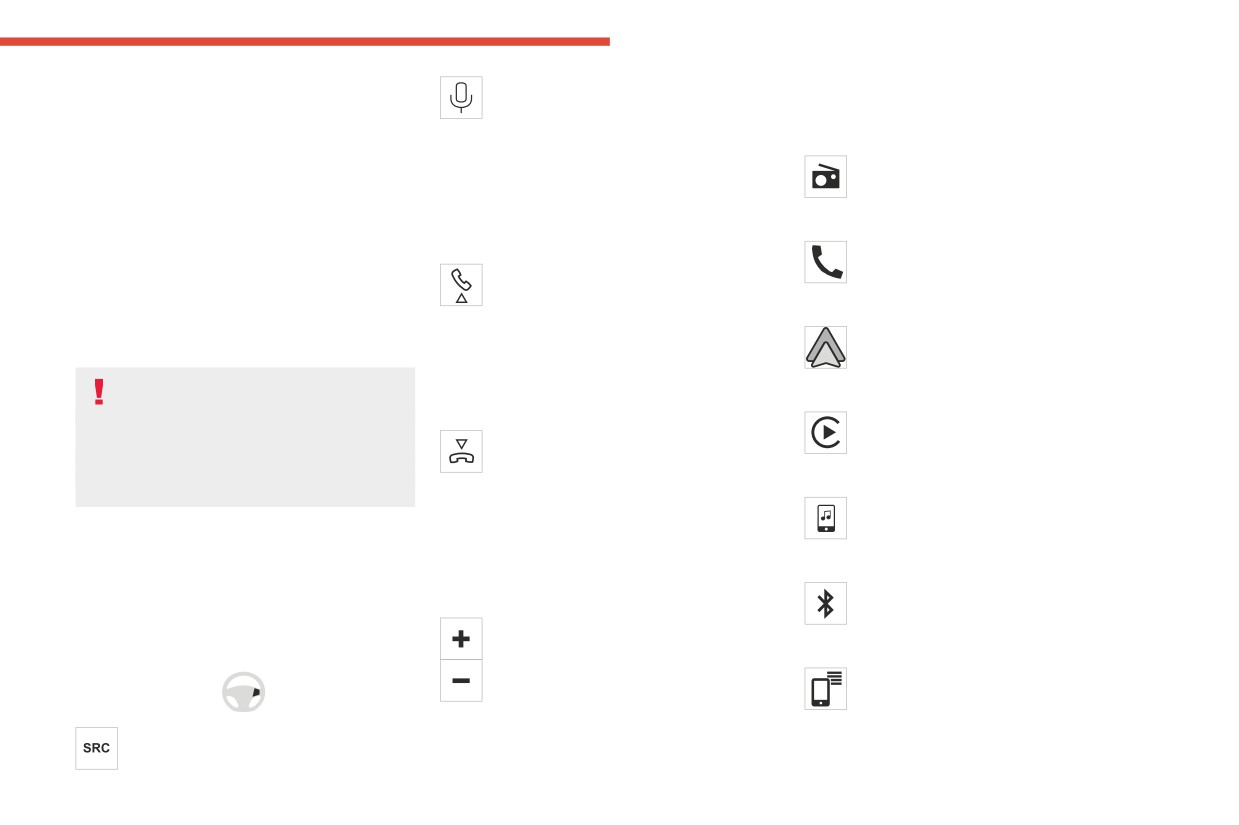
10" Touch Screen
7. Global shortcuts
Voice command
Menus
10
Activates voice recognition while
The touch screen allows quick access to all of
connected to a smartphone via Bluetooth® (with
your comfort, navigation, communication and
Radio
Internet on), Android Auto or Apple CarPlay®
entertainment options. Using the status and
Select a radio station.
and the system provides feedback through
feature bar, you can quickly select the feature
audible tones, prompts, questions and spoken
you want to use.
confirmations depending on the situation and the
Phone
chosen level of interaction (voice settings of the
Cleaning the touch screen
phone).
Access the phone contacts, dialpad and
Remove dirt and fingerprints with a dry, clean,
Seek up or next song
call log.
soft cloth.
While in radio mode, press to seek
If dirt or fingerprints are still on the screen, apply
between memory presets. Press and hold to
Android Auto
a small amount of cleaning alcohol to the cloth
increment quickly, until you find a station you
Run certain applications on a smartphone
and try to clean it again.
want to listen.
connected via Android Auto.
While in USB or Bluetooth® audio, press to seek
Do not use detergent or any type of
between songs or press and hold to fast seek.
Apple CarPlay®
solvent to clean the touch screen.
During an incoming call: accept call
Run certain applications on a smartphone
Do not pour or spray alcohol onto the touch
Seek down or previous song
connected via Apple CarPlay®.
screen.
While in radio mode, press to seek
Do not use sharp objects on the screen.
between memory presets. Press and hold to
Media
Do not touch the screen with wet hands.
decrement quickly, until you find a station you
Access and navigate media files of a USB
want to listen.
device or an iPod.
While in USB or Bluetooth® audio press to seek
Steering mounted controls
between songs or press and hold to fast seek.
BT Audio
Depending on your vehicle and option package,
During an incoming call: reject call
Access and control the audio files of a
you can use different controls on your steering
During an ongoing call : end call
device connected via Bluetooth.
wheel to interact with the touch screen system in
Increase volume
different ways.
Device List
Decrease volume (short press)
Access and manage the devices
Mute sound (long press)
connected to the system.
Change multimedia source
63
CarManuals2.co
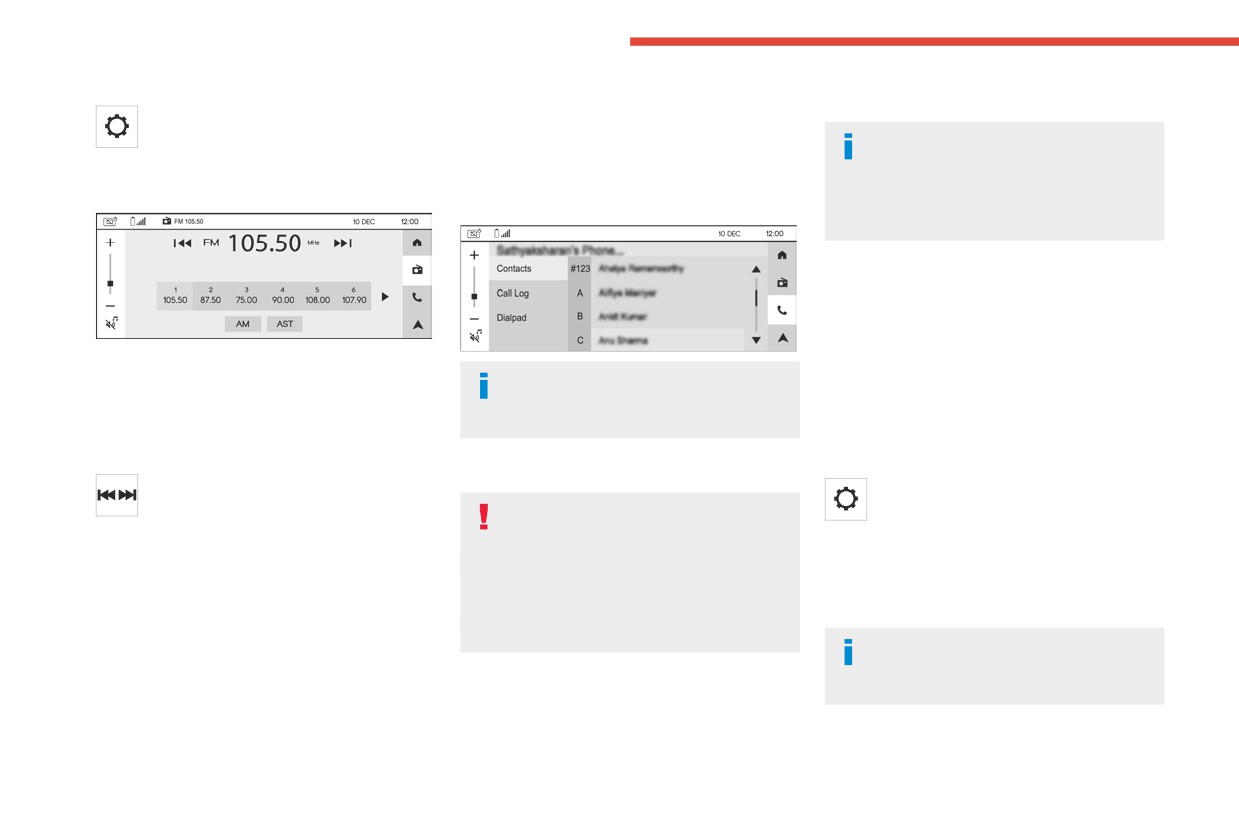
10" Touch Screen
Settings
Automatic
ensure that the code is the same in the system
Press AST to search all frequencies within
and in the phone.
Access the settings (system, phone,
the current band and automatically store valid
audio etc.).
If the pairing procedure fails, we
stations.
recommend deactivating and then
reactivating the Bluetooth® function on the
Radio
Phone
phone and deleting any CITROËN name
present in the pairing list.
Procedure from the phone
The system discoverable mode will operate 90
seconds once the BT visibility option is selected
under Settings.
Select the name of the system in the list of
Choosing the band
detected devices on the phone.
A phone must be paired to the system to
In the system, accept the connection request
Press FM or AM on the bottom of the screen to
be able to use the following
from the phone and follow the instructions on the
select the band.
functionalities.
phone and system screen.
Selecting a station
Procedure from the system
Pairing a phone
Make a short press to perform a manual
Select Settings menu.
search for previous/next radio frequency.
The services available depend on the
Make a long press to perform an automatic
network, the SIM card and the
Select Phone.
search for previous/next radio frequency.
compatibility of the Bluetooth® devices used.
Press Add device.
Consult the phone user guide, the service
Press Scan for Devices.
Presetting a station
provider and the OEM portal to check which
The list of detected devices is displayed.
12 stations can be preset on the FM band and 6
services are available.
Select the name of the required phone in the list.
on the AM band.
Depending on the type of phone, you
Manual
The Bluetooth® function must be activated and
may by prompted to accept the transfer
Make a long press on one of the preset number
the phone in "Visible to all" mode.
of contacts.
to preset the current playing station.
To complete the pairing, whichever procedure
is used (from the phone or from the system),
64
CarManuals2.co
10" Touch Screen
Automatic reconnection
Press this steering mounted button or use
Call options
10
the touch screen button.
On returning to the vehicle, if the last phone
During an active call, the following options are
To reject the call:
connected is present again (Bluetooth®
available:
Press this steering mounted button or use
activated), it is automatically reconnected after
Mute: mute the microphone.
the touch screen button.
key on.
Hold: put the active call on hold.
Add: add a second call from the dial pad, call log
Managing paired phones
Making a call
or contact list.
To connect or disconnect a paired phone and
Use Phone: switch to handset mode.
Using the telephone is not recommended
switch to Android Auto or Apple CarPlay®:
Keypad: use the keypad.
while driving.
Press Settings menu, select Phone then
End call: hang up the phone.
Park/stop the vehicle before using the mobile
Device List to display the list of paired
device.
Managing multiple calls
devices.
If there is a second incoming call, you can press
or
Calling a new number
Accept Call to accept it. The first call is on hold.
Press directly Device List menu to
Press Phone menu.
You can choose to swap between calls or merge
display the list of paired devices.
both calls. If you merge calls, a conference call
Press the Bluetooth icon to connect/
Press Dialpad.
is created.
disconnect a device.
Enter the phone number using the digital
keypad.
Delete a phone
Connectivity
Press the Call button.
Press Settings menu, select Phone then
Device List to display the list of paired
Calling a contact
Synchronising a smartphone enables
devices.
Press Phone menu.
users to display applications that support
or
the smartphone’s Android Auto or Apple
Press directly Device List menu to
Press Contacts.
CarPlay® technology on the vehicle’s screen.
display the list of paired devices.
Select your contact.
For Apple CarPlay® technology, the Apple
Press Delete to delete a device.
CarPlay® function must first be activated on
Calling a recently used number
the smartphone. In all cases, the smartphone
Press Phone menu.
must be unlocked, to enable the
Receiving a call
communication process between the
Press Call Log.
An incoming call is announced by a ring and a
smartphone and the system to function (at
Select the number in the list of recently used
superimposed display in the screen.
first connection only). As principles and
numbers.
To accept the call:
standards are constantly changing, we
65
CarManuals2.co
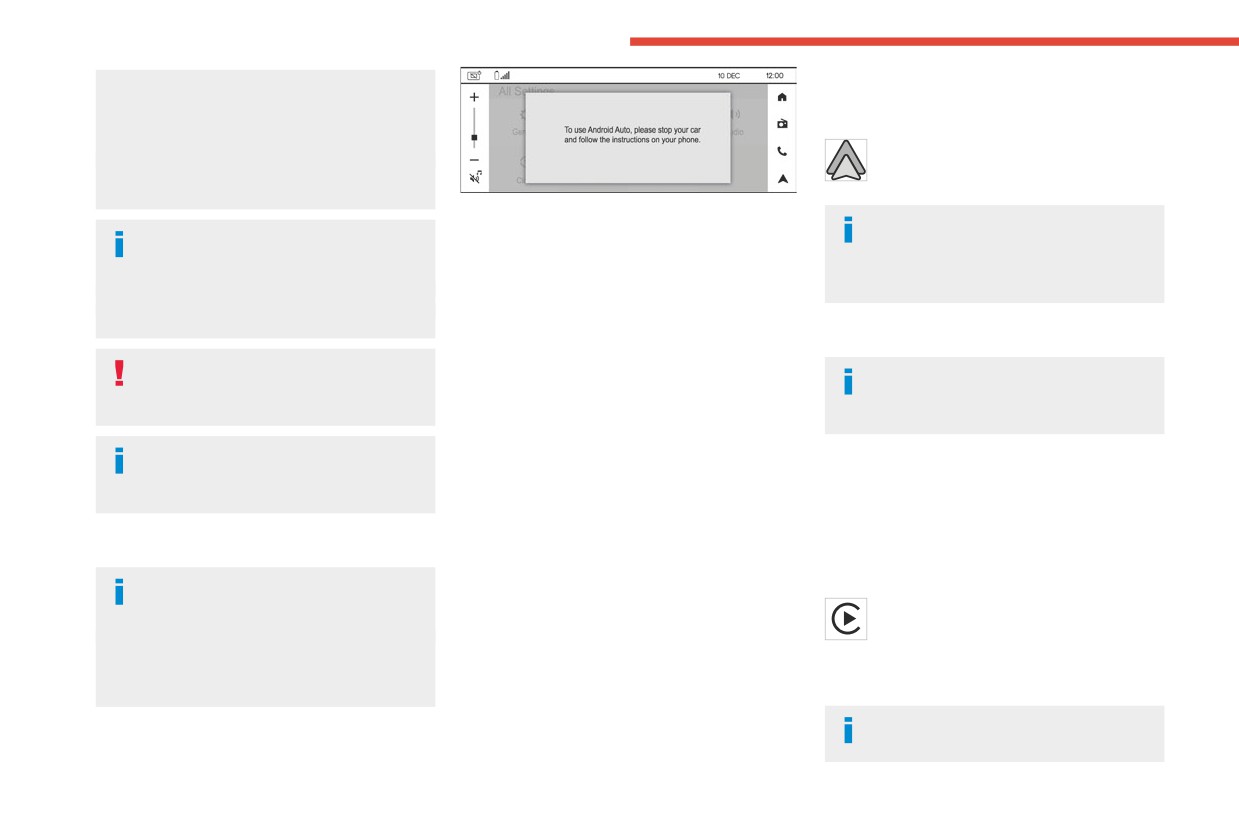
10" Touch Screen
recommend keeping the smartphone's
For wireless Android Auto, subsequent automatic
operating system up-to-date, together with the
connection of the smartphone requires activation
date and time on the smartphone and the
of Bluetooth® and Wi-Fi on your device.
system.
As soon as the connection is established,
Refer to your smartphone for Android Auto or
select this menu to display the Android
Apple CarPlay® settings.
Auto interface.
Connecting Android Auto smartphone can be
There may be a pause before
carried out either by USB cable or using a
For the list of suitable smartphones, visit
applications become available,
wireless connection.
the Android Auto and Apple CarPlay®
depending on the quality of the network and
websites:
USB connection
performances of the phone.
Connect the USB cable.
Android Auto is automatically launched a few
Apple CarPlay®
seconds after the USB connection has been
Stop the car before connecting Android
established. A validation procedure on the
The Apple CarPlay® function requires the
Auto or Apple CarPlay® and follow the
smartphone has to be followed for the first
use of a compatible smartphone and
instructions on your phone.
connection, with the vehicle stationary.
compatible applications.
The smartphone charges when connected by the
On connecting the USB cable, the
USB cable.
Connecting Apple CarPlay® smartphone can
Android Auto or Apple CarPlay® function
Wireless connection
be carried out either by USB cable or using a
deactivates the system's Bluetooth® mode.
wireless connection.
The wireless connection of an Android Auto
USB connection
device can be initiated from the Device List
Android Auto
menu or home screen Android Auto icon.
Connect the USB cable.
First activate the smartphone’s Bluetooth®
The smartphone charges when connected by the
Ensure the latest Android Auto
function.
USB cable.
application is available on your
Select Device List menu to display the device to
From the system, press Apple CarPlay®
smartphone. If not, install it via "Play Store".
be connected to Android Auto.
menu to display the Apple CarPlay®
The Android Auto function requires the use
If the device has already been connected to the
interface or press Device List menu to display
of a compatible smartphone and compatible
system via Bluetooth®, select the Android Auto
the list of connected devices and then select
applications.
of the desired device from the list of connected
Apple CarPlay®.
Android phones.
When the USB cable is disconnected
and the ignition is switched off then back
66
CarManuals2.co
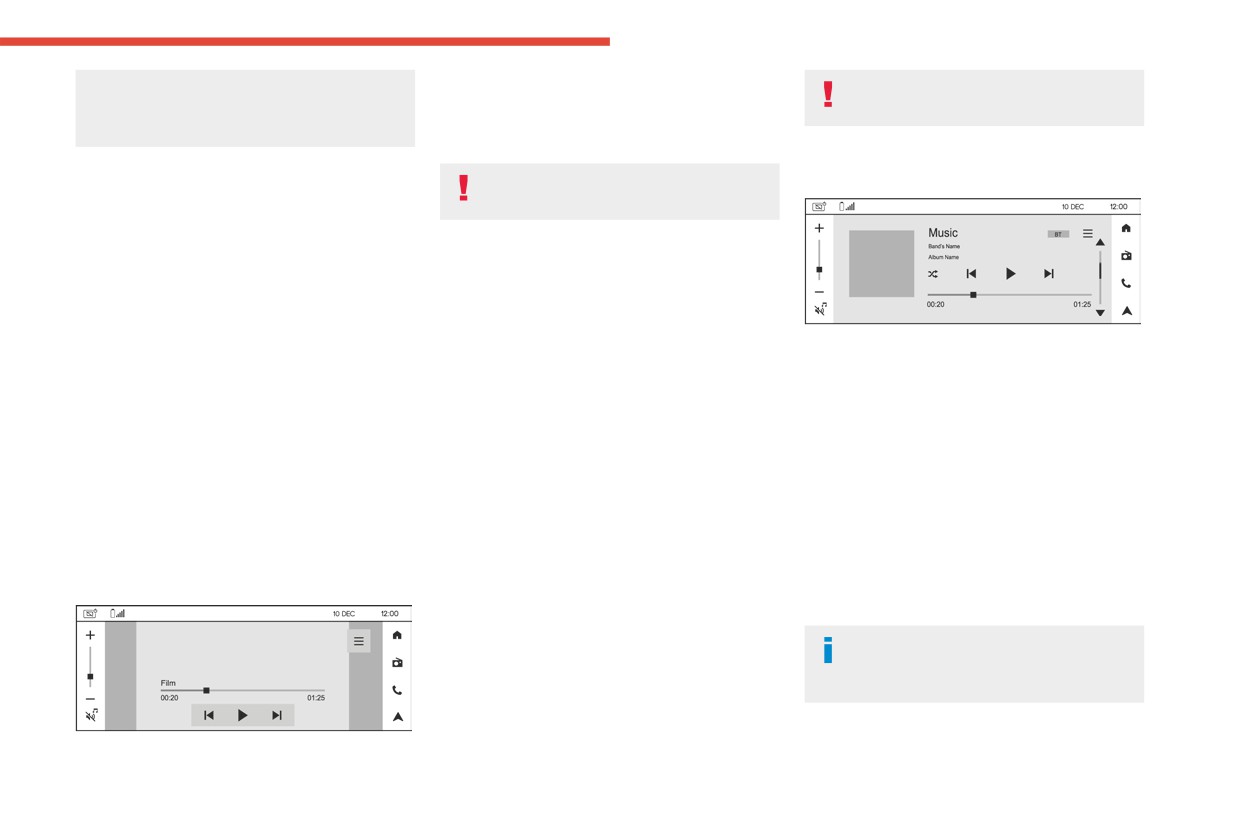
10" Touch Screen
on, the system will not automatically switch to
Insert the USB memory stick into the USB port
For safety reasons, park the vehicle
10
other mode; the source must be changed
or connect the USB device/iPod to the USB port
before playing a video.
manually.
using a suitable cable (not supplied).
USB device format supported: FAT16 or FAT32.
Wireless connection
BT Audio
To protect the system, do not use a USB
The wireless connection of an Apple CarPlay®
hub.
device can only be initiated from the Device List
menu.
Music
First activate the smartphone’s Bluetooth®
The system supports MP3 and WAV audio file
function.
types.
Select Device List menu to display the devices
The system builds music playlists (in temporary
to be connected to Apple CarPlay®.
memory); this operation can take from a
If the device has already been connected to the
few seconds to several minutes at the first
When a smartphone is paired to the system,
system via Bluetooth®, select Apple CarPlay on
connection.
streaming allows you to listen to the audio feed
the desired device from the list of connected
Reduce the number of non-music files and the
from your smartphone.
Apple phones.
number of folders to reduce the waiting time.
The Bluetooth® profile must be activated.
For wireless Apple CarPlay®, subsequent
Playlists are updated whenever the ignition
First adjust the volume on the portable device
automatic connection of the smartphone requires
is switched off or a USB memory stick is
(to a high level). Then adjust the volume of the
activation of Bluetooth® and Wi-Fi on your
connected. The audio system memorises these
audio system.
device.
lists, which will subsequently load faster if they
If play does not start automatically, it may be
Visit the Apple CarPlay® website at:
have not been changed.
necessary to start the audio playback from the
Videos
smartphone.
The system can play video files in the AVI, WMV,
Browse button is available if supported by the
MP4, MOV, M4V, DAT and VOB formats.
smartphone application.
Media
Video control commands are accessible only
Control is from the portable device or by using
through the touch screen.
the system's touch buttons.
When the vehicle is in motion, video playback
Once connected in streaming mode, the
will cut off and only audio playback will be
smartphone is considered to be a media
available.
source.
USB video is not available if Android Auto or
Apple CarPlay® is active/connected.
67
CarManuals2.co
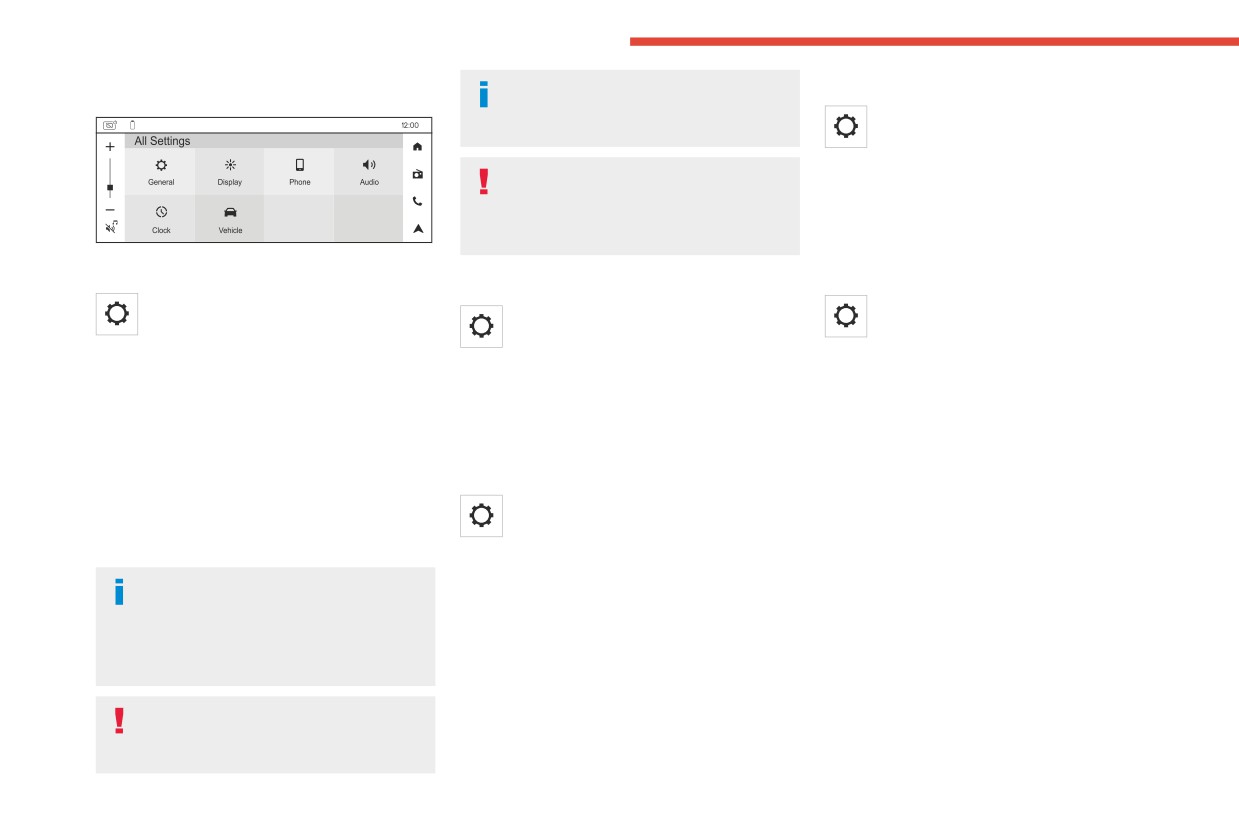
10" Touch Screen
Settings
The Wi-Fi network uses the 5 GHz
Audio settings
frequency. Some smartphones may not
Press Settings to display the main page.
support this feature.
Press Audio.
To protect your system, only networks
In this screen, you can modify the Balance
with a sufficient level of security are
& Fade settings, the Equalizer settings, the
allowed to connect. WPA2 encryption level,
Volume settings and activate the SDVC (Speed
equivalent to a domestic level, is required.
Dependent Volume Control) option.
General settings
Clock settings
Display settings
Press Settings to display the main page.
Press Settings to display the main page.
Press Settings to display the main page.
Press General.
Press Clock.
Press Display.
- Select Language to choose a language in the
Automatic date & time setting
- Select User off Mode to enable/disable date
list displayed.
and time display when the system is powered off.
Select Sync to GPS to enable date and time
- Select Factory Reset to return to factory
- Select Brightness to adjust the brightness of
synchronisation to GPS.
default system.
the touch screen by using the + or - buttons.
Select Time Zone to choose the appropriate
- Select About to see information about the
time zone.
current software version.
Phone settings
- Select Wi-Fi to generate a new password
Manual date setting
Press Settings to display the main page.
for the Wi-Fi network. Only the password can
Select Date.
be changed and not the network name (Wi-Fi
Choose the date format and then set the day,
Press Phone.
SSID).
month and year using up and down arrows.
- Select BT visibility to turn on/off the
Press Set.
The Wi-Fi connection including credential
Bluetooth® visibility of the system.
sharing with the user’s smartphone
Manual time setting
- Select Add device to select a mobile device
happens automatically after successful
to be connected.
Select Time.
Bluetooth® connection with a wireless
- Select Device list to view the previously
Choose the time format (12 hrs or 24 hrs) and
supported smartphone.
paired mobile devices and connect or delete a
then set the hours and minutes using up and
device.
down arrows.
It cannot be used for Internet sharing in
Press Set.
the vehicle nor software update nor any
other purpose.
68
CarManuals2.co
10" Touch Screen
Vehicle settings
10
Press Settings to display the main page.
Press Vehicle.
Select Vehicle Alerts to view alerts of the
vehicle. When an active alert is present, it is
displayed in the status bar. An icon is also
displayed on the Settings menu button.
69
CarManuals2.co
Maintenance and Warranty
TABLE OF CONTENTS
What is this chapter and How to use it?
WARRANTY SECTION
CITROËN Contractual Warranty Certificate
Standard Warranty
Battery Warranty
Replacement Part Warranty
Coupons
MAINTENANCE SECTION
Maintenance
Scheduled Maintenance
Maintenance Schedule
Service Record
CITROËN ASSISTANCE
73
CarManuals2.co
Maintenance and Warranty
WHAT IS THIS CHAPTER AND HOW TO USE IT?
This maintenance and warranty chapter explains the warranty terms of your new CITROËN vehicle as well as the maintenance required to keep your new
CITROËN vehicle at its optimum performance level.
The Warranty Section explains the general terms and conditions related to new CITROËN vehicle warranty.
The Maintenance Section explains the maintenance information which includes the necessity, types of maintenance, and the scheduled maintenance table
which should be used to record your CITROËN vehicle's maintenance history.
Every time a CITROËN authorised dealer (“Authorised Dealer”) services your CITROËN vehicle, they will check your vehicle’s maintenance record and the
warranty conditions so that we can provide you with proper warranty and maintenance services. Kindly remember that warranty support is provided under
the condition that the proper maintenance of your CITROËN vehicle is carried out according to the prescribed maintenance schedule, as it is mentioned in
the Warranty Section.
We encourage you to always keep the Owner’s Manual in your CITROËN vehicle and to hand it over to the next vehicle owner in the event that you sell
your CITROËN vehicle.
74
CarManuals2.co
Maintenance and Warranty
WARRANTY
WARRANTY SECTION
SECTION
75
CarManuals2.co
Maintenance and Warranty
CITROËN CONTRACTUAL WARRANTIES CERTIFICATE
CITROËN Contractual warranty
This certificate must be completed and stamped by the Citroën Authorised Dealer in order to validate the CITROËN contractual warranty (“Contractual Warranty”).
Application of the said warranties is dependent on the carrying out of routine services, as detailed in your service schedule, evidence of this being provided by the
completed counterfoils in this chapter.
The benefits of Citroën contractual warranty are not available to you in case of repairs carried out apart from the scheduled services mentioned in this chapter; even if
such repairs are carried out by a repairer authorised by PAIPL (“Authorised Repairer”).
The CITROËN contractual warranties take effect from the effective day of delivery of your vehicle (warranty start date entered on this page).
Details of the CITROËN contractual warranties which your vehicle benefits from, as well as their conditions of application, are given on the order form for your new
vehicle.
SELLING DEALER:
Vehicle prepared and delivered according to the procedure defined by CITROËN
Customer Name & Address:
Customer Sign:
Stamp of the Selling Dealer
The routine service schedule specific to your vehicle was given to you at
handover. This document can be found in your vehicle’s handbook pack.
If this is missing, your dealer or any CITROËN Authorised Repairer will be able
to supply a replacement or you can view it from your MyCITROËN App. You
are advised to retain any invoices or documents relating to work carried out on
your Citroën vehicle. In the event of resale of the vehicle, it is necessary to give
them to the new owner, along with all documents relating to the vehicle.
76
CarManuals2.co
Maintenance and Warranty
VIN:
12
MODEL:
OWNER NAME
VARIANT:
& ADDRESS
COLOUR:
ENGINE NO:
CONTACT NO:
KEY NO:
E-mail ID:
INVOICE DATE:
SELLING
ODOMETER READING
KM
DEALER NAME
& CODE
REGISTRATION NO:
BATTERY MAKE:
DEALER
BATTERY NO:
SHOWROOM
ADDRESS &
BATTERY BATCH:
CONTACT NO.
(STAMP)
TYPE
MAKE
BATCH CODE
Front Right
Front left
CONTACT NO.
FOR SERVICE
Rear Right
APPOINTMENT
Rear Left
& SUPPORT
Spare
77
CarManuals2.co
Maintenance and Warranty
STANDARD WARRANTY
CITROËN New Vehicle Warranty
• Any vehicle on which the odometer reading has been altered so that
mileage cannot be accurately determined.
PCA Automobiles India Private Limited (hereinafter called “PAIPL”),
warrants that each new CITROËN vehicle sold shall be free from any
What is not covered?
defects in material and workmanship, under normal use and maintenance,
Damage or failure resulting from:
subject to the following terms and conditions.
•
Negligence of proper maintenance as required in the chapter.
New Vehicle Warranty Period
•
Misuse, abuse, accident, theft, flooding or fire.
This warranty (“New Vehicle Warranty“) shall exist for a period of
•
Use of improper or insufficient fuel, fluids or lubricants.
24 months or 40,000 kilometres, from the date of delivery whichever
•
Use of parts other than CITROËN Genuine Parts.
is earlier (“New Vehicle Warranty Period”). This warranty is transferable
•
Any device and/or accessories not supplied by PAIPL.
to subsequent owner for the remaining New Vehicle Warranty Period.
•
Modifications, alterations, tampering or improper repair.
This warranty is applicable only in India and not transferable to any other
•
Parts used in applications of which they were not designed or not
country.
approved by PAIPL.
•
Slight irregularities not recognised as affecting quality or function of the
What is covered?
vehicle or parts, such as slight noise or vibrations, or items considered
Except as provided in “What is not covered?” hereof, our Authorised
characteristic of the vehicle.
Dealers shall either repair or replace, any CITROËN genuine part that is
•
Airborne, fallout, industrial fallout, acid rain, hail and wind storms, or
acknowledged by PAIPL to be defective in material or workmanship within
other Acts of God.
the New Vehicle Warranty Period stipulated above, at no cost to the owner
•
Paint scratches, dents or similar paint or body damage.
of the CITROËN vehicle for parts or labour. Such defective parts which
•
Action of road elements (sand, gravel, dust or road debris) which results
have been replaced will become the property of PAIPL.
in stone chipping of paint or glass.
•
Incidental or consequential damages, including without limitation, loss of
What is not covered?
time, inconvenience, loss of use of vehicle or commercial loss.
This warranty shall not apply to:
•
This warranty is the entire warranty given by PAIPL for CITROËN
• Normal maintenance services, including without limitation, cleaning and
vehicles and no dealer or its or his agent or employee is authorised
polishing, minor adjustments, engine tuning, oil/ fluid changes, filters
to extend or enlarge this warranty and no dealer or its or his agent or
replenishment, fastener retightening, wheel balancing, wheel alignment
employee is authorised to make any oral warranty on PAIPL behalf.
and tyre rotation etc.
•
PAIPL reserves the right to make any change in design or make any
• Replacement of parts as a result of normal wear and tear such as spark
improvement on the vehicle at any time without any obligation to make
plugs, belts, brake pads and linings, clutch disc/facing, filters, wiper
the same change on vehicles previously sold.
blades, bulbs, fuses, etc.
•
PAIPL reserves the right for the final decision in all warranty matters.
78
CarManuals2.co
Maintenance and Warranty
STANDARD WARRANTY
Owner’s Responsibilities
Tire information
• Proper use, maintenance and care of vehicle in accordance with the
• Tires originally installed on a new CITROËN vehicle are warranted by
instructions contained in owner’s manual (“Owner’s Manual”). If the
the tire manufacturer.
vehicle is subject to severe usage conditions, such as operation in
extremely dusty, rough, more repeated short distance driving or heavy
Fitting after-market accessories
city traffic during hot weather, maintenance of vehicle should be done
•
If you wish to install accessories on the vehicle, please contact
more frequently as mentioned in Owner’s Manual.
authorized Citroën dealer.
• Retention of maintenance service records. It may be necessary for the
•
Citroën India do not recommend to fit any non-genuine accessories.
customer to show that the required maintenance has been performed,
•
Please note that Citroën India will not be responsible for any issues
as specified in Owner’s Manual.
pertaining to Non-Genuine Accessories fitted either by dealership or
• Delivery of the vehicle during regular service business hours to any
aftermarket.
CITROËN Authorised Dealer to obtain warranty service.
• In order to maintain the validity of this standard warranty, the vehicle
must be serviced by CITROËN authorised workshop in accordance to
the Owner’s Manual.
NOTICE:
What we will do?
• Warranty repairs will be made at no charge for parts and/or labour.
Video Navigation & Telematics System, Batteries, Tyres and Audio
Any needed parts replacement will be rendered with new or authorised
Systems, originally equipped on CITROËN vehicles are warranted
remanufactured parts by CITROËN Authorised Dealer. A reasonable
directly by the respective manufacturers and not by PAIPL.
time to complete the repairs must be allowed after the CITROËN vehicle
is handed over to CITROËN Authorised Dealer.
• Labour free service will be performed one-time each at 2,000 Kms (2
Months) & 10,000 km (12 Months) & 20,000 km (24 Months).
• Warranty on any part replaced under New Vehicle Warranty will end on
the expiry of New Vehicle Warranty.
79
CarManuals2.co
Maintenance and Warranty
BATTERY WARRANTY
Terms & Conditions for Battery Warranty
Battery Installation and General Maintenance
•
Battery originally installed on a new CITROËN vehicle is warranted
Although the battery is made as robust and durable as possible, the
by the battery manufacturer.
following must be observed to get maximum performance from the
•
Batteries are warranted against all defects in material and workmanship.
battery.
Liability under this Battery Warranty is limited to making good of defects
•
The battery must be fitted firmly in the battery cradle, so that no undue
arising solely from the use of faulty material or workmanship during
vibration or straining occurs.
manufacture and developing under proper use.
•
Connecting cables should have adequate current carrying capacity and
•
The Battery Warranty is VALID only if the battery is properly used and
be long enough to prevent straining of the battery terminals. It must be
checked regularly as per the maintenance schedule at the service
ensured that correct polarities (plus to plus and minus to minus) are
stations of the CITROËN Authorised Dealers during the New Vehicle
connected.
Warranty Period.
•
Terminals should be brushed clean before connecting and coated
•
This Battery warranty does not cover damage to the battery caused by
immediately afterwards with pure petroleum jelly and NOT grease.
faulty electrical systems, irregular servicing, negligent maintenance,
•
Battery top should be clean and dry.
wilful abuse or destruction by fire, collision or theft.
•
This Battery Warranty is NOT VALID if the battery under complaint has
been opened or tampered with in any manner whatsoever. It should be
returned to the nearest CITROËN Authorised Dealer complete with the
electrolyte. The CITROËN Authorised Dealer has the option either to
rectify the defect in the battery or replace the battery.
•
Breakage of container and cover does not come under the purview of
this Battery Warranty.
•
To and fro transportation charges of the battery under complaint will be
borne by the customer.
•
The liability under this Battery Warranty will cease on the transfer of
the battery to any person other than the original purchaser of the new
Citroën vehicle or to any vehicle other than that on which the battery
was originally fitted.
80
CarManuals2.co
Maintenance and Warranty
REPLACEMENT PART WARRANTY
PAIPL warrants that each new CITROËN genuine replacement part
• Direct or indirect failures caused by misuse and improper maintenance
purchased from and installed by CITROËN Authorised Dealer shall be
of vehicle.
free from any defects in material or workmanship, under normal use and
• Any vehicle on which the odometer reading has been altered so that
maintenance, subject to the following terms and conditions.
mileage cannot be accurately determined.
• Incidental or consequential damages, including without limitation, loss of
Replacement Parts Warranty Period
time, inconvenience, loss of use of vehicle or commercial loss.
This warranty (“Parts Warranty”) shall exist for a period of 1 Year or until
the vehicle has been driven for a distance of 10,000 Kilometres from
This Parts Warranty is the entire warranty given by PAIPL for CITROËN
the date of installation of replacement part by CITROËN Authorised Dealer,
replacement parts and no dealer or its or his agent or employee is
whichever occurs first (“Parts Warranty Period”).
authorised to extend or enlarge this warranty and no dealer or its or his
agent or employee is authorised to make any oral warranty on PAIPL
What is covered?
behalf. PAIPL reserves the right for the final decision in all warranty
Our Authorised Dealers shall either repair or replace, any CITROËN
matters.
genuine part (except the cases listed in “What is not covered?” below),
that is acknowledged by PAIPL to be defective in material or workmanship
Owner’s Responsibility:
within the Parts Warranty Period stipulated above, after examinations
•
Proper use, maintenance and care of the vehicle in accordance with the
carried out to confirm that none of the original settings have been
instructions contained in the Owner’s Manual.
tampered with, at no cost to the owner of the CITROËN vehicle for parts
•
Retention of maintenance service records. It may be necessary for the
or labour. Such defective parts which have been replaced will become the
customer to show that the required maintenance has been performed,
property of PAIPL.
as specified in the Owner’s Manual.
•
Retention of the customer’s copy of the original repair order and its
What is not covered?
invoice/bill against which the part was replaced.
This Parts Warranty shall not apply to:
•
Delivery of the vehicle during regular service business hours to the
• Normal maintenance services of parts such as brake cleaning,
same CITROËN Authorised Dealer who had sold and installed the
adjustment or replacement (i.e. spark plugs that are oil fouled, lead
replacement part.
fouled, or which fail due to the use of low grade fuel).
•
In order to maintain the validity of this Parts Warranty, the vehicle must
• Parts that fail due to abuse, misuse, neglect, alteration or accident or
be serviced by CITROËN authorised workshop in accordance to the
which have been improperly lubricated or repaired.
Owner’s Manual.
• Parts used in applications for which they were not designed or approved
by PAIPL.
• Failure due to normal wear of parts.
81
CarManuals2.co
Maintenance and Warranty
CITROËN Authorised Dealer
Pre Delivery Inspection Coupon
Owner’s Name:
Address:
Notice of name/address ownership change
In case your name and/or address changes or you become a subsequent
owner, please be sure to complete and mail this slip to the address of the
VIN:
CITROËN Authorised Dealer shown on the vehicle identification page of
this section.
Engine No:
This slip will enable us to update our ownership file for future contact with
Date of Service:
you as required.
Mileage at Service:
Selling Dealer name:
Owner’s Signature:
NOTE
This is not valid after 100kms
83
CarManuals2.co
Maintenance and Warranty
Notice of name/address
ownership change
NAME/ADDRESS CHANGE
SUBSEQUENT OWNER
Please check one of the above boxes
Owner’s Name:
Address:
Pre Delivery Inspection (PDI) Coupon
Please see the MAINTENANCE SECTION in this chapter.
VIN:
Engine No:
Registration No:
Date of Purchase:
Mileage at Present:
Owner’s Signature:
THANK YOU FOR YOUR CO-OPERATION
Please give complete information
84
CarManuals2.co
Maintenance and Warranty
CITROËN Authorised Dealer
Labour free service coupon
2 Months / 2000 kms
Owner’s Name:
Address:
Notice of name/address ownership change
In case your name and/or address changes or you become a subsequent
owner, please be sure to complete and mail this slip to the address of the
VIN:
CITROËN Authorised Dealer shown on the vehicle identification page of
this section.
Engine No:
This slip will enable us to update our ownership file for future contact with
Date of Service:
you as required.
Mileage at Service:
Servicing Dealer name:
Selling Dealer name:
Owner’s Signature:
NOTE
This is not valid after 3 Months or 3000 kms
85
CarManuals2.co
Maintenance and Warranty
Notice of name/address
ownership change
NAME/ADDRESS CHANGE
SUBSEQUENT OWNER
Please check one of the above boxes
Owner’s Name:
Address:
LABOUR FREE SERVICE at
2 months / 2,000 kms
Please see the MAINTENANCE SECTION in this chapter.
VIN:
Engine No:
Registration No:
Date of Purchase:
Mileage at Present:
Owner’s Signature:
THANK YOU FOR YOUR CO-OPERATION
Please give complete information
86
CarManuals2.co
Maintenance and Warranty
CITROËN Authorised Dealer
Labour free service coupon
12 Months / 10000 kms
Owner’s Name:
Address:
Notice of name/address ownership change
In case your name and/or address changes or you become a subsequent
owner, please be sure to complete and mail this slip to the address of the
VIN:
CITROËN Authorised Dealer shown on the vehicle identification page of
this section.
Engine No:
This slip will enable us to update our ownership file for future contact with
Date of Service:
you as required.
Mileage at Service:
Servicing Dealer name:
Selling Dealer name:
Owner’s Signature:
NOTE
This is not valid after 13 Months or 13000 kms
87
CarManuals2.co
Maintenance and Warranty
Notice of name/address
Ownership change
NAME/ADDRESS CHANGE
SUBSEQUENT OWNER
Please check one of the above boxes
Owner’s Name:
Address:
LABOUR FREE SERVICE at
12 months / 10,000 kms
Please see the MAINTENANCE SECTION in this chapter.
VIN:
Note: Parts cost to be borne by customer.
Engine No:
Registration No:
Date of Purchase:
Mileage at Present:
Owner’s Signature:
THANK YOU FOR YOUR CO-OPERATION
Please give complete information
88
CarManuals2.co
Maintenance and Warranty
CITROËN Authorised Dealer
Labour free service coupon
24 Months / 20000 kms
Owner’s Name:
Address:
Notice of name/address ownership change
In case your name and/or address changes or you become a subsequent
owner, please be sure to complete and mail this slip to the address of the
VIN:
CITROËN Authorised Dealer shown on the vehicle identification page of
this section.
Engine No:
This slip will enable us to update our ownership file for future contact with
Date of Service:
you as required.
Mileage at Service:
Servicing Dealer name:
Selling Dealer name:
Owner’s Signature:
NOTE
This is not valid after 25 Months or 23000 kms
89
CarManuals2.co
Maintenance and Warranty
Notice of name/address
Ownership change
NAME/ADDRESS CHANGE
SUBSEQUENT OWNER
Please check one of the above boxes
Owner’s Name:
Address:
LABOUR FREE SERVICE at
24 months / 20,000 kms
Please see the MAINTENANCE SECTION in this chapter.
VIN:
Note: Parts cost to be borne by customer
Engine No:
Registration No:
Date of Purchase:
Mileage at Present:
Owner’s Signature:
THANK YOU FOR YOUR CO-OPERATION
Please give complete information
90
CarManuals2.co
Maintenance and Warranty
MAINTENANCE
MAINTENANCE SECTION
SECTION
91
CarManuals2.co
Maintenance and Warranty
MAINTENANCE
Necessity of maintenance
Maintenance services at CITROËN Authorised Dealers
Your CITROËN vehicle has been manufactured using the latest technology
A CITROËN Authorised Dealer has factory-trained technicians and genuine
and under the strictest quality control standards. It is also designed to
CITROËN parts to service your vehicle properly. For expert advice and
minimize maintenance requirements with longer service intervals to save
quality service, visit a CITROËN Authorised Dealer.
you both time and money.
Inadequate, incomplete or insufficient servicing may result in operational
However, scheduled maintenance is necessary to ensure your CITROËN
problems with your vehicle that could lead to vehicle damage, an accident,
vehicle operates properly and efficiently for the reasons listed below:
or personal injury.
We appreciate your understanding of the importance of these instructions,
Lubricants:
and we look forward to servicing your vehicle at CITROËN Authorised
Your CITROËN vehicle uses various kinds of oils and fluids, including
Dealers.
engine oil, transmission fluid, differential fluid, battery fluid, and engine
coolant. These oils and fluids play very important roles, such as lubricating
and cooling the vehicle and preventing rust. Periodically they need to be
properly refilled or replaced.
WARNING!
Rubber parts:
Hoses, belts and boots use rubber parts, which are bound to crack when
Failure to perform scheduled maintenance may result in
worn out. They need to be replaced with new ones if they should wear out.
reduced vehicle performance or possible breakdowns,
Normal deterioration
as well as exclusion from warranty coverage
Vehicles are equipped with many parts for which it is impossible to avoid
normal wear and tear. These parts include: tires, brake pads, clutch
disc, etc. They are indispensable for basic vehicle functions and must be
replaced regularly.
92
CarManuals2.co
Maintenance and Warranty
SCHEDULED MAINTENANCE
There are two types of maintenance schedules, namely, normal usage condition & severe usage conditions
A sales person or service advisor at our CITROËN Authorised Dealer will explain to you which type of maintenance schedule you should follow depending
on your driving pattern, climatic conditions in your area, etc. The two schedules and their conditions are described below:
Follow the Maintenance under severe usage conditions if any of the following conditions apply.
• Repeated driving short distance of less than 8 km in normal temperature or less than 16 km in freezing temperature.
• Extensive engine idling or low speed driving for long distances.
• Driving on rough, muddy, unpaved, gravelled or salt-spread roads.
• Driving in areas using salt or other corrosive materials or in very cold weather.
• Driving in heavy dust condition.
• Driving in heavy traffic area.
• Driving on uphill, downhill, or mountain road repeatedly.
• Vehicle towing, driving for patrol car, taxi, or other commercial use.
• Driving over 170 km/h.
• Frequently driving in stop-and-go condition.
If your vehicle is operated in any of the above listed conditions, you should inspect, replace or refill more frequently, using the severe usage maintenance
schedule instead of the normal usage maintenance schedule.
93
CarManuals2.co
Maintenance and Warranty
MAINTENANCE SCHEDULE
The following maintenance services must be performed to ensure good emission control and performance. Keep receipts for all vehicle emission services
to protect your warranty. Where both mileage and time are shown, the frequency of service is determined by whichever occurs first.
Service
1
2
3
4
5
6
7
8
9
10
11
Months
2
12
24
36
48
60
72
84
96
108
120
C3 Naturally
Aspirated
Km (K)
2
10
20
30
40
50
60
70
80
90
100
Air cleaner filter element
C
R
C
R
C
R
C
R
C
R
Engine oil
I
R
R
R
R
R
R
R
R
R
R
Oil Filter
R
R
R
R
R
R
R
R
R
R
Drain Plug Gasket
R
R
R
R
R
R
R
R
R
R
Change Spark plugs
R
R
Check accessory belt (waterpump & Strech belt)
I
I
I
I
I
I
I
R
I
I
1.2L (1199cc) (3 Cyl)
60KW @ 5750 rpm
Change coolant
I
I
I
I
I
R
I
I
I
I
R
115Nm @ 3750 rpm
Pollen Filter
R
R
R
R
R
R
R
R
R
R
Fuel Filter (intank)
R
Brake Fluid/Clutch Fluid
I
I
R
I
R
I
R
I
R
I
R
Check timing belt visual condition, replace if found
R
damage
Rear Twist Beam Bush - Check wear and tear or noise,
I
I
I
I
I
I
I
I
I
I
replace if found.
A: Adjust
C: Clean
I: Inspect
R: Replace
94
CarManuals2.co

Maintenance and Warranty
Service
1
2
3
4
5
6
7
8
9
10
11
Months
2
12
24
36
48
60
72
84
96
108
120
C3 Turbo
Km (K)
2
10
20
30
40
50
60
70
80
90
100
Air cleaner filter element
C
R
C
R
C
R
C
R
C
R
Change engine oil
R
R
R
R
R
R
R
R
R
R
Oil Filter
R
R
R
R
R
R
R
R
R
R
Drain Plug Gasket
R
R
R
R
R
R
R
R
R
R
Change Spark plugs
R
R
Check accessory belt condition visually, replace if
I
I
I
I
I
I
I
R
I
I
1.2L (1199 cc) (3 Cyl)
found damage
81KW @ 5500 rpm
Change coolant
I
I
I
I
R
I
I
I
I
R
190Nm @ 1750 rpm
Pollen Filter
R
R
R
R
R
R
R
R
R
R
Fuel Filter (intank)
R
Brake/Clutch Fluid
I
R
I
R
I
R
I
R
I
R
Check timing belt visual condition, replace if found
R
damage
Rear Twist Beam Bush - Check wear and tear or
I
I
I
I
I
I
I
I
I
I
noise, replace if found.
A: Adjust
C: Clean
I: Inspect
R: Replace
95
CarManuals2.co
Maintenance and Warranty
SERVICE RECORD
The following tables are to be signed and stamped by the CITROËN Authorised Dealer who services your CITROËN vehicle. Have the boxes below
(date, mileage, next service, etc.) completed, according to your conditions of use, by Authorised Repairer that you have chosen. You are advised to
retain any invoices or documents relating to work carried out on your vehicle. In the event of resale of the vehicle, it is necessary to give them to the new
owner, along with all documents relating to the vehicle. Having the routine services carried out is a compulsory requirement to meet the conditions of the
CITROËN contractual warranties.
Odometer reading
Dealer
Date
Next Service date
Next Service Kms
Remarks
(Kms)
Seal & Sign
96
CarManuals2.co
Maintenance and Warranty
CITROËN ASSISTANCE
CITROËN ASSISTANCE
With the CITRÖEN ASSISTANCE service, you can contact our breakdown and towing services anywhere in India, 24 hours a day, 7 days a week.
CITRÖEN ASSISTANCE services
CITRÖEN ASSISTANCE will provide assistance, free of charge, if your vehicle is immobilised as a result of a breakdown covered by the CITROËN
contractual warranty or CITROËN service contract that you purchased (extended warranty, maintenance plan, etc.) which is valid.
For vehicles or incidents that are not covered by the contractual warranty such as punctures, lost keys, lock-outs, incorrect fuel type, or any other non-
vehicle fault incident, CITRÖEN ASSISTANCE can arrange assistance with a roadside assistance agent if requested.
Contact CITROËN ASSISTANCE
● By pressing on CITROËN CONNECT ASSISTANCE if your vehicle is fitted with it (press the CITROËN button) or,
● By calling the CITRÖEN ASSISTANCE number found on the back cover, or
● Using the MyCITROËN app (Contact & Assistance)
A customer care agent will answer your call and handle your problem in full: they will perform a preliminary diagnosis and attempt to solve your incident
over the phone. If required, a roadside assistance agent will be dispatched to the breakdown location within a timeframe provided during the call. They will
repair your vehicle at the roadside to enable you to set off again immediately. If this is not possible, the roadside assistance agent will tow your vehicle to
the nearest CITROËN Authorised Repairer.
In any case the kms for towing are restricted to 100 kms for free towing, all kms above 100 kms would be on chargeable basis at Rs 65 per km.
CITROËN ASSISTANCE ensures your mobility
The CITROËN Authorised Repairer based on your request shall provide referral for an alternative means of travel if your vehicle is immobilised as a result
of a breakdown covered by the CITROËN contractual warranty or valid CITROËN service contract, or alternatively at your expense, for your onward travel
or your return home.
If you are stranded more than 100 kms from your home, you can ask for the referral for the following at your expense:
● Hotel accommodation
● Referral for forward travel from breakdown location to the destination (OR)
● Referral for return travel from breakdown location to the customer residence
Note: Various rules governing eligibility, luggage allowance and seating capacity shall be applicable as enforced by hotel, or transportation party.
98
CarManuals2.co
Maintenance and Warranty
CITROËN ASSISTANCE 24 hours a day - 7 days a week
If your vehicle has the localised assistance call service, use it by pressing the button.
The location and identification of your vehicle will automatically be sent to CITROËN ASSISTANCE.
Be ready to provide the following information to the CITRÖEN ASSISTANCE call centre:
- the precise location of your vehicle: town/city, street name and number, road number and visual marker, etc.
- the identification of your vehicle: registration number or vehicle identification number (VIN) visible on the registration certificate or at the bottom left-hand
side of the windscreen (from outside the vehicle)
- your mobile telephone number so that the roadside assistance agent can contact you
- the number of passengers in the vehicle
TOLL FREE NUMBER FOR CITRÖEN ASSISTANCE
18004192000
TOLL FREE NUMBER OF CITRÖEN CUSTOMER CARE CALL CENTRE
18002671000
EMAIL ID OF CITRÖEN CUSTOMER CARE CALL CENTRE
contact@citroen-crm.in
99
CarManuals2.co