Snowmobile Lynx RAVE 120/200 SERIES. OPERATOR’S GUIDE (2023)
Foreword
Snowmobiling is an exhilarating experience and a highly enjoyable sport.
However, it also carries with it many responsibilities. The freedom
snowmobilers experience will only continue as long as snowmobilers continue
to act responsibly. Essentially, that means caring for your personal safety and the
safety and rights of others, and protecting our environment.
Reading and following the information in the Operator’s Guide and this
Snowmobile Safety Handbook is the first step in maintaining the sport of
snowmobiling and the safety of all. Common sense, proper judgment, and
experience all play a very important role in the safe operation of a snowmobile.
You, the operator, are the most important aspect of safety. Safety must be your
concern before, during, and after snowmobiling.
Proper snowmobile maintenance, observation of all laws, operator education,
and practice all contribute to a safe, enjoyable experience. Please exercise
patience since many of the special skills and knowledge required for safe
snowmobiling must be learned over a period of time.
Taking a snowmobile safety course and a first-aid class, and joining a
snowmobile club will greatly enhance your snowmobiling experience and will
ensure many years of safe snowmobiling.
Every BRP snowmobile bears the SSCC label and meets or exceeds the standards
of the Snowmobile Safety and Certification Committee. BRP endorses and
encourages the safe use of all snowmobiles. Always wear an approved helmet
and eye protection. Drive with caution, observe all state and local laws, and
respect the rights of others. International Snowmobile Manufacturers Association
(ISMA) members like BRP do their part to improve trails, sponsor events, and
generally support the sport of snowmobiling. As a member of the American
Council of Snowmobile Associations (ACSA), BRP promotes snowmobiling
through education, charity, and research programs.
This Snowmobile Safety Handbook should be considered a permanent part of
the snowmobile and must remain with the snowmobile at the time of resale.
Table of Contents
Before Operation
1-6
Snowmobile Controls
1
Towing with a Snowmobile
3
Safety Labels
3
Safety Equipment
4
Trailering a Snowmobile
6
Operator Preparation
7-11
Word to All Snowmobile Operators
7
Trail Signs
7
Proper Dress
8
Wind Chill Chart
8
Physical and Mental Fitness
9
Environmental
10
Responsibilities
10
Registration and Permits
11
Code of Ethics
11
Operating a Snowmobile
12-14
Safe Operating Instructions
12
Preparing a Snowmobile
15-16
Maintenance
15
Pre-Ride/Start Inspection
15
Proper Fueling
16
Riding a Snowmobile
17-22
The First Ride
17
Mastering Basic Snowmobile Control
17
Riding Positions
17
If a Snowmobile Gets Stuck in Snow
18
Group (Safari) Riding
18
Terrain and Riding Variations
19
Hazards
20
Emergencies
23-25
Cold Weather Injuries
23
Emergency Situation
24
Suggested Extra Equipment
24
Survival
25
Rescue Signals
25
Closing
26
Before Operation
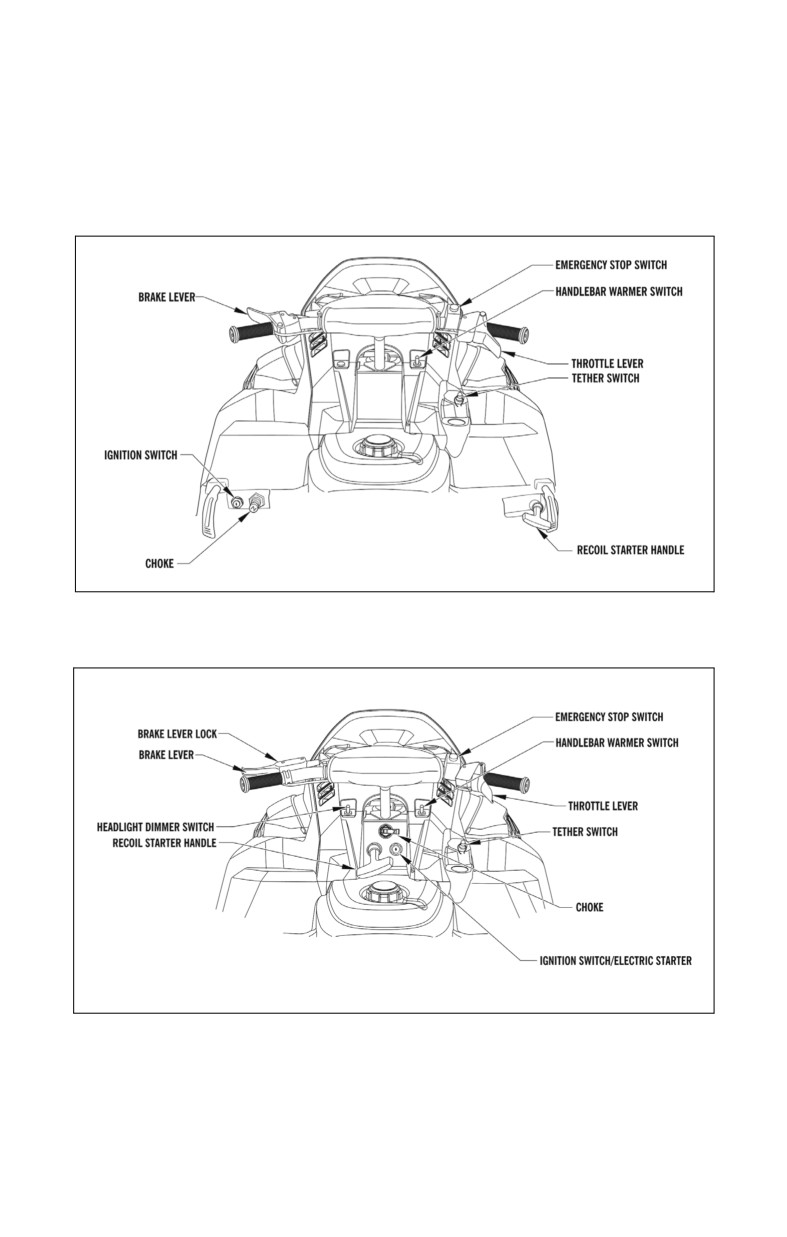
SNOWMOBILE CONTROLS
NOTE: The illustrations and descriptions below explain typical snow-
mobile controls. Read the Operator’s Guide for information on the con-
trols of your specific snowmobile model.
120
0753-830
200
0753-827
1
BRAKE LEVER — Located on the left handlebar, the BRAKE LEVER can be
compressed to slow down or stop the forward movement of the snowmobile.
BRAKE LEVER LOCK (200) — Located next to or on the BRAKE LEVER, the
BRAKE LEVER LOCK holds the BRAKE LEVER in the compressed position. To
activate the lock actuator, compress the BRAKE LEVER fully; then using an index
finger, engage the actuator and release the BRAKE LEVER. To release the lock actu-
ator, compress the BRAKE LEVER and allow the actuator to release.
! WARNING
The brake lever lock is not a parking brake and should not be applied for peri-
ods exceeding 5 minutes. The brake lever lock maintains the brake lever in
the compressed position and maintains pressure against the brake disc;
however, after a period of time, the pressure applied to the brake disc may
relax below the amount required to hold the snowmobile stationary.
CHOKE — To start a cold engine, activate the choke button or choke lever. Read the
Operator’s Guide for detailed instructions. A warm engine requires little or no use of
the choke.
EMERGENCY STOP SWITCH — Located on the right handlebar, the EMER-
GENCY STOP SWITCH can be activated to immediately stop the engine. In the up
position, the EMERGENCY STOP SWITCH allows the engine to run. Pushing down
on the EMERGENCY STOP SWITCH interrupts engine ignition and stops the
engine to allow the snowmobile to coast to a stop.
HEADLIGHT DIMMER SWITCH (200) — Located on the hood, the HEAD-
LIGHT DIMMER SWITCH can be pressed to select either high or low beam.
IGNITION SWITCH — Operated with a key, the IGNITION SWITCH allows the
engine to be started (RUN or START position) or stopped (OFF position). If the snowmo-
bile is equipped with a start switch and/or recoil starter, the IGNITION SWITCH must be
in the RUN or START position to activate the starter motor. To reduce the chances of
unauthorized usage, always remove the key from the IGNITION SWITCH after each use.
CAUTION
Severe damage to the starter and/or engine ring gear will occur if the
starter is engaged while the engine is running or if the IGNITION SWITCH
is held in the START position after the engine has started.
THROTTLE LEVER — Located on the right handlebar, the THROTTLE LEVER
is used to operate the snowmobile at various speeds. The actual speed of the snow-
mobile is dependent on terrain conditions and is directly proportionate to the throttle
lever movement. When the THROTTLE LEVER is released, it must automatically
return to the idle position.
! WARNING
If the throttle lever does not return quickly and completely to the idle
position, the throttle system must be repaired or damaged components
replaced before the snowmobile is operated.
WARMER SWITCHES — Located on the hood, engage the switches to activate
warming elements for the handlebars, thumb (THROTTLE LEVER).
2
TOWING WITH A SNOWMOBILE
Pulling a tow-sled or another snowmobile demands special attention. Tow-sleds
towed behind a snowmobile must always be loaded with the lowest possible cen-
ter of gravity. A rigid tow bar must be used when pulling a tow-sled. When pull-
ing passengers in a tow-sled, use a slow speed and avoid rough terrain for safety.
Also, have all passengers get out of the tow-sled and walk when crossing a road.
Every tow-sled must have reflective material on each side and on the rear. Never
use a rope to tow a toboggan, sled, etc., with passengers. Towing a tow-sled with
a rope is extremely dangerous and is strictly forbidden!
If a snowmobile must be towed by another snowmobile, the first step is to
remove the drive belt of the towed snowmobile. Then, using a tow rope, secure
(with a knot) the center portion of a rope to the center of the towing snowmo-
bile’s rear bumper, making sure the rope ends are equal in length; then wrap each
end of the rope two times around a spindle of the towed snowmobile and secure.
CAUTION
When towing a snowmobile, use a slow speed and avoid rough terrain.
Also, when braking, remember that the towed snowmobile will not
brake when the lead snowmobile brakes but instead coast to a stop. Do
not tow by the ski loops.
SAFETY LABELS
BRP snowmobiles display three types of labels relating to maintenance and
snowmobile operation in the Operator’s Guide, Snowmobile Safety Handbook,
and on the snowmobile.
!WARNING identifies personal safety-related information. Be sure to fol-
low the directive because it deals with the possibility of severe personal injury or
even death.
!CAUTION identifies a hazard situation which, if not avoided, could
result in minor or moderate injury.
CAUTION identifies unsafe practices which may result in snowmobile-
related damage. Follow the directive because it deals with the possibility of dam-
aging part or parts of the snowmobile.
NOTE: identifies supplementary information worthy of particular attention.
You, the owner/operator, must ensure that all labeling is retained on the snowmo-
bile and that the related information is being followed.
Minimum safety standards for snowmobiles have been adopted by the Snowmo-
bile Safety Certification Committee. All BRP snowmobiles carry a certification
label affixed to the tunnel. This label signifies that an independent testing labora-
tory has verified compliance with the safety standards set by the SSCC.
0155-567A
3
SAFETY EQUIPMENT
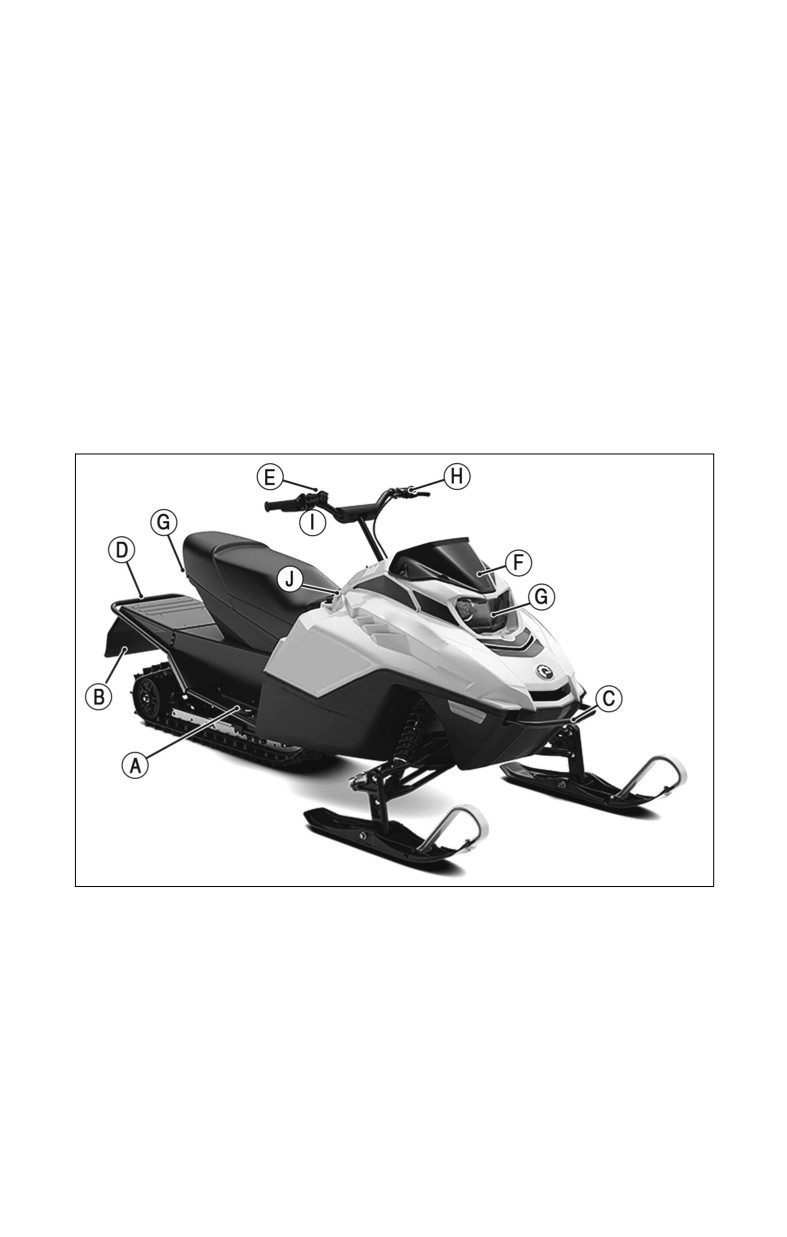
BRP snowmobiles have safety equipment designed to protect the operator and
the passenger, if the snowmobile is designed to carry a passenger:
A. RUNNING BOARD WITH ANTI-SKID SURFACE — Serves as a
footrest while the operator is riding the snowmobile. It also protects the
operator/passenger feet from hitting foreign objects on the trail. The
operator/passenger must keep feet on the RUNNING BOARD at all
times. Never place feet beyond the outside edge of the snowmobile
when attempting to turn or while the snowmobile is in motion. If the sur-
face of the RUNNING BOARD becomes packed with snow or ice, clean
the surface immediately. The RUNNING BOARD should be cleaned
before each use. An ANTI-SKID SURFACE is located on the RUN-
NING BOARD to help prevent accidental slippage by the operator/pas-
senger during operation and mounting or dismounting when free of
snow and ice.
B. SNOWFLAP — Extends from the rear of the snowmobile and deflects
snow, ice and other objects hurled by the track.
SNO-WL12
C. FRONT BUMPER — Provides protection from damage in minor colli-
sions.
D. REAR BUMPER — Provides protection from damage in minor colli-
sions. The REAR BUMPER may be used as a handle for lifting the rear
of the snowmobile.
E. EMERGENCY STOP SWITCH — Works independently of the igni-
tion switch and must be in the ON (raised) position before the engine
will start. If an emergency occurs requiring the engine to be immediately
shut off, the EMERGENCY STOP SWITCH is pushed down to the OFF
position to stop the engine; then the brake is applied to stop the forward
movement of the snowmobile.
4
F. WINDSHIELD — Provides the operator with comfort as well as pro-
tection by deflecting wind and snow.
G. TAILLIGHT, BRAKE LIGHT, HEADLIGHT AND REFLEC-
TORS — The LIGHTS provide the operator with the proper operating
and night visibility. Also, for the snowmobiler’s safety, the snowmobile
has REFLECTORS to increase the visibility of the snowmobile. Never
drive a snowmobile unless all LIGHTS are working properly and
REFLECTORS are in place.
H. BRAKE LEVER LOCK (200) — Provides a locking device for the
BRAKE LEVER. The actuator should be engaged whenever the snow-
mobile is parked, idling or unattended. Never operate the snowmobile
with the actuator engaged.
! WARNING
The brake lever lock is not a parking brake and should not be applied for peri-
ods exceeding 5 minutes. The brake lever lock maintains the brake lever in
the compressed position and maintains pressure against the brake disc;
however, after a period of time, the pressure applied to the brake disc may
relax below the amount required to hold the snowmobile stationary.
I. THROTTLE CONTROL SWITCH — Protects against a runaway
snowmobile caused by a throttle slide that will not return to the idle
position. If ice forms in the throttle system or if there is some other mal-
function, the switch will stop the engine when the THROTTLE LEVER
is released. If a situation occurs in which the throttle system does not
operate properly, immediately activate the EMERGENCY STOP
SWITCH. If the THROTTLE CONTROL SWITCH stops the engine or
the above situations occur, correct the problem before re-starting the
engine.
J. TETHER SWITCH — When the TETHER SWITCH cord is connected
to the rider, the TETHER SWITCH interrupts the ignition circuit when
the cap is removed from the base if the operator falls off the snowmo-
bile. Attach the TETHER SWITCH cord to the operator in some manner
before starting the engine. Use of a TETHER SWITCH is mandatory for
all racing applications.
CAUTION
When using a TETHER SWITCH, be careful to ensure the cord does not
become entangled with the handlebars or come into contact with tree
branches or other objects. This could cause the cap to be inadvertently
removed, resulting in an unexpected loss of power, which could cause
loss of control of the snowmobile and serious injury.
BELT GUARD (not shown) — Protects the operator should the clutch or drive
belt break. Never operate the snowmobile or run the engine without the BELT
GUARD secured and the hood/access panels fastened securely.
5
WARMERS FOR HANDLEBAR/THUMB (not shown) — Provide the oper-
ator with comfort and are controlled with a switch.
! WARNING
People who are unable to feel pain to the skin because of advanced
age, chronic illness, diabetes, spinal cord injury, medication, alcohol
use, exhaustion or other physical conditions, must exercise care when
using the seat heater. The seat heater may cause burns even at low
temperatures, especially if used for long periods of time. Do not place
anything on the seat that insulates against heat, such as a blanket or
cushion, because this may cause the seat heater to overheat. Do not
puncture the seat with pins, needles or other pointed objects because
this may damage the heating element which may cause the seat heater
to overheat. An overheated seat may cause serious personal injury.
HANDGRIPS (not shown) — If the snowmobile is equipped with a passenger
seat, HANDGRIPS provide the passenger with secure handholds. Before riding,
the operator must advise the passenger to use the HANDGRIPS at all times.
Never carry a passenger on a snowmobile designed for only one person.
TRAILERING A SNOWMOBILE
It is best to use a trailer that is specifically designed for hauling snowmobiles,
such as tilt-bed trailers, flatbed open trailers, and enclosed trailers. A tilt-bed
trailer may be equipped with a winch system to assist with loading your
snowmobile. Open flatbed trailers are equipped with folding or self-storing
ramps that allow snowmobiles to be loaded onto the trailer from the rear and
unloaded off the trailer in the front. Enclosed trailers typically have doors in the
front and rear that fold down to serve as loading and unloading ramps.
Be sure you have all the proper equipment to attach the trailer to your vehicle,
including safety chains, the proper size hitch ball and the proper electrical
connections to power the trailer lights. Before you trailer a snowmobile, check
the maximum load capacity limit and required tire pressure of your trailer and
the gross vehicle weight rating and towing capacity of your towing vehicle.
CAUTION
BEFORE loading the snowmobile on the trailer, always double-check
to ensure that the trailer tongue is properly secured to your towing
vehicle’s hitch ball. This will prevent the trailer from popping off the
hitch when a snowmobile is driven onto the trailer bed, particularly
with 2-place trailers.
When securing your snowmobile on the trailer, avoid using rope or rubber straps
since they can easily fray, stretch or break. After securing the snowmobile, check
to be certain the trailer’s brakes (if the trailer is equipped with brakes), taillights/
brake lights/turn signals and side marker lights all function properly. After the
re-check, always cover your snowmobile if on an open trailer to protect it while
towing.
! WARNING
Make sure all seats, accessories and cargo are properly secured, or
remove it to prevent from falling on the road and creating a hazard for
following vehicles.
6

Operator Preparation
WORD TO ALL SNOWMOBILE OPERATORS
Regardless of previous experience in operating an automobile, motorcycle or
motorboat, everyone is a beginner the first time one sits behind the controls of a
snowmobile. Every sport requires skill and judgment on the part of the participant
to keep risks well within acceptable boundaries. Variable conditions of snow, ice,
light, terrain, weather, and temperature, and their effects on snowmobile operation
and the operator, must be learned. How to balance the snowmobile under varying
terrain conditions and speeds must be learned by the operator. How to compensate
for other vehicles or activities when snowmobiling must also be learned. It is
highly recommended for a novice operator to participate in a certified Snowmobile
Safety Course before operating a snowmobile.
Every snowmobile operator should familiarize themselves with:
1. snowmobile controls
2. safety equipment
3. trail signs
4. proper dress
5. responsibilities
6. safe operating instructions
7. general maintenance
TRAIL SIGNS
DEAD
PRIVATE TRAIL
END
Dead End/Private Trail
Right or Left Turn
Stop
Steep Hill
Snowmobiles Permitted
Snowmobile Crossing
No Snowmobiling
Two-Way Traffic
One-Way — Do Not Enter
Stop Ahead
Informational
Trail Marker
DANGER
Danger
Directional Marker
CAUTION
Caution
Trail Intersection
0000-066
7
Trail signs are used to control, direct or regulate the use of snowmobiles on trails
and to inform the operator of trail conditions. A snowmobile operator MUST
become familiar with and be able to recognize all signs in any area.
Regulatory, warning, trail marking and informational are the four types of signs
used on trails. The trail signs in the above illustration are recognized by most
agencies having jurisdiction over snowmobile use areas. Other trail signs may be
used in certain areas, so be sure to become familiar with them before trail riding.
PROPER DRESS
Snowmobiling and related winter sports require wearing warm clothing. In an
effort to keep warm, however, a person may overdress, perspire and end up get-
ting chilled. A basic theory in keeping warm is if dressed properly, the clothing
will keep out cold air and will allow moisture to evaporate from the body.
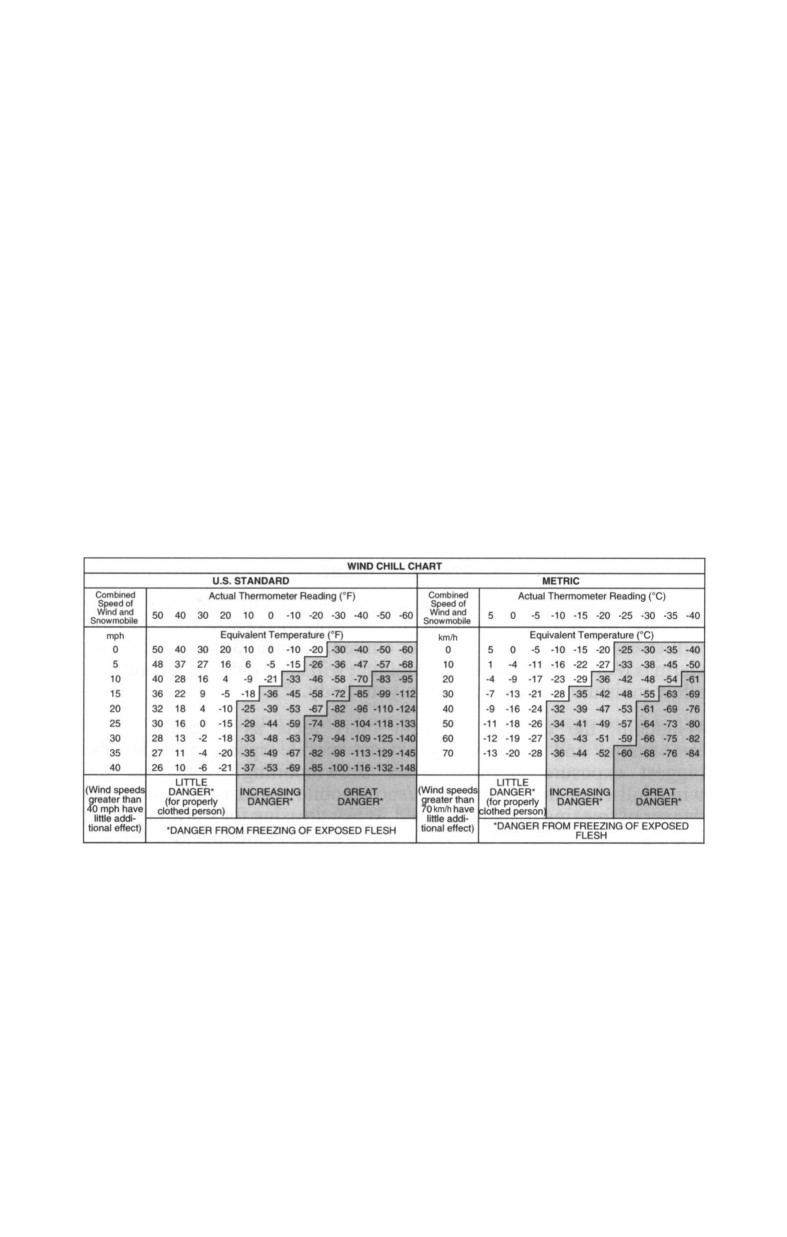
Wind chill, the temperature your body feels as a result of the temperature and
combined wind/snowmobile speed, provides the biggest exposure problem when
snowmobiling. Notice in the wind chill chart below that as the wind/snowmobile
speed is increased, the danger of freezing is also increased. When dressing for
snowmobiling, it is important to dress according to the coldest anticipated wind
chill factor, the length of your exposure, and the anticipated weather conditions.
It is often not enough to dress according to the current temperature and condi-
tions.
Wind Chill Chart
WINDCHILL
Good quality one or two-piece snowmobile suits with water-resistant fabric and
lightweight, high insulating linings should be worn by all snowmobilers. The
type and amount of clothing worn underneath the snowmobile suit depends on
the weather conditions of the day. Thermal, breathable underwear next to the
skin provides an important layer of air space necessary for proper insulation.
8
Approved helmets, which provide warmth and protection, should always be
worn with the chin strap buckled at all times. Helmets should be full-coverage
with a plastic protective shield and a durable chin strap. If the helmet is not
equipped with the protective plastic shield, protective eye goggles must be worn.
Goggles or a face shield are important attire for eye protection and increased vis-
ibility in varying light conditions. Suggested lens colors per operator preference
are gray or dark green in bright sunlight and amber or yellow will improve visi-
bility in overcast conditions or late afternoons. Colored lenses must be removed
at night. Clear lenses (which are suitable for all light conditions) must be used at
night.
In extremely cold weather, a face mask is recommended in addition to the helmet
and goggles/face shield to reduce the possibility of frostbite.
Hands must be protected by a pair of well-insulated snowmobile gloves or mit-
tens that will permit unhampered use of the thumbs and fingers for operation of
the controls.
Rubber-soled boots with a waterproof nylon or leather upper and a synthetic, felt
or wool liner, are best suited for snowmobiling as they provide the necessary
warmth, dryness, and traction. A pair of wool or thermal socks, in addition to
snowmobile boots, gives the feet the required protection from the cold. Several
points concerning snowmobile clothing need to be stressed:
1. Clothing that ventilates as well as insulates is a necessity.
2. Dress in layers which do not limit mobility. Layers of clothing function bet-
ter than a single heavy layer: an inner layer with a ventilating weave (ther-
mal underwear), a second layer of a durable, utility nature (wool shirt and
sturdy pants), and a third insulating layer (snowmobile suit).
3. Remember when purchasing snowmobile clothing that COMFORTABLE
and PROPERLY FITTED clothing is essential for warmth.
4. Keep insulating clothing dry, as it loses its insulating effectiveness when
wet. Keep snow out of clothing. To cool off, open clothing at the collar.
Allow clothing to dry after use.
5. Hand and foot warmth is dependent on movement. Do not wear socks or
gloves that are too heavy. One pair of wool or thermal socks and one
pair of snowmobile gloves with glove liners are adequate for most win-
ter conditions.
6. Cover all exposed skin to prevent frostbite.
7. NEVER wear long scarves or loose clothing that could get drawn into or
caught by moving parts of the snowmobile.
8. Dress appropriately; never overdress or underdress.
PHYSICAL AND MENTAL FITNESS
Snowmobiling requires physical exertion. In order to enjoy snowmobiling to its
fullest, good physical preconditioning is required to handle the snowmobile with the
required muscle and reduce the “morning after” stiff muscles and aching arms.
Also, in difficult situations such as becoming stuck in deep snow, the snowmobiler
in good physical condition will have the advantage.
9
Extended riding and snowmobile safaris (group riding) require physical stamina
above and beyond the stamina required for short rides. Getting plenty of sleep
and eating healthy meals is a good practice to provide the necessary stamina.
Frequent rest stops when fatigued are a must.
High altitude riding presents another complication. Lower oxygen levels in high
altitude areas cause premature exhaustion and fatigue following limited exertion.
The best preparation for high altitude riding is short “adapting” rides with
extended rest stops.
Mental preparation for snowmobiling is extremely important. Mental fatigue is
hazardous as it can lead to poor judgment and unsafe operating performance.
Prompt reactions and expert judgment are required at all times by snowmobile
operators. If an operator is not prepared to properly react to a possible emer-
gency, there has not been enough preparation to operate a snowmobile.
Never operate a snowmobile (or any motorized vehicle) under the influence of
drugs, alcohol or medication which may impair your judgment or reactions.
ENVIRONMENTAL
Environmental stewardship is the responsibility of every snowmobiler. Damag-
ing or destroying snowmobiling areas is strictly forbidden and can lead to more
restrictive laws concerning snowmobile use. Common sense and courtesy should
guide the snowmobiler. The policy of all snowmobilers should be, “What you
carry in, you carry out; take only pictures and leave only tracks.” Several guide-
lines should be followed:
1. Operate a snowmobile only when there is sufficient snow cover to protect
the ground vegetation.
2. Leave trees and shrubs alone; do not drive over them.
3. When encountering wildlife on trails, allow them to move off leisurely. Do
not chase or harass wildlife.
4. Do not litter or pollute.
5. Ride only in designated areas and on designated trails. Observe all rules and
regulations. Obtain permits as required.
6. Snowmobile noise may disrupt specified “quiet zones” such as hospitals,
rest homes and residential areas, so use common sense and courtesy when
near these zones.
RESPONSIBILITIES
Federal, state, provincial and local governments have enacted laws and regula-
tions pertaining to the use and operation of snowmobiles. It is the responsibility
of the snowmobile owner and operator to learn and obey these laws and regula-
tions. Also, the owner and operator must be aware of the liability, property dam-
age and insurance laws relating to snowmobile operation.
Respect other people’s privacy and property at all times. Always obtain the property
owner’s consent before snowmobiling on the property. Check with the proper offi-
cials before riding on public lands and drive slowly in residential areas.
10
A parent must be the judge of a child’s capability to safely understand, operate and
control a snowmobile. It is the parent’s responsibility to determine how involved the
child should be in the sport of snowmobiling. Never under any circumstances let
children ride a snowmobile unsupervised; warn them against speed, carelessness
and overconfidence. To reduce the chance of unauthorized usage, always remove
the key from the ignition switch after each use.
REGISTRATION AND PERMITS
Most countries, states, and provinces require by law that new and used snowmo-
biles be registered with the governing body having jurisdiction over snowmobile
use. Snowmobile registration has several purposes: It allows the state or prov-
ince to maintain records of existing snowmobiles, and those records provide the
owner/operator with a means to identify their snowmobile if recovered after
theft. Registration fees also generate a revenue stream for governmental agencies
to establish and maintain trails.
Be sure to obtain all necessary permits. Snowmobiles can be operated by people
of any age. However, if a juvenile is to operate a snowmobile across public prop-
erty or private property not owned by a parent or guardian, an operator’s permit
is required by most states and provinces. Consult a local law enforcement offi-
cial or conservation officer for specific laws concerning juvenile snowmobile
operator permits.
CODE OF ETHICS
1.
I will be a good snowmobiler. I recognize that people judge all snowmobil-
ers by my actions. I will use my influence with other snowmobilers to pro-
mote proper conduct.
2.
I will not litter any trails or camping areas, nor will I pollute streams or
lakes. I will carry out what I carry in.
3.
I will not damage trees, shrubs or other natural features.
4.
I will respect other people’s property and rights.
5.
I will lend a helping hand when I see someone in distress.
6.
I will make myself and my snowmobile available to assist in search and res-
cue operations.
7.
I will not interfere with the activities of other winter sports enthusiasts. I will
respect their right to enjoy their recreational activities and facilities.
8.
I will know and obey all federal, state, provincial and local laws and regula-
tions related to the speed and operation of snowmobiles in areas where I
snowmobile.
9.
I will not harass wildlife.
10.
I will not snowmobile where prohibited.
11.
I will not operate a snowmobile under the influence of drugs, alcohol or
medication.
11
Operating a Snowmobile
SAFE OPERATING INSTRUCTIONS
Before the snowmobile engine is started:
1.
Check weather forecasts for possible dangerous weather conditions.
2.
Dress properly. A helmet, eye protection and proper clothing, based on cur-
rent and forecasted weather conditions, are a must. Never wear long or
loose scarves, shoelaces, etc., which could get caught in a moving part of
the snowmobile.
3.
Inform someone as to where you are going and when you plan to return.
4.
Arrange to ride with friends using the “buddy system.” Avoid riding alone.
5.
Equip the snowmobile with a survival kit and all necessary supplies. A
flashlight, critical spare parts and the tool kit should be carried with the
snowmobile at all times. It is also a good idea to carry personal identifica-
tion, money, wireless phone, matches, knife, compass, paper and a writing
instrument.
6.
Complete the Pre-Ride/Start Inspection of the snowmobile (see page 15 for
details).
7.
Forbid a new or inexperienced rider to operate the snowmobile without
proper instruction. Carefully supervise and control these individuals over
flat, predetermined courses. Observe federal, state, provincial and local
requirements regarding minimum-age licensing and operation. Read the
Operator’s Guide and Snowmobile Safety Handbook thoroughly; under-
stand and follow all recommendations.
8.
Obtain permission before crossing private property.
9.
Never operate the snowmobile while under the influence of alcohol, drugs
or medication which may impair your judgment or reactions.
10.
Make sure the track is free to rotate by rocking the snowmobile from side to
side, because in certain weather, the track may freeze to the ground or other
contact surface. This procedure will prevent unnecessary drive belt wear.
11.
BE MENTALLY PREPARED TO OPERATE THE SNOWMOBILE.
Emergency situations require automatic reactions.
Once the snowmobile engine is running:
1. Check the headlight (high and low beam), taillight and brake light to ensure
they are properly working and correctly adjusted. Make sure all lights are
clean to provide maximum illumination. The headlight and taillight must be
illuminated whenever the engine is running.
2. Activate the emergency stop switch to ensure it properly operates. If the
emergency stop switch properly shuts off the engine, restart the engine.
! WARNING
Do not operate the snowmobile if the emergency stop switch does not
function.
3. Keep feet, hands and clothing away from moving parts of the engine and
drivetrain. Always shut off the engine to make adjustments or repairs.
12
4. When the snowmobile is operated in extremely cold weather, the drive sys-
tem must be “run in.” Raise the back of the snowmobile with a shielded
safety stand or lay the snowmobile on its side and open the throttle slightly
allowing the track to turn several revolutions. This rotation allows the drive
belt, bearings and track to “warm up” properly. Never run the engine at high
RPM when “warming up” the track.
! WARNING
Do not allow anyone else to stand near the snowmobile during “warm-
up” of the track. Severe personal injury may result from flying debris or
contact with the track.
5. Check the tether switch to ensure it operates by removing the cap. Attach
the tether switch cord to the operator in some manner (suit, vest, etc.) before
applying the throttle.
Once the ride has started:
1.
Keep feet on the running board at all times and away from the revolving
track. NEVER extend feet or legs over the edge of the running board under
any circumstances while the snowmobile is moving.
2.
Obey restrictions on the number of riders. If the snowmobile is designed for
one operator, never carry passengers. If the snowmobile is designed to carry
a passenger (equipped with handgrips), carry the passenger only after pro-
viding the passenger with safety instructions.
3.
Never operate the snowmobile faster than allowed by the designated speed
limit, terrain and conditions. Use common sense. Avoid obstructions and
suspicious-looking areas; snow and glare can conceal a steep drop-off or
ravine.
4.
Never operate the snowmobile between railroad tracks or on the railroad
right-of-way. The sound of an approaching train may be drowned out by the
snowmobile engine.
5.
Stay away from ice skaters and skiers; never use ski slopes or ski trails for
snowmobiling.
6.
Do not cut across another snowmobiler’s line of travel; a collision can cause
serious bodily injury or death.
7.
Operate the snowmobile well away from a roadway. Come to a complete
stop before crossing roads or highways, and yield to all vehicular traffic.
Driving close to a highway or toward oncoming automobile traffic at night
may cause confusion and contribute to a serious accident.
8.
Never over-drive the headlight of the snowmobile. Visibility is the key to
snowmobiling safety. Always operate the snowmobile at a speed that will
allow ample time to recognize and avoid a hazard.
13
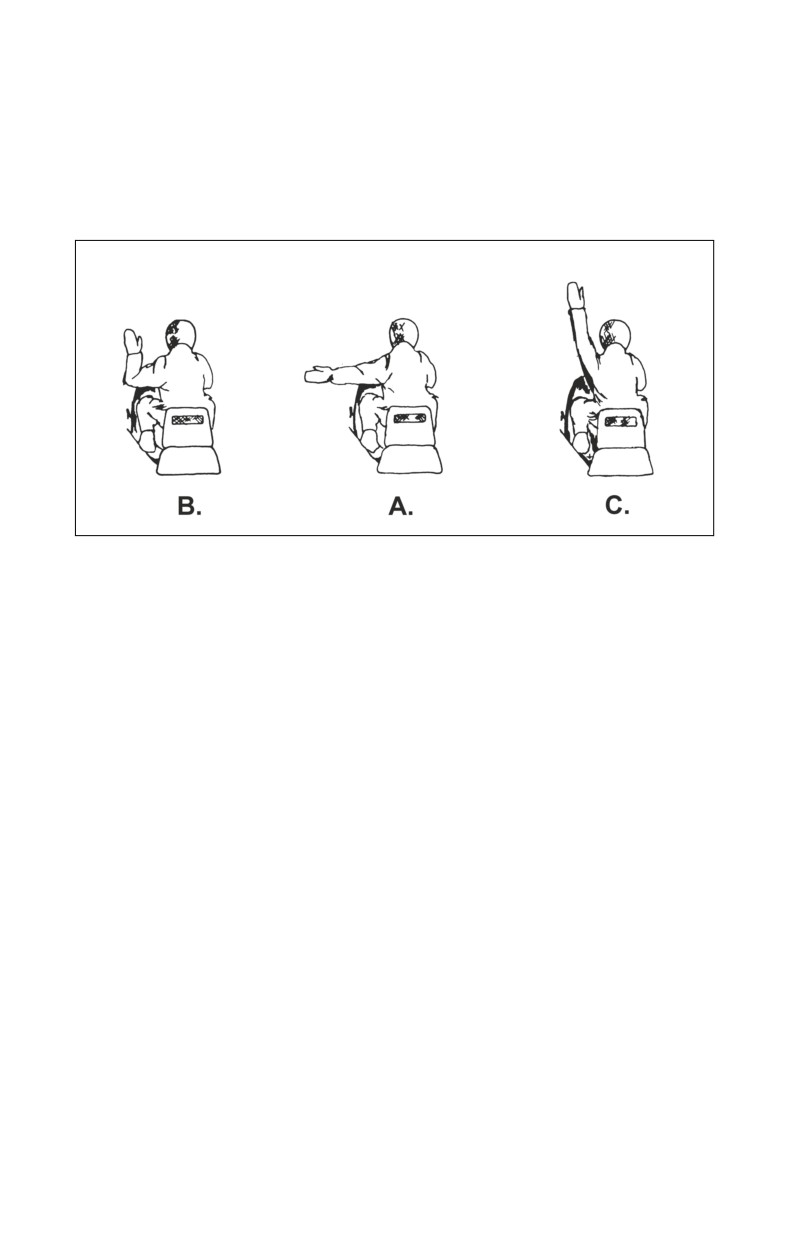
9. Always use the appropriate hand/arm signals, especially when group
(safari) riding. The recognized signals are:
A. LEFT TURN: Extend the left arm straight out to the left of the body.
B. RIGHT TURN: Extend the left arm horizontally, bending it at the elbow
to vertically raise the hand.
C. SLOW DOWN OR STOP: Raise either arm vertically above the head.
0000-051
10. When operating a snowmobile in reverse, always use caution and minimal
speed. Be sure the reverse switch is in the desired position before applying
throttle.
14
Preparing a Snowmobile
MAINTENANCE
To ensure snowmobiling safety and enjoyment, snowmobiles require proper
maintenance and care at regular intervals. Since snowmobiles are often operated
in the harshest weather and terrain conditions, care must be taken in performing
certain mechanical procedures. It is imperative that all snowmobile maintenance
be done correctly and professionally if needed. Use only genuine BRP snowmo-
bile replacement parts and accessories as they have been tested to ensure the
safety and reliability of your snowmobile. Always follow the maintenance
schedules and procedures specified in the Operator’s Guide. Ensure your safety
by completing the Pre-Ride/Start Inspection BEFORE you ride.
In addition to the proper maintenance and Pre-Ride/Start Inspection, proper
snowmobile preparation is important for variations in terrain, altitude and tem-
perature. Carbide ski wear bar kits, track stud kits, high altitude kits and wheel
kits are available to improve handling and performance of the snowmobile under
prescribed conditions. Consult an authorized BRP snowmobile dealer regarding
the specific kits to be used in your specific operating terrain.
PRE-RIDE/START INSPECTION
Never start the engine or ride a snowmobile without first completing the follow-
ing inspection and making the appropriate corrections or adjustments:
1. Make sure the carburetor and exhaust systems are securely fastened.
2. Make sure the belt guard and hood/access panels are in place and securely
fastened.
3. Make sure the windshield is not broken or jagged.
4. Check for loose bolts or rivets.Tighten all loose bolts securely or to speci-
fied torque values. Replace any loose rivets.
5. Check the operation of the brake. Make necessary adjustments as required.
6. Check for proper operation of the steering system by manually (do not
force) moving the skis completely to the right and left. If difficulty is
encountered, check and repair/replace any component causing the difficulty
or remove any ice and snow buildup that may be obstructing the steering
components. There should be no excessive free-play in the steering linkage,
ball joints or connections to the skis.
7. Check the operation of the throttle. Completely compress the throttle lever
several times to make sure it operates smoothly and returns quickly and
completely to the idle position.
! WARNING
If the throttle lever does not return quickly and completely to the idle
position, the throttle system must be repaired or damaged components
replaced before the snowmobile is operated.
8. Check the drive belt and the track for wear and alignment. Replace or
adjust if necessary.
9. Check the gasoline and oil supply of the snowmobile. Never take extended
trips without the gas tank being full and always have a reserve for possible
emergencies. A good habit is filling the gas tank and checking all fluid lev-
els before each day of snowmobiling.
15
10. Make sure an Operator’s Guide and all necessary emergency equipment
are included with the snowmobile.
11. Make sure the snowmobile is facing an open area and no one is in front of
or behind the snowmobile before starting.
PROPER FUELING
Proper fueling is an extremely important aspect of snowmobile operation. Most
snowmobiles manufactured today do not require gasoline and oil to be pre-
mixed except in certain circumstances. Read the Operator’s Guide for specific
instructions, including gasoline octane and type requirements and oil recommen-
dations.
Common sense must be used when handling gasoline as it is highly explosive.
Always fill the gas tank in a well-ventilated area. Do not ingest or come into con-
tact with gasoline. If gasoline is ingested or comes into contact with the eyes,
seek medical attention immediately. Skin contacted with gasoline must be
washed with soap and water immediately. Gasoline-soaked clothing must be
changed immediately.
When filling the gas tank from a gas can, a funnel with a fine-mesh screen
should be used to prevent spillage of gasoline and foreign particles from entering
the gas tank. Since gasoline expands as its temperature rises, fill the gas tank to
the rated capacity only.
When adding fuel to the snowmobile:
1. NEVER smoke or light any matches.
2. NEVER add fuel while the snowmobile engine is running.
3. NEVER over-fill the gas tank.
4. NEVER spill fuel during fueling.
16
Riding a Snowmobile
THE FIRST RIDE
Never operate a snowmobile without proper instruction. It is recommended that all
snowmobile operators attend a certified Snowmobile Safety Course. The most
important objective when first operating a snowmobile is getting the feel of starting,
stopping and turning. Once the novice snowmobiler has read and understands the
information in the Operator’s Guide and Snowmobile Safety Handbook, and been
advised by an experienced snowmobiler of the proper starting, stopping and turning
procedures, operating the snowmobile should be practiced on an open, flat, obstruc-
tion-free area. The main caution for the novice is that overconfidence must never
take over from practice and experience. Operating a snowmobile requires special
skills and knowledge that must be learned over a period of time.
MASTERING BASIC SNOWMOBILE CONTROL
When starting, compress the throttle lightly and move ahead slowly. Gradually
increase speed, release the throttle and try braking. Turning a snowmobile is sim-
ilar to turning a motorcycle. When turning, the operator should lean toward the
direction of the turn. Turning does not merely happen; it depends on four basic
factors: 1) snowmobile speed; 2) the type of turn; 3) snow conditions; and 4)
weight on the skis. When turning the snowmobile in soft or lightly packed snow,
in sweeping turns, or in medium-speed turns, the operator should assume the
kneeling position and lean into the direction of the turn. For faster turns, the
operator should use the sitting position and lean far into the turn. Turning at a
high rate of speed on hard-packed snow or ice can be dangerous and is not rec-
ommended. Inexperienced operators should maintain a slower rate of speed
when practicing turns on hard-packed snow or ice. Only experience will teach
how much to lean into turns at different speeds.
RIDING POSITIONS
Standing, kneeling, posting and sitting are the four basic positions normally used
while operating a snowmobile. Each position has its advantages and disadvantages
under different terrain and snow conditions. Only experience will determine which
position is best for each operator under each situation.
SITTING — Position both feet on the running boards, body midway back on the
seat, and hips and knees in a flexible position. The sitting position is ideal for
snowmobile operation over smooth and familiar terrain. The position is generally
accepted as the most relaxing and safest, allowing the operator to maintain the best
control in an emergency situation.
KNEELING — Position one foot firmly on the running board and the opposite
knee on the seat. The kneeling position allows the operator at slower speeds to shift
weight quickly and put more “body English” into turns, especially in deep snow.
One disadvantage of this position is that the windshield does not protect the opera-
tor from the onrush of cold air and snow. The kneeling position also does not allow
the operator to gain quick control of the snowmobile in an emergency situation.
Quick stops must be avoided in this position.
STANDING — Position both feet on the running boards with knees flexed. The
standing position allows the operator to see better, obtain maximum traction, and
shift weight as conditions dictate. When traveling up a steep incline, the operator
should lean forward in the standing position. As with the kneeling position, the
standing position does not allow the operator to gain quick control of the snowmo-
bile in an emergency situation. Quick stops must be avoided in this position.
POSTING — Position the body off the seat in a squatting posture. The posting posi-
tion allows the legs to work as shock absorbers when traveling over rough terrain.
17
IF A SNOWMOBILE GETS STUCK IN SNOW
It is always better to prevent a snowmobile from becoming stuck in snow than to
exert oneself in attempting to free a stuck snowmobile. Two techniques will
greatly reduce the possibility of becoming stuck in snow. First, in deep, fresh
snow, stop the snowmobile in snow that has already been packed down. This can
be accomplished by driving the snowmobile in complete circle and then stopping
on the packed circumference of the circle. Second, always stop the snowmobile
facing downhill, never uphill.
If a snowmobile becomes stuck in snow, do not attempt to lift it out — that is
physically hard on a person’s back and heart.
In deep snow conditions, there are two methods to free a snowmobile. The first
method is to stand on the rear of the running board, compress the throttle gently
(without spinning the track or breaking traction), and bounce up and down. This
will apply more pressure to the track of the snowmobile and remove some
weight from the skis. If this method does not work, do not compress the throttle
wide open as this will merely bury the snowmobile deeper.
The second method is to turn off the snowmobile engine and tamp down a short
trail approximately three to five feet (one to two meters) in front of the snowmo-
bile at a lower level than the snowmobile. Then lift (from the knees) the rear of
the snowmobile onto new snow, start the engine, compress the throttle gently
(without spinning the track or breaking traction) and drive forward. Never place
foreign material beneath the track for support or attempt to push the snowmobile
by the handlebar while accelerating. Models with a reverse switch can, under
certain conditions, free themselves from a stuck situation by simply backing up.
GROUP (SAFARI) RIDING
The enjoyment and safety of group (safari) riding should be a concern of all snow-
mobilers. Before starting out on a group ride, the person who is most familiar with
the trail should be designated as the leader. All members of the group should be
knowledgeable of the proposed route and destination. A “shadow,” the rider who
follows up the group, should also be designated.The following group riding rules
should be followed:
1. Never overtake the leader or any other snowmobile.
2. Use appropriate hand signals at all times.
3. Maintain safe distances between all snowmobiles at all times.
4. Use moderate speeds and keep a steady pace. Obey all speed limits. Never
drive faster than conditions and common sense dictate.
5. Stop periodically for rests.
6. Cross all roadways and railroad tracks in single file at a 90° angle.
7. Assist others when necessary.
8. Carry sufficient gasoline and all necessary and emergency tools and
equipment.
18
TERRAIN AND RIDING VARIATIONS
Not all snowmobiles can ride on trails. Check with local authorities to make sure
that your snowmobile can be used on trails.
The snowmobile, unlike a car or motorcycle which generally travels on familiar
roads or trails, can get into areas where other vehicles cannot travel. Because the
snowmobile is a versatile vehicle, operators are often tempted to put the snowmo-
bile into places and situations which may be hazardous. It is important, at all times,
to understand the limitations of the snowmobile and to drive cautiously no matter
what the terrain conditions. Learn to read the trail as you ride. Know what’s coming;
be prepared to react long before you get there. The following sections are a briefing
on the variety of conditions a snowmobiler is likely to encounter and a general over-
view of how the snowmobile should be operated under each condition. Snowmo-
biles are not designed for use on roads, streets or highways.
Groomed Trail
The sitting position is the preferred riding position on a groomed trail. Always
observe all trail signs, keep to the right side of the trail, and be prepared for the
unexpected. Never race or zigzag from one side of the trail to the other. Never
stop unexpectedly, directly on the trail or in a location where you cannot be
clearly seen by other snowmobilers on the trail.
Ungroomed Trail
The sitting, kneeling and posting positions are preferred riding positions on an
ungroomed trail. You can expect snowdrift and washboard conditions unless there
has been a recent snowfall. Because of these conditions, it is important to use mod-
erate speed and to keep a watchful eye out for hidden rocks, tree stumps, etc.
Deep Snow
The kneeling and standing positions are the preferred riding positions in deep
snow conditions. You can expect the snowmobile to perform differently in deep
powder snow than snow six inches (15 centimeters) deep. Turns are harder, the
risk of becoming stuck is greater, and the snowmobile can begin to bog down. A
higher rate of speed will be required to negotiate a turn and turns should be wide
and sweeping. Be sure to always stop on a previously traveled track with the
snowmobile facing an open area or downhill.
Ice or Hard-Packed Snow
Since the skis and track do not have much traction on ice or hard-packed snow,
the snowmobiler is advised to slow down and avoid rapid acceleration, turning
and braking. Traction aids are recommended for this type of riding. Turning
should be done only at a slow speed. Always use extreme caution as braking
capability is reduced on ice or hard-packed snow. If brakes are firmly applied
and the track locks, the snowmobile may swerve, risking the chance of the oper-
ator losing control. The sitting position will give the operator the best control. If
swerving results from attempting to turn or brake, turn the skis into the direction
of the slide and gently apply throttle.
If at all possible, avoid waterways; traveling on frozen lakes and rivers can be
fatal. Consult local authorities concerning the ice conditions if there is any ques-
tion or doubt as to the thickness or strength of the ice or if you are unfamiliar
with the area. Also, be familiar with or ask about inlets, outlets, springs, fast-
moving currents, or any other hazard that may create thin ice. NEVER ride on
ice you THINK is thick enough.
19
Uphill
Depending on the angle of the incline, climbing a hill can be accomplished by
two methods. The SLALOM METHOD (sidehilling) can be used if there are few
obstacles on the hill. The operator assumes a kneeling position while keeping
their body weight on the uphill side at all times. While maintaining a steady, safe
speed, the operator crosses the hill at an angle as far as possible in one direction,
and then turns back at the same angle in the opposite direction, switching the rid-
ing position to keep weight on the uphill side of the snowmobile. The DIRECT
CLIMB method should be approached with caution. The operator should assume
the standing position, accelerate before the start of the climb and then reduce
throttle pressure to prevent track slippage.
In either type of climb, the snowmobile speed should be only as fast as the
incline dictates. Always slow down as the crest of the hill is approached. If the
snowmobile stalls, shut off the engine, free the skis by pulling them out and
downhill, place the rear of the snowmobile uphill, position yourself on the snow-
mobile to avoid tipping, start the engine, and ease it out with slow, even throttle
pressure.
Downhill
The sitting position is best for downhill riding in order to have full control of the
snowmobile. Keep a low center of gravity and maintain slight throttle pressure,
allowing the snowmobile to run downhill with the engine operating. Speed
should be held to a minimum, but if a higher than safe speed is reached, apply
frequent light pressure to the brakes. Never lock the track by jamming on the
brake.
Sidehill
The preferred position for sidehill riding is the kneeling position with the down-
hill leg on the seat of the snowmobile. This position will allow the necessary
shifting of weight as quickly as needed. All riders are advised to lean into the
hill. The harder the lean inside, the more pressure placed on the inside of the
track allowing for better control. “Sidehilling” is fairly easy in fresh deep snow
but is extremely difficult on ice or hard-packed snow. Only experienced “side-
hillers” should be allowed to break trail on an icy hill.
HAZARDS
Snowmobiling is not without hazards. Trail systems and heavy use areas are gen-
erally free of most obstacles, but low-hanging branches, guy wires, posts,
ditches, roadways, fences and open water are hazards that should be watched for
carefully.
Fences and Posts
Fences and posts may be partially or completely covered by snow. Care should
be taken to locate fences before riding. Proceed with caution in unfamiliar ter-
rain. Newly found fences should be marked with a flag or reflective device. Do
not drive over small snow mounds that may be a fence or a rock pile.
Wires
Always be on the lookout for hidden wires. Fence wires, guy wires, and chains
or wires used as road closures are all hazards that should be avoided. Trails
should be routed a safe distance from guy wires. Trails should not be cut
between a pole and a guy wire. Reflective devices should be attached to guy
wires and fences for easy recognition at night. Do not operate in unfamiliar terri-
tory at night as wires are extremely difficult to detect.
20
Ditches, Excavations and Culverts
Ditches and excavations may become partially or completely covered with snow
obscuring any possible danger. Open water, deep trenches, culverts or rough
excavations are particular hazards along snowmobile trails that pass near roads
or residential areas. Snowmobilers must not attempt to ride in ditches unless
absolutely sure of the ditch base.
Culverts possess the potential of hooking a ski, causing the snowmobile to flip.
Use caution when approaching a crossing with a culvert or when you suspect a
culvert may be present.
Roadway Crossing
Improper crossing of roadways is dangerous and, in some places, illegal. When
approaching a roadway, approach with caution and choose a place to cross with-
out difficulty. Assume the standing position for increased visibility. Come to a
complete stop, look both ways, wait for the traffic to clear and proceed across the
road at a 90° angle. NEVER drive diagonally across a road and remember that
steering on dry or icy pavement is nearly impossible. Also, never stop a snow-
mobile on a paved road because it is very difficult to get started again.
Railroad Crossing
Snowmobile trails may cross railroad tracks. When crossing tracks, come to a
complete stop, look both ways, and proceed directly across the tracks at a 90°
angle. Proceeding diagonally across the tracks may result in the skis becoming
wedged in the tracks. NEVER use railroad tracks as a snowmobile trail as it is
illegal and very dangerous. Because of the sound level of the snowmobile
engine, the snowmobile operator may not hear a train approaching from the rear.
Unfamiliar Territory
Always operate the snowmobile with extreme caution in an unfamiliar area even
when following existing snowmobile tracks or trail. Proceed slowly enough to
recognize potential hazards and obstacles which could shorten your ride and
enjoyment. Even hitting a small rock or stump could throw the snowmobile out
of control and cause severe injury to the operator or passenger. Be safety con-
scious, slow down and enjoy the scenery of unfamiliar territory.
In fog or heavy snow, even a very familiar trail becomes unfamiliar and hazard-
ous. If you must proceed into the fog or heavy snow, do so slowly and watch
intently for hazards. DO NOT PROCEED if not sure of what is ahead.
Night Riding
Riding a snowmobile at night is very popular; however, riding at night can be
very hazardous. Obstacles and other hazards (that are easily identified during
daytime) are much more difficult to see and avoid. When night riding, make sure
the snowmobile’s lights are properly adjusted and in good working order.
Reduce speed; do not over-drive the headlight. Never travel in an unfamiliar area
or blaze a new trail at night. Always carry a flashlight or flare for signaling an
emergency.
Avalanche Areas
In some cases, snowmobilers may be driving in mountainous areas. Since even a
footstep is enough to start an avalanche, a snowmobile is certainly capable of
starting one.
The best way to avoid an avalanche is to stay out of the area where the potential
for avalanche exists. The safest snowmobile routes are on ridgetops, slightly on
21
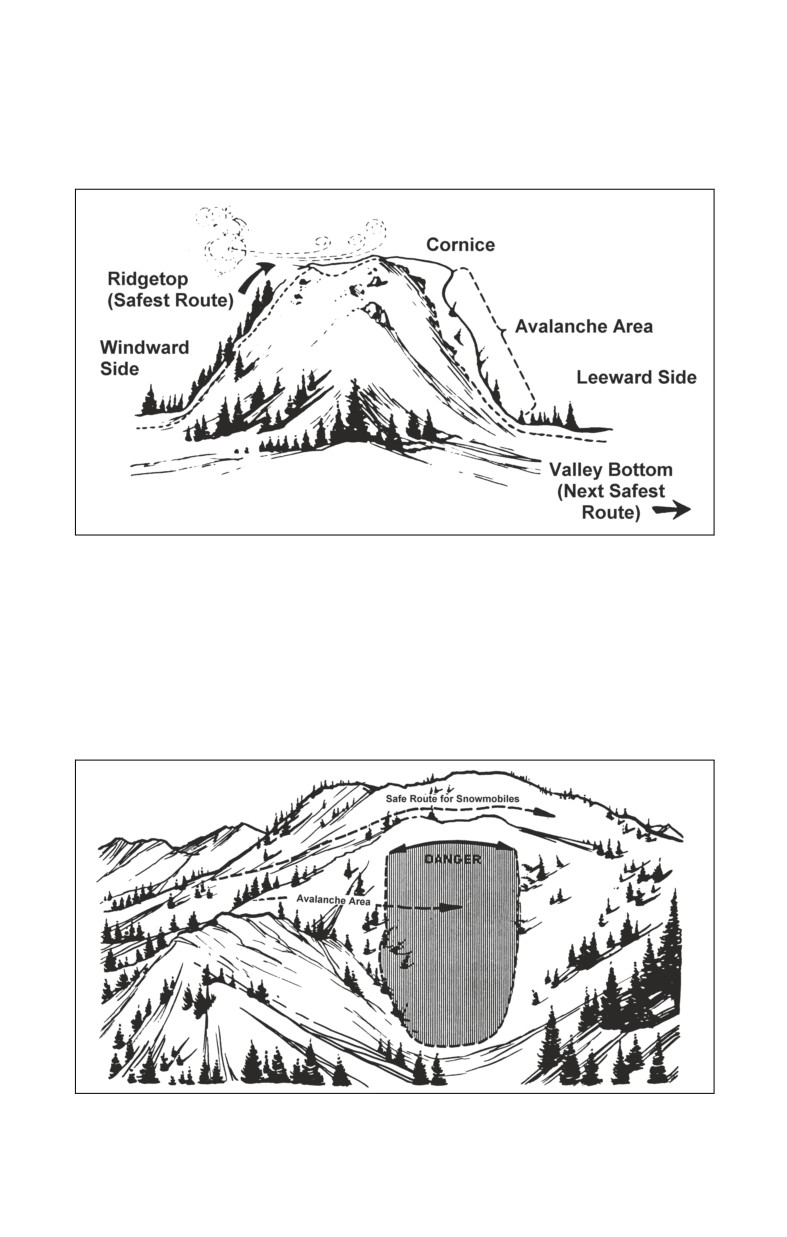
the windward side, away from cornices. Windward slopes are usually safer than
leeward slopes. If you cannot travel on the ridgetop, the next safest route is out in
the valley far from the bottom of slopes. Avoid disturbing the cornices from
either below or above. Drive to the top of the ridge by detouring around cornice
areas.
0000-063
Snowmobiles should not cross the lower part of slopes. Do not drive a snowmo-
bile across especially long open slopes or known avalanche paths. Many poten-
tial hazard areas will be posted and closed to travel. In cornice areas, trail an
avalanche cord behind your snowmobile. If you are buried, this brightly colored,
lightweight rope will float to the snow’s surface to aid in a quick recovery.
If caught in an avalanche, discard all equipment and get away from the snow-
mobile. Make swimming motions, trying to stay on top and trying to get to the
side of the avalanche. Before coming to a stop, get your hands in front of your
face and try to make an air space in the snow as you are coming to a stop.
0000-064
Illustrations reprinted with permission from Outdoor Empire Publishing,
Inc., Seattle, Washington. Copyright 1983. All rights reserved.
22
Emergencies
COLD WEATHER INJURIES
Frostbite, hypothermia and snowblindness are the most common snowmobiling
injuries. Recognizing the early symptoms of these injuries and knowing how to
treat them can prevent permanent injury and possibly death. For your own and
others’ protection, enroll in a certified first-aid course.
Frostbite
Frostbite, the crystallization of the fluids and underlying soft tissues of the skin,
is the most common cold weather injury. The nose, cheeks, ears, fingers and toes
are the areas most commonly affected by frostbite. Often the victim is not aware
of the frostbite until told by someone else. As frostbite develops, the symptoms
follow this order:
1. The affected skin may be slightly flushed.
2. The skin changes to white or grayish-yellow in appearance.
3. Pain is sometimes felt early but subsides later (often there is no pain).
4. Blisters may appear.
5. The affected part feels intensely cold and numb.
6. Mental confusion and impairment of judgment set in.
7. The victim staggers.
8. Eyesight fails.
9. The victim falls and may become unconscious.
10. Shock is evident.
11. Breathing may cease.
Minor frostbite may be treated by slowly warming the affected area. Do not rub
the frostbitten area. Severe frostbite must be treated by a physician.
Hypothermia
Hypothermia, the state at which the body is losing heat faster than it can produce
it, drains valuable energy from the body. As hypothermia develops, the symp-
toms follow this order:
1. Uncontrolled shivering and fumbling hands.
2. Numbness and memory lapses.
3. A dangerously low body temperature.
4. Stupor, frequent stumbling and a lurching walk.
5. Vague slow speech, drowsiness and apparent exhaustion.
6. The victim collapses.
Hypothermia should be treated by a physician as soon as possible. In the mean-
time, the victim should be covered with warm, dry clothing and/or blankets. The
best way to prevent hypothermia is to dress adequately and to stay dry.
23
Snowblindness
Snowblindness is a condition snowmobilers may experience during medium-
bright to intense sunshine days. The symptoms are the following:
1. Severe headache.
2. Dizziness.
3. Sensitivity to light and seeing stars.
The recommended treatment is immediate removal to a totally dark area. Snow-
blindness can be prevented by wearing goggles or a face shield with the proper
colored lens.
EMERGENCY SITUATION
All snowmobilers are advised to be prepared for an emergency situation at all
times. Informing someone of your intended journey and time of expected return
is good insurance for your safety. If, while riding a snowmobile on a trail, an
accident is encountered or if the snowmobile breaks down and cannot be fixed,
YOU are involved in an emergency situation! If confronted with an emergency
situation, remember to stay calm, dry and warm. Panic and exhaustion can lead
to needless actions that can result in injury or death. Do not attempt to walk
through extremely deep snow as it could take two or three days to cover the area
traveled by a snowmobile in 10 or 20 minutes.
Extended snowmobile trips require the following suggested additional equip-
ment for safety and protection:
SUGGESTED EXTRA EQUIPMENT
space blanket
rope
candy bars
pocketknife
Operator’s Guide
friction tape
waterproof matches
extra starter rope
flashlight
tool kit
extra spark plugs
gasoline de-icer
first-aid kit
shovel
snow shoes
ax
extra mittens, socks,
flares
and boot liners
extra drive belt
metal cup or kettle
compass
tarp or plastic sheet
area map
wireless phone
NOTE: A single snowmobile could not possibly carry all of this equip-
ment by itself unless equipped with a cargo rack or pulling a sled. That is
one reason why it is necessary to take extended trips with other snowmo-
bilers and divide the load.
24
SURVIVAL
There are several steps which will make a survival situation easier. It is impera-
tive to remember that the best tool of survival is your brain; use it in a survival
situation. The following steps will help save a life, POSSIBLY YOURS:
1. Do not panic.
2. Plan a course of action.
3. Stay together.
4. Conserve energy and warmth.
5. Make an adequate shelter.
6. Build a fire.
7. Melt clean snow for water.
8. Signal for help.
NOTE: Consult a library or enroll in a first-aid course for further infor-
mation on survival techniques. The above list is only a summary of the
steps to follow.
RESCUE SIGNALS
Ground-to-air rescue signals should be tamped approximately 100 feet (30
meters) long with one side of the signal “walled up” or with boughs placed in the
signal to increase its visibility. Make your emergency situation clear by using the
appropriate signal in the following illustration:
A. B. C. D.
E.
F.
G.
H. I.
J.
K.
L.
M.
0726-101
A. Need Food
H. Need Compass and Map
B. Can’t Proceed
I. Tell Me Direction to Go
C. Am Going This Way
J. Need a Gun
D. Yes
K. No
E. All Well
L. Don’t Understand
F. Need a Doctor
M. Universal Help
G. Need Medical Supplies
25
Closing
Join a snowmobile club or help start one. Read, understand and follow the infor-
mation in the Operator’s Guide and on all decals found on the snowmobile.
Enroll in a certified snowmobile safety course and first-aid class. Be a responsi-
ble snowmobiler. Enjoy snowmobiling and remember, SAFETY FIRST!
26