Snowmobile Lynx Rave 120. OPERATOR’S GUIDE (2023)
In Canada, products are distributed and serviced by Bombardier Recreational Prod-
ucts Inc. (BRP).
In the USA, products are distributed and serviced by BRP US Inc.
In the European Economic Area (which is comprised of the member states of the
European Union plus the United Kingdom, Norway, Iceland and Liechtenstein), the
Commonwealth of the Independent States (including Ukraine and Turkmenistan) and
Turkey, products are distributed and serviced by BRP European Distribution S.A. and
other affiliates or subsidiaries of BRP.
For all other countries, products are distributed and serviced by Bombardier Recre-
ational Products Inc. (BRP) or its affiliates.
TM® Trademarks of BRP or its affiliates.
This is a non-exhaustive list of trademarks that are the property of Bombardier Recre-
ational Products Inc. or its affiliates:
LYNX®
RAVE®
XPS®
All rights reserved. No parts of this Operator’s Guide may be reproduced in any form
without the prior written permission of Bombardier Recreational Products Inc.
This vehicle can be hazardous to operate.
Never accelerate rapidly or drive at high speed beyond the limits of visibility or without being
totally familiar with the terrain and what lies in front of you. Obey speed limits and never
operate at speeds that do not allow adequate maneuvering and stopping distances. Read and
study the entire Operator’s Guide and Snowmobile Safety Handbook.
Failure to follow this warning could result in personal injury to yourself or others. For your
safety, understand and follow all the warnings contained in this Operator’s Guide and on the
labels on this vehicle.
Keep this Operator’s Guide handy for future reference. If you lose your guide, an electronic
printable version is available on www.operatorsguides.brp.com or visit your authorized
dealer for a hard copy replacement. The safety labels should be considered permanent parts
of the vehicle. If a safety label comes off or becomes hard to read, contact your authorized
dealer for a free replacement.
FAILURE TO FOLLOW THE WARNINGS CONTAINED IN THIS GUIDE CAN
RESULT IN SERIOUS INJURY OR DEATH.
The Operator’s Guide, Snowmobile Safety Handbook, and Snowmobile Decals display
important information:
The Safety Alert Symbol means ATTENTION! BE
! ALERT! YOUR SAFETY IS INVOLVED.
! WARNINGWARNING identifies personal safety-related informa-
tion. Follow the directive because it deals with the pos-
sibility of serious personal injury or even death.
! CAUTION
CAUTION indicates a hazard situation which, if not
avoided, could result in minor or moderate injury.
CAUTION
CAUTION, without the safety alert symbol, identifies
unsafe practices. Follow the directive because it
deals with the possibility of damaging part or parts
of the snowmobile.
NOTE:
A NOTE identifies supplementary information wor-
thy of particular attention.
Personal Injury
•
To avoid injury to yourself and others, NEVER operate the snowmobile without first
reading and understanding this guide and the Snowmobile Safety Handbook; then fol-
low the instructions and heed the warnings given.
•
USE COMMON SENSE.
•
DON’T DRINK and DRIVE.
•
STAY IN CONTROL at ALL TIMES.
•
TELL YOUR FRIENDS. If you see a friend operating a snowmobile recklessly, at exces-
sive speeds, while intoxicated, or in other unsafe ways, don’t wait until it is too late to
warn of the consequences of snowmobile misuse. Such conduct endangers everyone.
TAKE AN ACTIVE ROLE IN THE SAFETY OF YOURSELF AND OTHERS.
1
Table of Contents
Foreword
3
Maintenance
18-26
Snowmobile Safety Rules
4
Engine Oil
18
Hangtags
5-7
Carburetor
19
Warning Labels & Information
8
In-Line Fuel Filter
20
Declaration of Conformity (EU)
9
Air Cleaner/Filter
20
Declaration of Conformity (UK)
10
Spark Plug
20
Emissions Regulation 2016/1628 (EU
Brake
21
models)
11
Drive Chain
21
Preparing to Safely Operate the Rave 120.
Drive Chain Tensioner
22
Track Tension
22
............................................................12
Track Alignment
23
Operating the Rave 120
13
Adjusting Front Ski Shock Springs
24
General Information
14-15
Adjusting Rear Spring Tension
24
Control Locations
14
Ski Alignment
24
Snowmobile Identification
14
Ski Wear Bar
25
Gasoline — Oil
14
Recoil Starter Air Vents
26
Engine Break-In
15
Lights
26
Muffler
15
Preparation for Storage
27
Operating Instructions
16
Preparation after Storage
28
Starting and Stopping Engine
16
Specifications
29
Periodic Maintenance/Tune-Up Chart
17
Warranty
30
Customer Information
37
Contact Us
39
Change of Address/Ownership
40
p/n: 520003027
2
Foreword
The Rave 120 Snowmobile is intended to be a learning/recreational snowmobile for a
responsible child at least 6 years of age and under adult supervision. This snowmobile
is intended to be ridden by the operator only; there should be no passenger. Also, this
snowmobile is intended for daylight use in restricted off-road areas, primarily on
snow. Use of this snowmobile on public streets, roads, and highways can be hazard-
ous and is prohibited by law in most cases. As a parent or guardian, one must accept
the responsibility of training the child in the safe operation of the snowmobile. Teach
all operators the basic principles of operation, snowmobile rules and regulations, and
especially how to stop the snowmobile in case of an emergency. Impress upon the
child a sense of snowmobile courtesy and responsibility.
This snowmobile is a quality product designed, engineered, and assembled to give
dependable service. Be sure, as the owner, to become thoroughly familiar with its
basic operation, maintenance, and storage procedures. Read this guide and the
accompanying Snowmobile Safety Handbook to ensure safe and proper use of the
snowmobile.
This guide is divided into sections. The sections “Getting Ready to Operate the Rave
120 Safely” and “Operating the Rave 120” must be read and explained to the child/
operator. The other sections are for the owner/parent/guardian and contain informa-
tion on snowmobile identification, safe operating instructions, lubrication, mainte-
nance, storage, and after-storage preparation. If repair or service is ever required,
contact an authorized BRP Snowmobile dealer for professional service.
At the time of publication, all information and illustrations were technically correct.
No retroactive obligation is incurred.
This Lynx Operator’s Guide should be considered a permanent part of the snowmo-
bile and must remain with the snowmobile at time of resale.
Every BRP snowmobile meets or exceeds the standards of the Snowmobile Safety
and Certification Committee and displays the SSCC decal. BRP endorses and encour-
ages the safe use of all snowmobiles. Always wear a helmet and eye protection. Drive
with caution, observe all state and local laws, and respect the rights of others. Interna-
tional Snowmobile Manufacturers Association (ISMA) members like BRP do their
part to improve trails, sponsor events, and generally support the sport of snowmobil-
ing. As a member of the National Snowmobile Foundation, BRP promotes snowmo-
biling through education, charity, and research programs.
Printed in U.S.A.
3
Hangtags
This vehicle comes with hangtags containing important safety information. Anyone
who rides the vehicle should read and understand this information before riding.
5
Hangtags
This vehicle comes with hangtags containing important safety information. Anyone
who rides the vehicle should read and understand this information before riding.
6
Hangtags
This vehicle comes with hangtags containing important safety information. Anyone
who rides the vehicle should read and understand this information before riding.
7
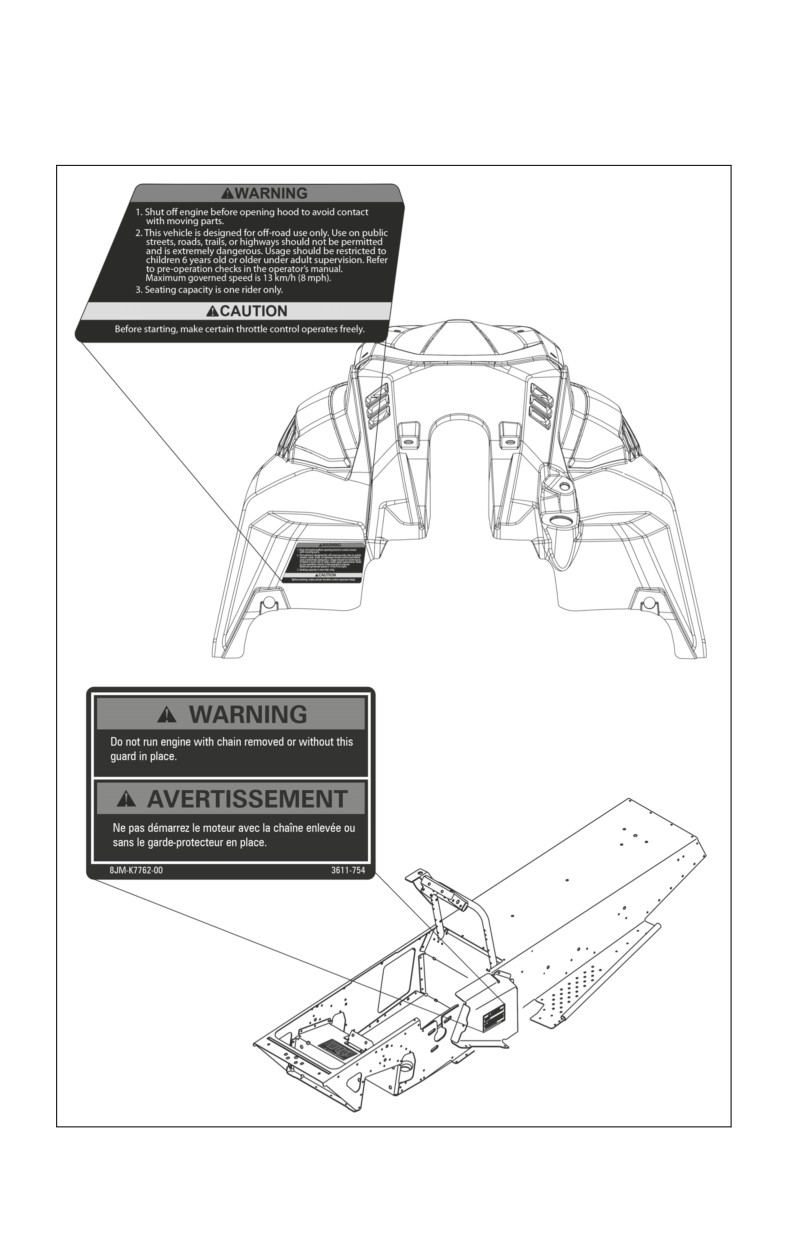
Warning Labels & Information
This vehicle comes with labels containing important safety information. Anyone who rides
the snowmobile should read and understand this information before riding. The labels
should be considered as permanent parts of the snowmobile. If a label comes off or
becomes hard to read, contact your authorized dealer for a replacement.
ONS-425
8
Declaration of Conformity (EU)
9
Declaration of Conformity (UK)
10
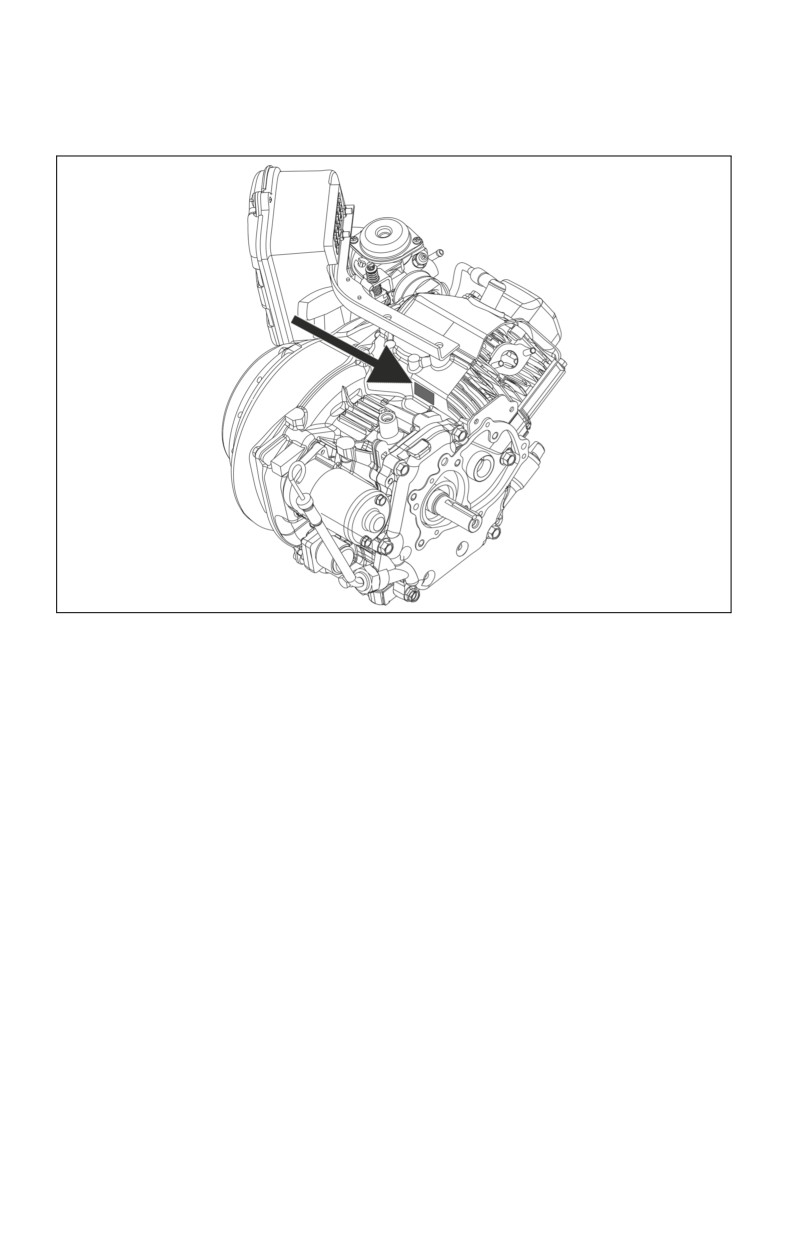
Emissions Regulation 2016/1628
(EU models)
Equipment complies with Emissions Regulation 2016/1628 as shown by a Non-Road
Mobile Machinery (NRMM) identification decal on the engine cylinder head cover.
ONS-311
11
Preparing to Safely Operate the
Rave 120
NOTE: This section and Operating
Second, you must check several things
the Rave 120 section must be read
every time before the engine is started.
and explained to the child/operator
A. Make sure the brake lever works
by the owner/parent/guardian. Refer
properly (moves freely) by pulling
to Control Locations or the snowmo-
(squeezing) the brake lever and
bile while explaining this section.
releasing it several times.
Like most boys and girls, you are anx-
B. Make sure the throttle lever works
iously waiting to drive the snowmobile.
properly (moves freely) and that it
Remember that the snowmobile is not a
snaps back to the idle position
toy. It must be driven carefully at all
quickly when it is released. The idle
times!
position is when the throttle lever is
First, you must understand the controls,
farthest away from the handlebar
know where the controls are, and know
grip. If the throttle lever does not
how to use them correctly.
snap back quickly, the engine must
not be started and the throttle system
A. BRAKE LEVER — To slow
must be repaired.
down or stop the snowmobile, the
brake lever should be pulled
C. Make sure that you have enough
(squeezed) toward the handlebar
clothes on to keep yourself warm but
grip.
NEVER wear clothes such as long
or loose scarves or long shoe laces
NOTE: When the brake is being
that could get caught in a moving
used, the throttle lever must be in
part of the snowmobile.
the idle (released) position.
Third, make sure that you can answer yes
B.
THROTTLE LEVER — Controls
to all of the following questions before
the speed of the snowmobile. The
each ride.
closer the throttle control lever is to
the handlebar grip (the more it is
A. Do you have permission from the
squeezed), the faster the snowmo-
owner or parent or guardian to oper-
bile will go.
ate the snowmobile?
C.
IGNITION SWITCH — When
B.
Are you wearing an approved safety
the key is in the OFF position, the
helmet?
engine will neither start nor run. If
C.
Are you wearing something to pro-
the key is in the RUN position, the
tect your eyes (such as goggles or a
engine will start and run.
visor)?
D. EMERGENCY STOP SWITCH
D. Are you dressed warmly enough?
— If something happens that you do
not understand or if there is an emer-
E.
Has your parent or guardian checked
gency, move the emergency stop
to make sure you have enough gaso-
switch to the OFF (down) position to
line?
immediately stop the engine.
F.
Do the throttle lever and brake lever
E.
TETHER SWITCH
— The
move freely?
engine will neither start nor run
G. Are all shields and covers in the
unless the tether switch cap is con-
right place and is the hood securely
nected to the tether switch located
latched?
on the top right-hand side of the con-
sole. The tether cord MUST BE
H. Do you have a safe area to ride in? Is
attached to the operator before
the area free of rocks, wires, trees,
attempting to start the engine.
traffic, etc.?
12
Operating the Rave 120
You must be a responsible, careful, and
E.
The snowmobile is designed for
considerate snowmobile operator at all
your enjoyment. DO NOT give rides
times. Your safety is our concern and
to your friends. It is made to carry
must always be yours.
only one person.
A. When you are learning how to oper-
F.
Do not pull sleds, sleighs, etc.,
ate the snowmobile, have a parent or
behind the snowmobile.
guardian take you to an open area to
G. If you get stuck, shut the engine off
practice figure eights, starting, and
and get help.
stopping. This practice is important
and will give you a good “feel” of
the snowmobile. You will also be
able to learn how the snowmobile
handles under different conditions
(deep snow, hard-packed snow, etc.).
B.
Always sit on the seat and keep both
feet on the running boards when
operating the snowmobile. Do not
get off the snowmobile until it has
come to a complete stop.
C.
Never drive the snowmobile faster
than a safe speed. Do not drive too
close to roads, buildings, trees, other
snowmobiles, or people. Never
show off!
D. Never operate the snowmobile
unless the headlight and taillight are
in working order.
13
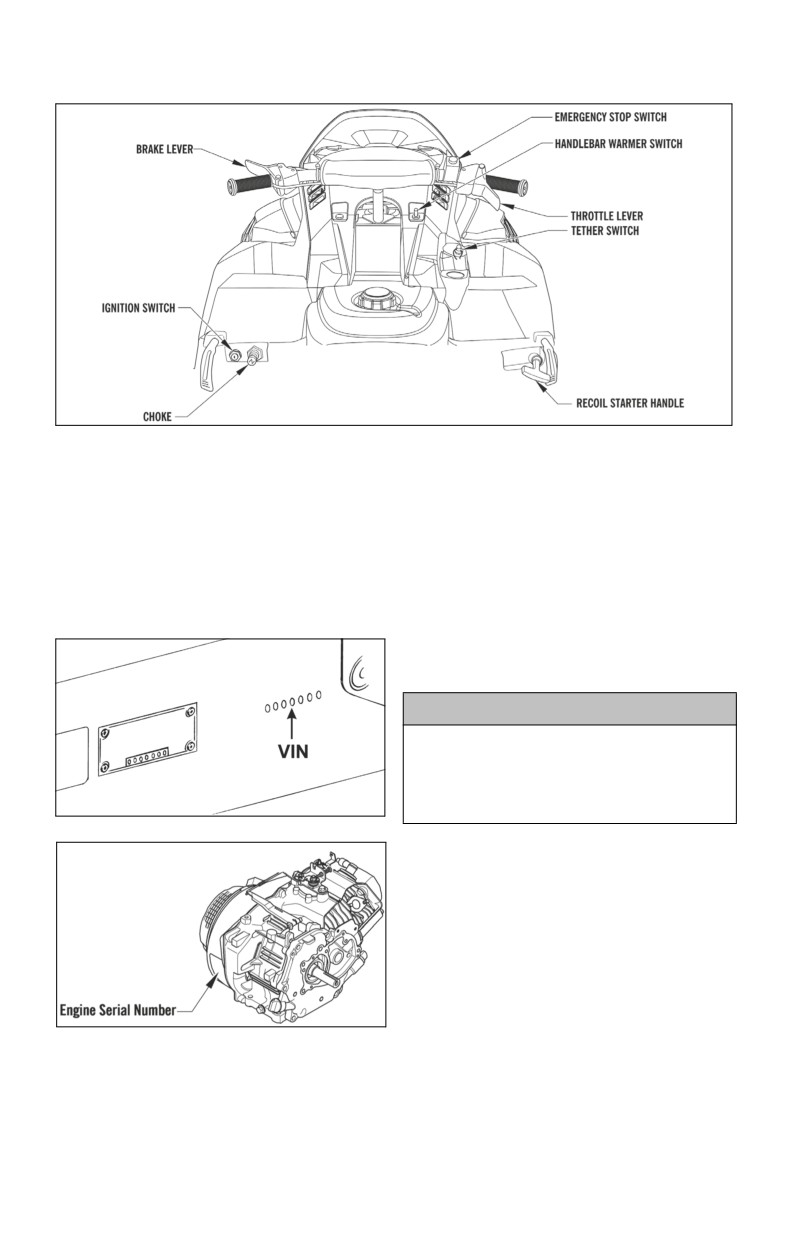
General Information
Control Locations
0753-830
Snowmobile
Always provide the snowmobile model
Identification
name, VIN, and engine serial number
when contacting an authorized BRP
This snowmobile has two identification
Snowmobile dealer for parts, service,
numbers: The Vehicle Identification
accessories, or warranty.
Number (VIN) is stamped into the right
side of the tunnel and the Engine Serial
Gasoline — Oil
Number (ESN) is on the front side of the
This snowmobile has a four-cycle
recoil cover.
engine; therefore, it is unnecessary to
premix gasoline and oil.
Fuel Requirements
CAUTION
Always use fresh gasoline. Gasoline
will oxidize; the result is loss of
octane, volatile compounds, and the
production of gum and varnish depos-
its which can damage the fuel system.
0726-200
Alcohol fuel blending varies by country
and region. Your vehicle has been
designed to operate using the recom-
mended fuels, however, be aware of the
following:
Use of fuel containing alcohol above the
percentage specified by government reg-
ulations is not recommended and can
result in the following problems in the
0744-926
fuel system components:
These numbers are required by the dealer
• Starting and operating difficulties.
to complete warranty claims properly. No
• Deterioration of rubber or plastic
warranty will be allowed by BRP if either
parts.
the ESN or VIN is removed or mutilated
• Corrosion of metal parts.
in any way.
• Damage to internal engine parts.
14
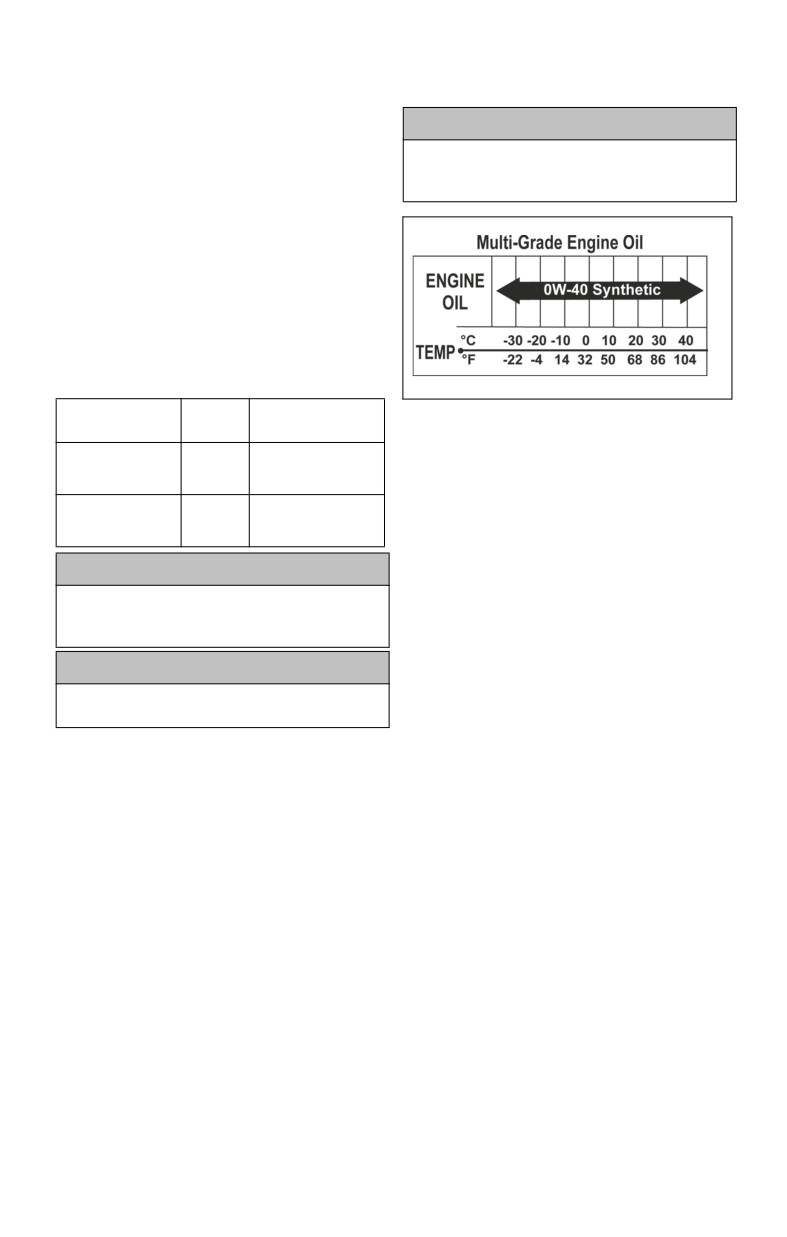
• Inspect frequently for the presence
The recommended oil to use in the
of fuel leaks or other fuel system
engine is 0W-40 Synthetic oil. See the
abnormalities if you suspect the
viscosity chart for details.
presence of alcohol in gasoline
exceeds the current government
CAUTION
regulations.
Any oil used in place of the recom-
• Alcohol blended fuels attract and
mended oil may cause serious engine
hold moisture which may lead to fuel
damage.
phase separation and can result in
engine performance problems or
engine damage.
Recommended Fuel
Use unleaded gasoline containing MAX-
IMUM 10% ethanol. The gasoline must
have the following minimum octane
requirements.
OILCHARTJ
Minimum
Fuel Type
Engine
Octane Rating
Engine Break-In
87 Pump Posted
Fuel with
The engine requires a short break-in
120
AKI (RON+MON)/2
NO ethanol
period
(approximately
10 operating
92 RON
hours) before being subjected to heavy
Fuel which may
91 AKI
contain up to 10%
120
(RON+MON)/2
load conditions or full-throttle operation.
MAX ethanol
95 RON
Strict adherence to the break-in proce-
dure will contribute to optimum perfor-
CAUTION
mance and longevity of the engine.
Never experiment with other fuels.
During break-in, a maximum of
1/2
Engine or fuel system damages may
throttle is recommended; however, brief
occur with the use of an inadequate fuel.
full-throttle accelerations and variations
CAUTION
in driving speeds contribute to good
engine break-in. After the 10-hour break-
Do NOT use fuel from fuel pumps
in period, the snowmobile may be taken
labeled E85.
to an authorized BRP Snowmobile dealer
for a checkup and oil change. This ser-
Use of fuel labeled E15 is prohibited by
vice is at the discretion and expense of
U.S. EPA Regulations.
the snowmobile owner.
Recommended Oil
Muffler
NOTE: This snowmobile comes
The muffler is designed to reduce engine
from the factory with SAE
0W-40
noise and improve the total performance
synthetic oil installed.
of the engine. If the muffler is removed
from the engine, severe engine damage
will result.
15
Operating Instructions
Starting and Stopping
4. For a cold engine, pull the choke out
Engine
completely. If the engine is warm,
choking is not normally necessary.
! WARNING
5. Pull the recoil starter handle slowly
Never allow anyone to stand in front of
until resistance is felt; then give a
the snowmobile at any time, especially
short quick pull. The engine should
when starting the engine.
start; however, if the engine does not
It is imperative that all safety checks
start, repeat this step.
found in the accompanying Snowmobile
Safety Handbook be performed before
CAUTION
attempting to start the engine.
To avoid damaging the recoil starter,
This snowmobile is equipped with a recoil
DO NOT pull the recoil starter rope to
starter. The recoil starter handle is located
its limit or release the recoil starter
on the lower right-hand side of the console.
handle from an extended position.
Allow recoil rope to rewind slowly.
NOTE: If the recoil starter rope
should break or if the recoil starter
6. When the engine starts, push the
should malfunction, take the snow-
choke approximately half way in.
mobile to an authorized BRP Snow-
Allow a cold engine to “warm up”
mobile dealer for service.
for approximately 2-3 minutes. The
choke should be pushed in com-
To start the engine, use the following
pletely after the “warm up.”
procedure:
7. Flooding — If the engine does not
1.
Test the throttle lever by completely
start when the choke is being used
compressing and releasing it several
but seems ready to start, push the
times. The lever MUST return to the
choke in completely.
idle position quickly and completely.
NOTE: Continued choking will only
2.
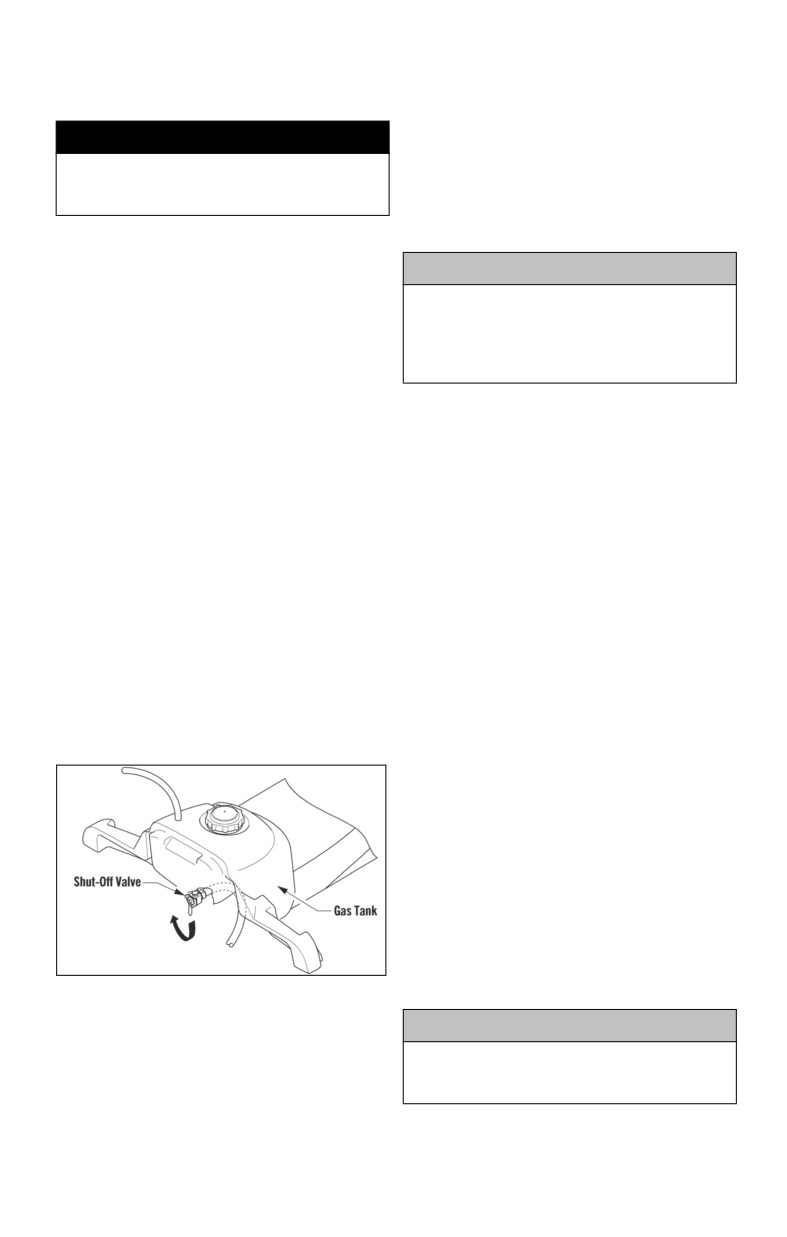
Open the gas tank shut-off valve
cause the engine to flood more.
located under the gas tank by rotating
NOTE: If the engine fails to start
the valve counterclockwise. Open the
during the attempt with the throttle
valve completely; otherwise, it may
lever compressed, remove the spark
close during operation of the snow-
plug and clean and dry it thoroughly
mobile due to engine vibration.
or install a new, properly gapped,
recommended spark plug.
8. To shut the engine off, turn the igni-
tion key to the OFF position, move
the emergency stop switch to the
OFF (down) position, or pull the
tether cap from the tether switch.
NOTE: Unless the engine will be
started within a short period of time,
close the gas tank shut-off valve
(located under the gas tank) by rotat-
0744-944
ing the valve clockwise.
3.
Insert the key into the ignition
switch; then rotate the key to the
CAUTION
RUN position.
If the snowmobile is not to be used for
NOTE: Make sure the emergency
an extended period of time, be sure to
stop switch is in the ON (up) position
close the gas tank shut-off valve.
and the tether cap is connected to
the tether switch.
16

Periodic Maintenance/Tune-Up Chart
1st 10
Every 20
Every 50
Every 100
Every 300
Daily
Hours
Hours
Hours
Hours
Hours
(2 Weeks)
(1 Month)
(3 Months)
(6 Months)
(12 Months)
Valve Clearance
IA
Engine
I
Compression
Spark Plug
I
Fuel Supply Hose
I-R
Replace every
3 years
Gas Tank Shut-Off
I
IC*
Valve
Carburetor Float
I
C*
Chamber
Engine Oil
I
R*
R*
Nuts/Screws/
I
T
Bolts
Rear Suspension
IC
Recoil Starter
I
I-IC-IL-*
Air Filter
I*
C*
Carburetor
IC
Pilot Air Screw
IA
In-Line Fuel Filter
I
C = Clean
IA = Inspect and adjust (if necessary)
I = Inspect
IC = Inspect and clean (replace if necessary)
R = Replace
IL = Inspect and lubricate (replace if necessary)
T = Tighten
* = Service more frequently if used in adverse conditions
17
Maintenance
Engine Oil
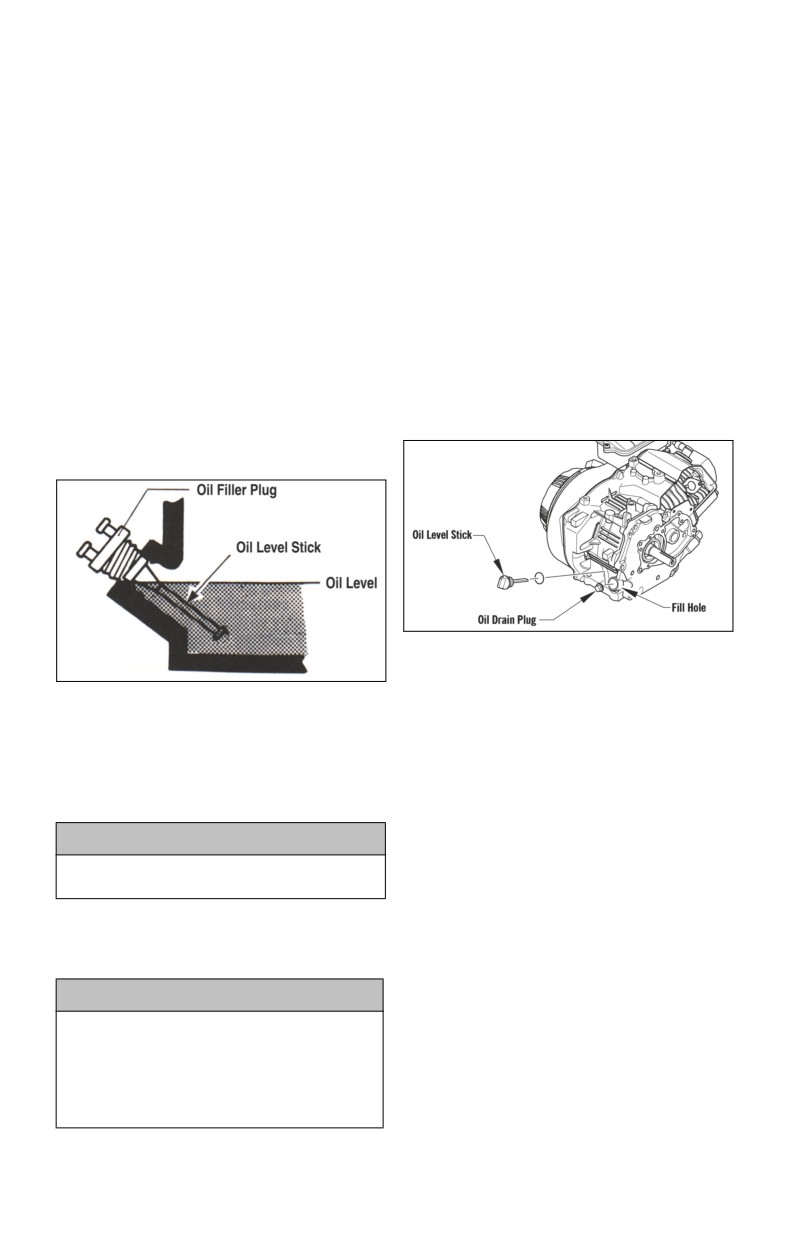
NOTE: If the oil level is below the
oil level mark, add recommended oil
NOTE: After the engine break-in
until it reaches the oil level mark.
period, the engine oil should be
changed every 100 operating hours (6
4. Insert the oil level stick into the
months) and before prolonged storage.
crankcase; then rotate the stick
Checking
clockwise until snug.
5. Close the hood and secure with the
The engine oil level should be checked
straps.
each day before operating the snowmo-
bile. To check the engine oil level, use
Changing
the following procedure:
To change the engine oil, use the follow-
NOTE: The front of the snowmo-
ing procedure:
bile must be elevated until the bot-
tom of the front bumper is
NOTE: The front of the snowmo-
approximately 47 cm (18.5 in.) off the
bile must be elevated until the
floor when checking the oil level.
engine is in a level position when
Also, ensure the engine is “cooled
changing the oil.
down” to room temperature to allow
the oil to drain into the sump.
0744-920
1.
Remove the access plug; then place
a drain pan beneath the engine.
740-330A
1. Release the two hold-down straps
2.
Release the two hold-down straps
and open the hood.
and open the hood.
2. Rotate the oil level stick counter-
3.
Loosen the oil level stick; then
clockwise; then remove the stick
remove the oil drain plug from the
from the crankcase and wipe it clean.
crankcase and allow the oil to drain.
4.
Install the drain plug.
CAUTION
5.
Remove the oil level stick; then pour
Clean the area around the fill hole to
600 mL
(20.3 fl oz) of recom-
keep dirt, debris, etc., out of the engine.
mended oil into the fill hole.
3. Insert the stick into the crankcase
6.
Install the oil level stick; then
and remove and check oil level on
tighten until snug. Install the access
the stick.
plug.
CAUTION
7.
Close the hood and secure with the
Seeing oil in the crankcase does not
straps.
mean the level is in the safe operat-
ing range. Always use the oil level
stick to check engine oil. Never oper-
ate the engine with the oil level below
the point of overflowing the fill hole.
18
Carburetor
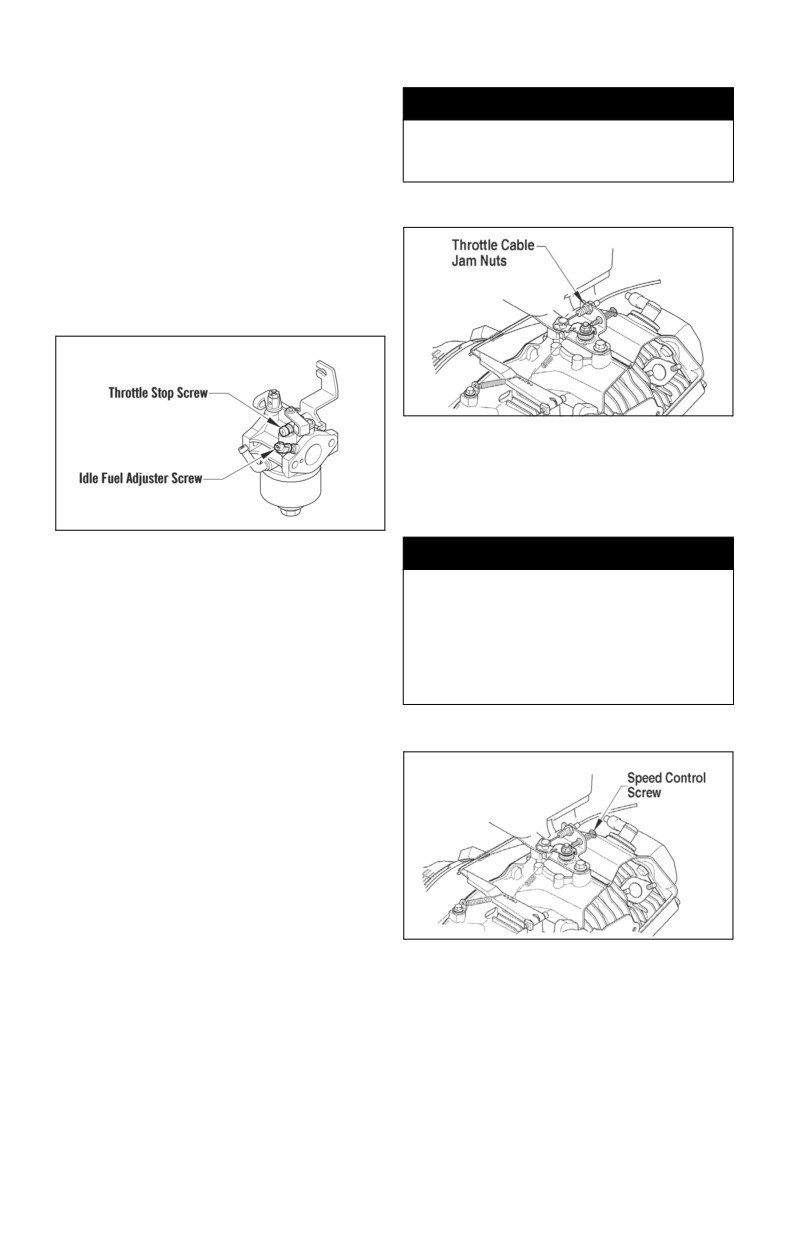
To adjust the throttle cable, use the fol-
lowing procedure:
The carburetor has been calibrated for
average riding conditions; however, alti-
tude, temperature, and general wear may
! WARNING
necessitate certain carburetor adjust-
Do not attempt to adjust the throttle
ments. Since carburetor adjustments criti-
cable with the engine running. Per-
cally affect engine performance, BRP
sonal injury could result.
recommends that any changes in internal
1. Loosen the throttle cable jam nuts.
carburetor calibration be made by an
authorized BRP Snowmobile dealer;
however, three external adjustments can
be made on the carburetor. These are the
throttle stop screw, idle fuel adjuster
screw, and throttle cable.
0744-922
2. Pull all slack from the throttle cable
wire and exert slight tension on the
wire.
3. Tighten the throttle cable jam nuts.
0744-921
! WARNING
Throttle Stop Screw
DO NOT operate the snowmobile
This screw controls the seating position of
when any component in the throttle
the throttle valve which in turn determines
system is damaged, frayed, kinked,
the proper idle speed. Rotate the screw clock-
worn, or improperly adjusted. If the
snowmobile is operated when the
wise to increase engine idle speed and coun-
throttle system is not functioning
terclockwise to decrease engine idle speed.
properly, personal injury could result.
Idle Fuel Adjuster Screw
Speed Control Screw
This adjuster screw determines the fuel/
air mixture for idling. To adjust, use the
following procedure:
1. Start the engine and allow to run at
half throttle 5-10 minutes to warm up.
2. Place the throttle in the idle position;
then rotate the idle fuel adjuster
screw/cap in or out within the
adjustment range to obtain smooth
low speed performance.
0744-949
Throttle Cable
The maximum speed of the snowmobile
can be reduced by adjusting the speed
The correct throttle cable adjustment is
control screw.
when (with the engine OFF) the carbure-
To reduce the maximum speed, rotate
tor throttle is completely open (against its
the speed control screw clockwise. DO
limit) while the throttle lever lightly con-
NOT EVER INCREASE THE MAXI-
tacts the handlebar grip. The throttle arm
MUM SPEED BEYOND THE ORIGI-
on the carburetor should also contact the
NAL
8
MPH
(12.8
KM/H)
speed control screw when the throttle
MAXIMUM!
lever is released.
19

In-Line Fuel Filter
CAUTION
! WARNING
Failure to inspect the air filter fre-
Whenever any maintenance or inspec-
quently if the snowmobile is used in
tion is made on a fuel system when
adverse conditions can damage the
there may be fuel leakage, there
engine.
should be no welding, smoking, open
flames, etc., in the area.
1. Remove the two screws securing the
BRP recommends that the in-line fuel filter
air cleaner cover; then remove the
be checked once a month. The filter is
cover.
located in the fuel hose between the gas
2. Remove the foam filter from the
tank and carburetor. The only cleaning
housing.
possible is to back-flush the filter using
clean gasoline. To check, clean, or replace
3. Clean the foam filter in a non-flam-
the filter, use the following procedure:
mable cleaning solvent; then allow
the filter to dry.
1. Turn the gas tank shut-off valve to
the CLOSED position.
4. Put the dry filter in a plastic bag;
then pour in recommended air filter
2. Remove and discard the clamps;
oil and work the oil into the filter.
then pry the fuel hoses off the in-line
fuel filter and remove the filter.
CAUTION
3. Install the in-line fuel filter in the
A torn air filter can cause damage to
fuel hose so the arrow on the filter
the engine. Contaminants may get
points toward the carburetor. Make
inside the engine if the filter is torn.
sure the fuel hoses fit tightly on the
Carefully examine the filter for tears
filter. If a fuel hose does not fit
before and after cleaning it. Replace
tightly, cut 6 mm (1/4 in.) from the
the filter with a new one if it is torn.
end of the fuel hose; then install on
5. Clean any debris from inside the air
the filter. Install new clamps.
cleaner. Be sure no debris enters the
carburetor.
CAUTION
6. Place the filter into the housing.
The fuel hoses must fit tightly on the
fuel filter. If the fuel hose length
7. Place the air cleaner cover onto the
doesn’t permit this procedure, replace
housing; then secure with the two
the fuel hose. Also, after installing the
screws.
fuel hoses on the filter, check to be
Spark Plug
sure that the fuel hoses do not con-
tact any hot or rotating components.
This snowmobile comes equipped with a
4. Turn the gas tank shut-off valve to
specified spark plug. See the Specifica-
the OPEN position.
tions chart on page 29 for the correct
spark plug type. To help prevent cold
Air Cleaner/Filter
weather fouling, make sure to thoroughly
The air filter inside the air cleaner housing
warm up the engine before operating.
must be kept clean to provide good engine
To maintain a hot, strong spark, keep the
power and gas mileage. If the snowmobile
plug free of carbon.
is used under normal conditions, service
the filter at the intervals specified. If oper-
Before removing the spark plug, be sure
ated in adverse conditions, inspect and ser-
to clean the area around the spark plug. If
vice the filter more frequently. Use the
you do not, dirt could enter engine when
following procedure to remove the filter
removing or installing the spark plug.
and to inspect and/or clean it.
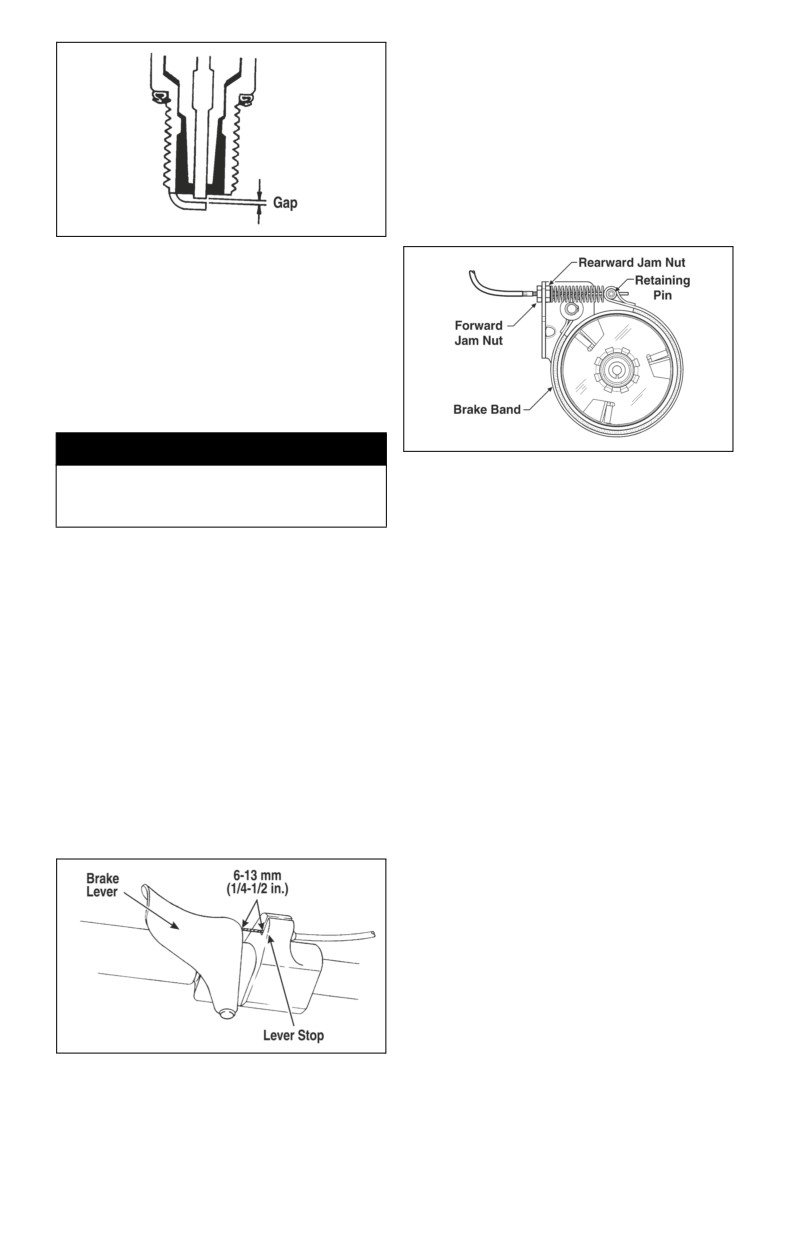
Adjust the gap to specified amount (see
Specifications chart on page
29) for
proper ignition. Use a feeler gauge to
check the gap.
20
Adjusting Brake Lever
Travel
To adjust the brake lever travel, use the
following procedure:
1. Remove the drive chain shield.
2. Loosen the rearward brake cable jam
nut; then tighten the forward jam nut
to set up the brake.
ATV0052B
When installing the spark plug, be sure to
tighten it securely. A new spark plug
should be tightened
1/2 turn once the
washer contacts the cylinder head. A
used spark plug should be tightened
1/8-1/4 turn once the washer contacts the
cylinder head.
Brake
! WARNING
0735-457
DO NOT operate the snowmobile when
3. Check the brake lever travel distance
any component in the brake system is
periodically while tightening the for-
damaged, worn, or adjusted improperly.
ward jam nut. When the distance is
BRP recommends that the complete brake
within the specified range of 6-13 mm
system be checked daily for wear or dam-
(1/4-1/2 in.), tighten the rearward jam
age and for smooth operation. Periodically,
nut to secure the adjustment.
the brake band should be inspected for
Drive Chain
cracks and to ensure the liner is intact and
not worn excessively. Replace the brake
The drive chain should be lubricated
band if cracked or worn excessively.
every 10 operating hours with Synthetic
Chain Lube or with a suitable dry, graph-
Checking Brake Lever
ite-based chain lubricant. By using the
Travel
recommended chain lube or a dry, graph-
ite-based chain lubricant, dirt buildup on
1. Compress the brake lever fully.
the drive chain will be minimized. Before
2. Check the distance between the
each lubrication, inspect the drive chain
brake lever and the lever stop. The
for dirt accumulation.
distance must be within the specified
To lubricate the drive chain, shut the
range of 6-13 mm (1/4-1/2 in.).
engine off and wait for all moving parts
to stop, remove the drive chain shield,
and lubricate the drive chain. After lubri-
cating the drive chain, install the drive
chain shield.
NOTE: If the recommended chain
lube or a dry, graphite-based chain
lubricant is not available, lubricate
the drive chain with several drops of
petroleum-based oil. If the snowmo-
bile is operated in the summer with
ONS-412
the optional wheel kit, the drive chain
3. If travel distance is not as specified,
should be lubricated more frequently.
adjust the brake.
21
Drive Chain Tensioner
The drive chain tensioner is automatic;
therefore, no adjustment is required by
the snowmobile owner. The tensioner
and chain should be checked annually for
proper operation and excessive wear and
replaced when necessary. Check the ten-
sioner by pushing down on it and releas-
ing it. It should immediately spring back
and put tension on the drive chain.
0755-095
Track Tension
Adjusting
NOTE: Track tension and track
alignment are interrelated; there-
1.
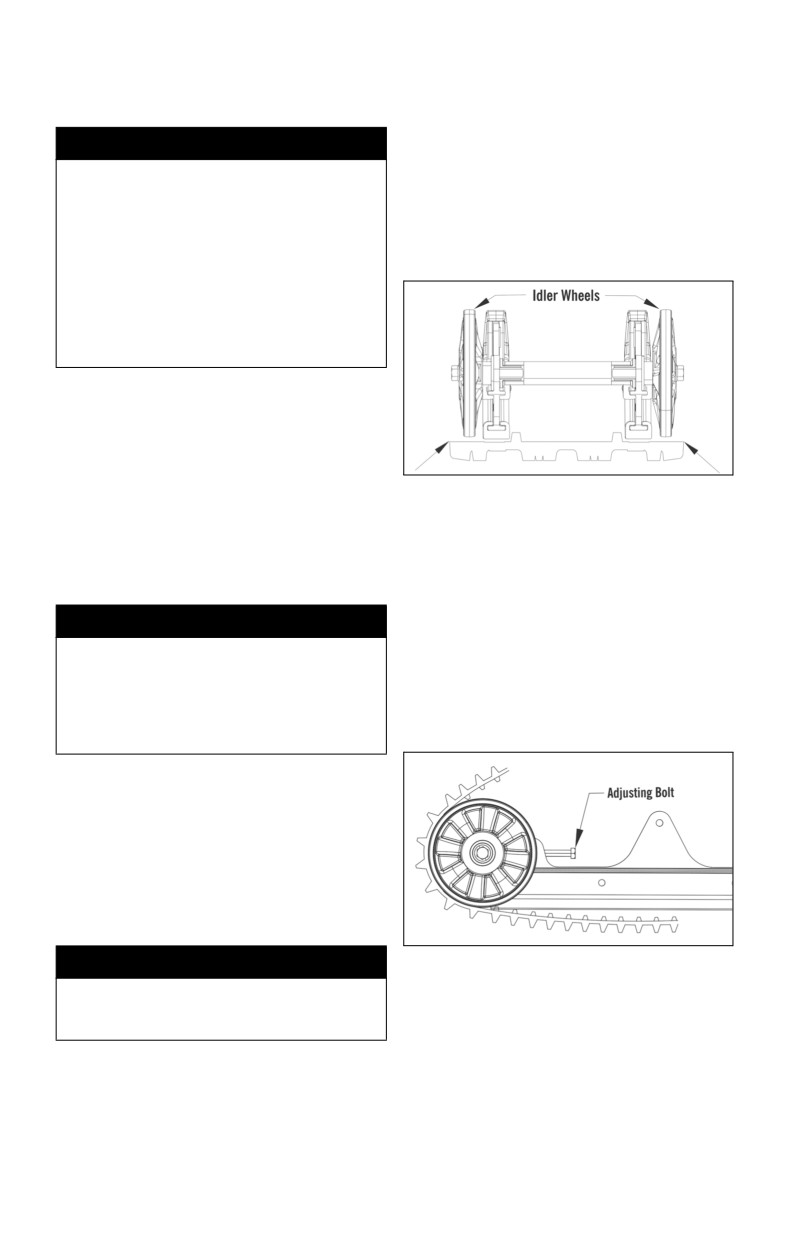
Loosen the idler wheel bolts.
fore, always check both, even if only
one adjustment seems necessary.
2.
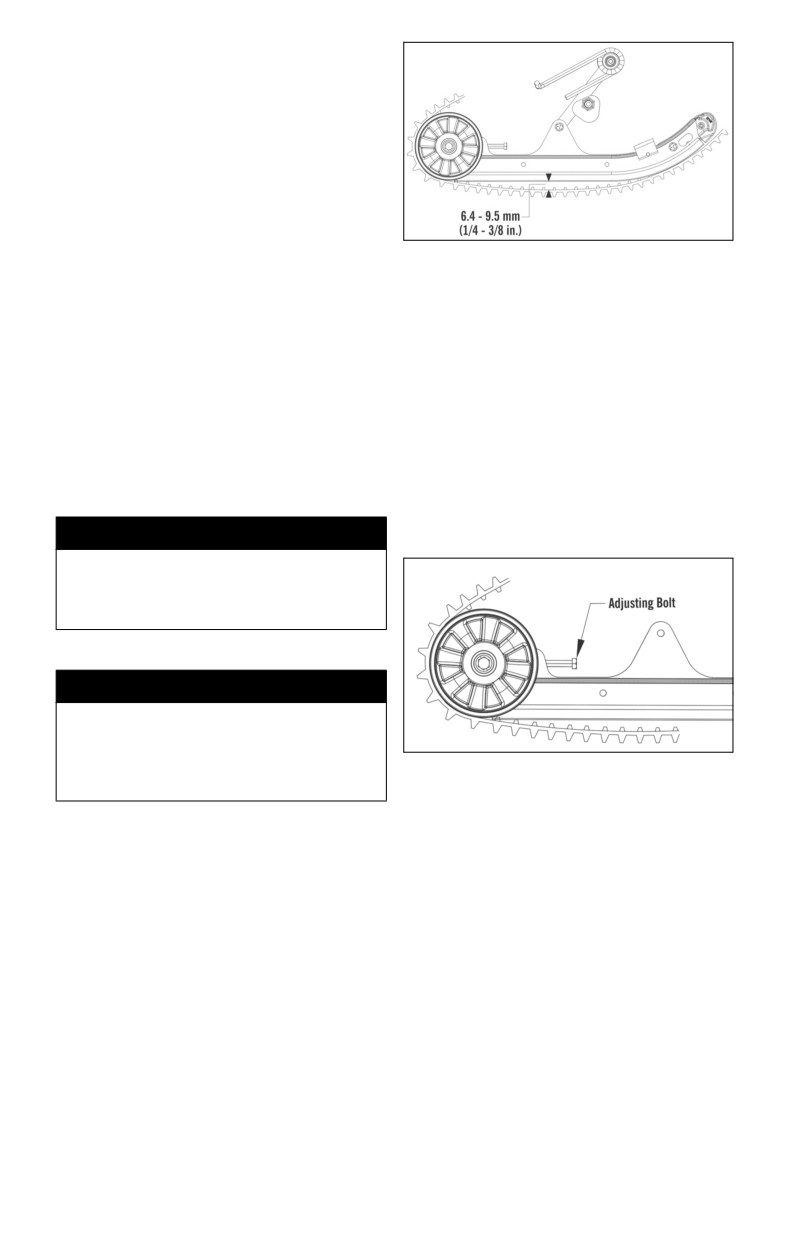
If the deflection (distance between
the bottom of the wear strip and the
Track tension is directly related to the over-
inside of the track) exceeds specifi-
all performance of the snowmobile. If the
cations, tighten the adjusting bolts to
track is too loose, it may slap against the
take up excessive slack in the track.
tunnel causing wear, or it may ratchet on the
track drive sprockets. BRP recommends
3.
If the distance between the bottom
that the track tension be checked once a
of the wear strip and the inside sur-
month and adjusted accordingly.
face of the track is less than speci-
fied, loosen the adjusting bolts to
! WARNING
increase the slack in the track.
Track tension must be properly main-
tained. Personal injury could result if
a track is allowed to become exces-
sively loose.
Checking
! WARNING
DO NOT attempt to check or adjust
track tension with engine running.
Turn ignition key to the OFF position.
0755-096
Personal injury could result from con-
tact with a rotating track.
NOTE: To ensure proper track ten-
sion adjustment, perform all adjust-
1. Remove excess ice and snow
ments on both sides of the
buildup from the track, track drive
snowmobile.
sprockets, and the inside of the skid
4. Check track alignment (see Track
frame.
Alignment section).
2. Place the rear of the snowmobile up
5. When proper track tension is
on a safety stand high enough so the
obtained, tighten idler wheel bolts
track is free of the floor.
securely.
3. Without exerting any pressure on the
track, measure the distance between
the bottom of the wear strip and the
inside surface of the track. The mea-
surement must be within specifica-
tions of 6.4-9.5 mm (1/4-3/8 in.). If
the measurement is not within speci-
fications, an adjustment is necessary.
22
NOTE: Since track tension and
NOTE: Allow the track to coast to a
track alignment are interrelated,
stop. DO NOT apply the brake
always check both even if only one
because it could produce an inaccu-
adjustment seems necessary.
rate alignment condition.
4. When the track stops rotating, check
! WARNING
the relationship of the idler wheels
Always make sure the adjusting bolts
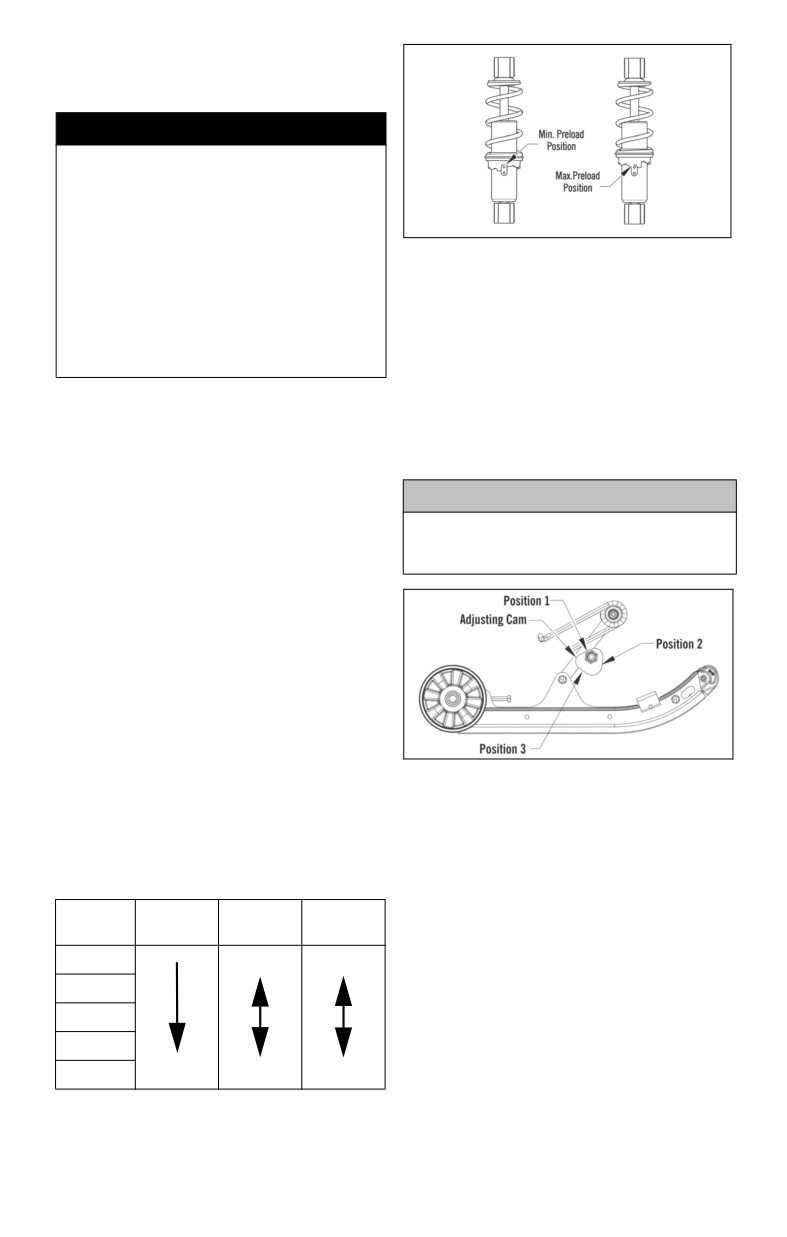
and the outside edge of the track. If
are snug against the axle and the idler
the distance from the idler wheels to
wheel bolts are tightened to specifica-
the outside edge of the track is the
tions. Failure to do so could cause the
same on both sides, no adjustment is
track to become extremely loose and,
necessary.
under some operating conditions,
allow the idler wheels to climb over
the track lugs forcing the track against
the tunnel causing the track to “lock.”
If a track
“locks” during operation,
severe personal injury could result.
Track Alignment
Proper track alignment is obtained when
the idler wheels are equal distance from
the edge of the track. Excessive wear to
the idler wheels, drive lugs, and track
0755-097
will occur if the track is improperly
5. If the distance from the idler wheels
aligned. BRP recommends that the track
to the inner track drive lugs is not
alignment be checked once a week or
the same on both sides, an adjust-
whenever the track tension is adjusted.
ment is necessary.
Checking
Adjusting
! WARNING
1. On the side of the track which has
Make sure the ignition key is in the
the inner track drive lugs closer to
OFF position and the track is not
the idler wheel, loosen the idler
rotating before checking or adjusting
wheel bolt and the adjusting bolt jam
track alignment. Personal injury could
nut; then rotate the adjusting bolt
result if contact is made with a rotat-
clockwise 1 to 1-1/2 turns.
ing track.
1. Remove excess ice and snow buildup
from the track, track drive sprockets,
and the inside of the skid frame.
2. Position the tips of the skis against a
wall; then using a shielded safety
stand, raise the rear of the snowmo-
bile off the floor making sure the
track is free to rotate.
0755-096
! WARNING
2. Check track alignment and continue
The tips of the skis must be posi-
adjustment until proper alignment is
tioned against a wall or similar object
obtained.
for safety.
NOTE: Make sure correct track
3. Start the engine and accelerate
tension is maintained after adjust-
slightly. Use only enough throttle to
ing track alignment (see Track Ten-
turn the track several revolutions.
sion section).
SHUT ENGINE OFF.
23
3. After proper track alignment is
obtained, tighten the idler wheel bolt
securely.
! WARNING
Always make sure the adjusting bolts
are snug against the axle and the
idler wheel bolts are tightened to
specifications. Failure to do so could
cause the track to become extremely
0753-279
loose and, under some operating
conditions, allow the idler wheels to
Adjusting Rear Spring
climb over the track lugs forcing the
Tension
track against the tunnel causing the
Rear spring tension adjustment is accom-
track to
“lock.” If a track
“locks”
plished by rotating the adjusting cams.
during operation, severe personal
Position 3 provides the stiffest ride, and
injury could result.
position 1 is for the light driver or slow-
4. Field test the track under actual con-
speed trail riding. Position 2 is for the
ditions.
average operator under normal condi-
tions. Always rotate the cam from the
5. After the field test, check the align-
lighter position to the heavier position.
ment of the track. If additional adjust-
ment is necessary, repeat Adjusting
CAUTION
Track Alignment procedure.
Never force the adjustment cams from
Adjusting Front Ski
the low position to the high position.
Shock Springs
Cam damage may occur.
The front ski shock springs are individu-
ally adjustable for the driving style of the
operator.
NOTE: Equal adjustments should
be maintained on both sides of the
snowmobile.
The front shock absorbers have a preload
adjustment sleeve with five preload
adjustment positions to increase or
0755-113
decrease coil spring tension.
Using a 13/16-in. wrench, rotate the cam
until it is in the desired position. To
To adjust the spring tension, rotate the
stiffen the ride, rotate the cam so as to
preload adjustment sleeve with a suitable
raise the spring end. Make the adjustment
spanner wrench until the desired spring
on the other cam and be sure both cams
tension is achieved.
are adjusted equally.
Spring
Position
Setting
Load
Ski Alignment
Tension
The skis have been aligned during setup of
1
Soft
Light
the snowmobile. Ski alignment usually will
2
not change unless a rock or similar hard
object is hit while the snowmobile is being
3
operated. BRP recommends that the ski
4
alignment be checked once a week.
5
Stronger
Stiff
Heavy
Checking
1. Turn the handlebar to the straight-
ahead position.
24
2. Measure the distances to the inside
Ski Wear Bar
edges of the skis. Make sure the
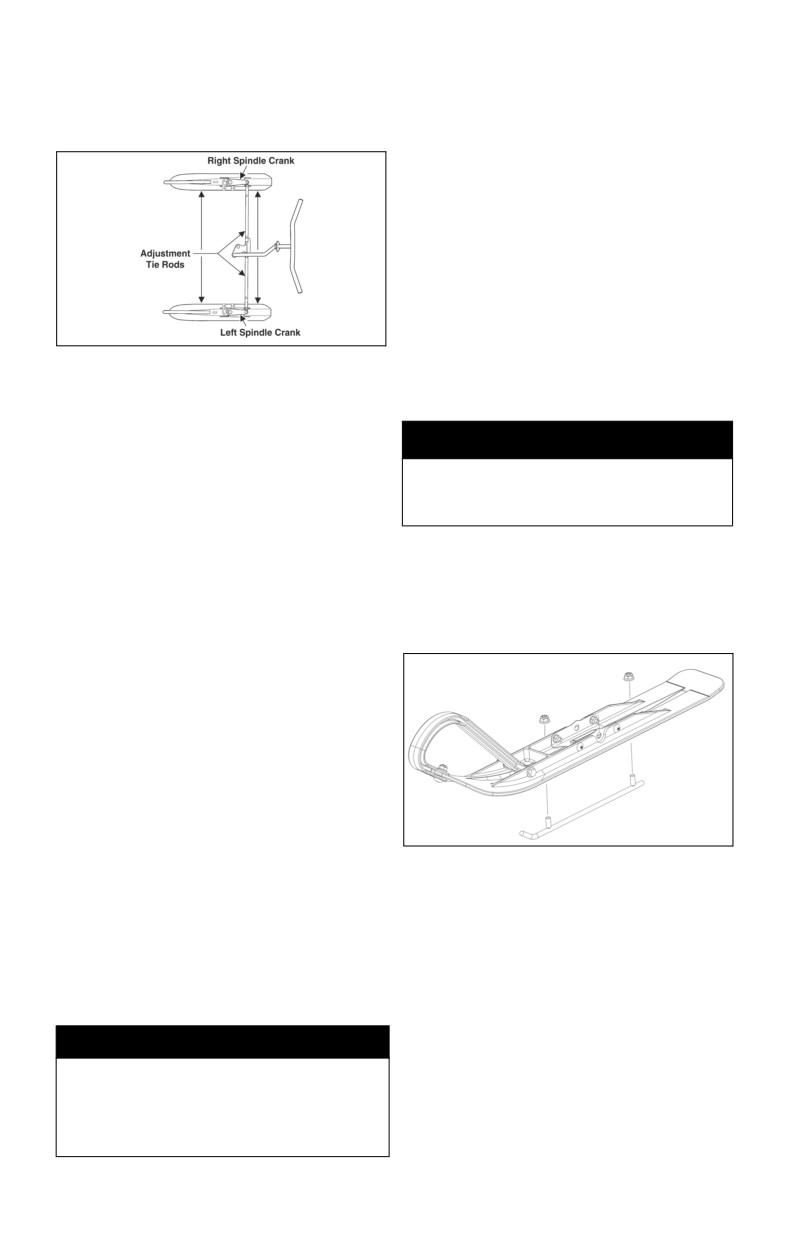
The ski wear bar is a replaceable bar
measurements are taken behind the
attached to the underside of the ski. The
front mount bracket and ahead of the
purpose of the wear bar is to assist in
rear mount bracket.
turning the snowmobile, to minimize ski
wear, and to maintain good steering con-
trol. If the snowmobile is operated pri-
marily in deep snow, ski wear bar wear
will be minimal; however, if the snow-
mobile is operated on terrain where the
snow cover is minimal, the ski wear bar
will wear faster.
To maintain positive steering characteris-
tics, BRP recommends that the ski wear
bars be checked once a week and replaced
0735-446
if worn to 1/2 of original diameter. Ski
NOTE: Ski alignment is correct
wear bars are available from an authorized
when the skis are parallel to each
BRP Snowmobile dealer.
other
(equal measurements front
and rear) or when the skis have up to
! WARNING
a maximum of 6 mm (1/4 in.) “toe
out” (front measurement 6 mm (1/4
Operating the snowmobile with
in.) more than rear measurement).
excessively worn ski wear bars may
result in a loss of steering control.
3. If ski alignment is not as specified,
the snowmobile will have a ten-
Removing
dency to wander and may be diffi-
1. Raise the front of the snowmobile.
cult to control; therefore, an
adjustment is necessary.
2. Remove the lock nuts securing the
wear bar to the ski.
Adjusting
1. Make sure the ignition key is in the
OFF position.
2. Visually examine the skis to deter-
mine which ski is out of alignment
with respect to the handlebar.
3. Open the hood and loosen the jam nut
on each end of the adjustment tie rod.
4. While holding the ski in position,
rotate the adjustment tie rod until the
SNO-945
measurement between the skis is
3. Remove the wear bar.
within specifications.
Installing
5. When the ski alignment is correct,
1. Insert the wear bar studs into the
apply blue Loctite 243 to the jam nut
holes in the ski.
threaded areas and tighten each jam
nut securely against its adjustment
2. Center the wear bar studs in the
tie rod.
holes and install the lock nuts.
3. Tighten lock nuts securely.
! WARNING
Neglecting to lock the tie rod by tight-
ening the jam nuts against the adjust-
ment tie rod may cause loss of
snowmobile control and possible per-
sonal injury.
25
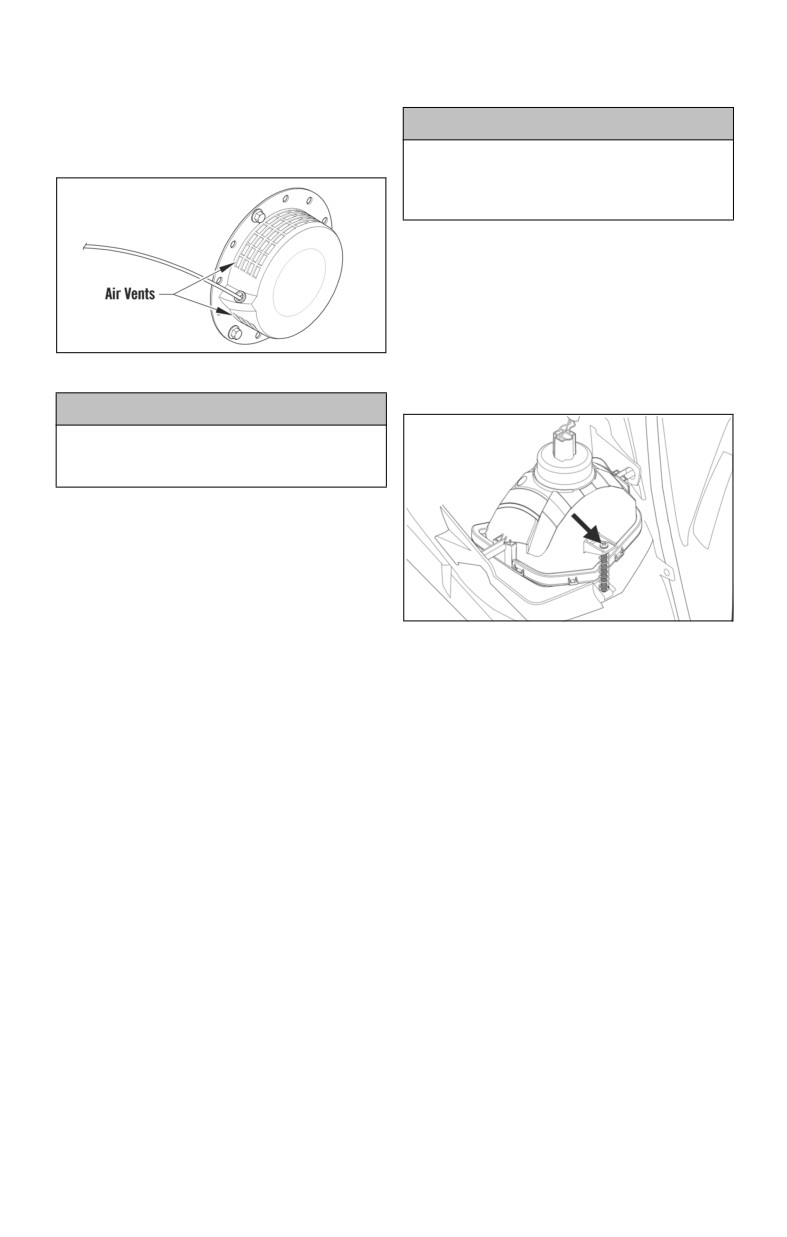
Recoil Starter Air Vents
2. Remove the bulb from the housing
by rotating it counterclockwise until
It is important for proper engine cooling
loose.
that the air vents located on the recoil
starter are kept clean. These air vents
CAUTION
should be checked periodically and
cleaned if necessary.
Do not touch the glass portion of the
bulb. If the glass portion is touched, it
must be cleaned with a dry cloth
before installing.
3. Install the new bulb into the hous-
ing; then rotate the bulb clockwise to
lock it into place.
The headlight aim can be adjusted to pro-
vide maximum illumination for the oper-
ator. To adjust headlight aim, adjust the
0744-923
screw until maximum illumination for
the operator is apparent.
CAUTION
Serious overheating of the engine
and engine damage will result if the
air vents are not kept clean.
Lights
To change the headlight bulb, use the fol-
lowing procedure:
1. Open the hood; then disconnect the
harness connector from the head-
light bulb.
0752-957
26
Preparation for Storage
Prior to storing the snowmobile, it is
C. Install the spark plug and con-
extremely important that it be properly
nect the high tension wire.
serviced to prevent corrosion and compo-
6.
Remove the drive chain and clean
nent deterioration. BRP recommends the
thoroughly in a solvent. Install drive
following procedure to prepare the snow-
chain and lubricate with a dry,
mobile for storage:
graphite-based chain lubricant.
1.
Clean the seat cushion with Vinyl
7.
Change the oil; then clean the air fil-
Protectant and a damp cloth.
ter.
2.
Clean the snowmobile thoroughly
8.
Tighten all screws, nuts, and bolts
by hosing dirt, oil, grass, and other
securely.
foreign matter from the undercar-
riage, tunnel, hood, and belly pan.
9.
Make sure all rivets holding compo-
Allow the snowmobile to dry thor-
nents together are tight. Replace all
oughly. DO NOT get water into any
loose rivets.
part of the engine.
10.
Clean and polish the hood, console,
3.
Drain all gas from the gas tank.
and chassis with XPS Spray Cleaner
Close the gas tank shut-off valve by
and Polish. DO NOT USE SOL-
rotating it clockwise; then drain the
VENTS. THE PROPELLANT
gasoline from the carburetor by
WILL DAMAGE THE FINISH.
loosening the drain screw on the car-
11.
If possible, store the snowmobile
buretor float chamber.
indoors. Raise the rear of the snow-
4.
Plug the muffler outlet with a clean
mobile off the floor and block up the
cloth.
rear end. Cover the snowmobile
with a snowmobile cover to protect
5.
With the ignition key in the OFF
it from dirt and dust.
position:
12.
If the snowmobile must be stored
A. Disconnect the high tension wire
outdoors, block the entire snowmo-
from the spark plug; then remove
bile off the ground and cover it with
the spark plug.
a snowmobile cover to protect it
B. Pour 10 mL (approximately two
from dirt, dust, and rain.
teaspoons) of petroleum-based
oil into the spark plug hole; then
CAUTION
pull the recoil starter handle
Avoid using a plastic cover as mois-
slowly about five times.
ture will collect on the snowmobile
causing corrosion.
CAUTION
Never crank the engine over without
grounding the spark plug. Damage to
the transistorized ignition may result.
27
Preparation after Storage
Taking the snowmobile out of storage
5. Lubricate the drive chain with rec-
and correctly preparing it for operation
ommended lube or with a dry,
will ensure many miles and hours of trou-
graphite-based chain lubricant.
ble-free snowmobiling. BRP recom-
6. Check brake-lever travel distance,
mends the following procedure to
all controls, ski alignment, track ten-
prepare the snowmobile:
sion, track alignment, brake band,
1. Clean the snowmobile thoroughly.
and ski wear bars; adjust or replace
Polish the exterior of the snowmo-
as necessary.
bile using the cleaner.
7. Examine the in-line fuel filter and
2. Clean the engine cooling fins and
clean or replace if necessary.
the recoil starter vents. Remove the
8. Fill the gas tank.
cloth from the muffler.
9. Clean the seat cushion with the vinyl
3. Check all control wires and cables
protectant.
for signs of wear or fraying. Replace
if necessary. Use cable ties or tape to
10. Check the spark plug (clean, gap,
route wires and cables away from
and/or replace as necessary); then
hot or rotating parts.
start the engine and ensure proper
carburetor adjustments.
4. Inspect the drive chain and drive
chain tightener. Replace if neces-
sary.
28
Specifications
ENGINE AND DRIVE
Type
Forced Air Cooled/4-Cycle
Bore x Stroke
56 x 50 mm (2.2 x 1.97 in.)
Valve Arrangement
Overhead
Displacement
123 cc (7.5 cu in.)
Lighting Coil Output
12V/55W
Compression Ratio
8.3:1
Lubrication
Forced Splash
Cooling System
Forced Air
Drive Clutch
Centrifugal
Drive Chain Tensioner
Automatic
Brake Type
Band
Ignition Type
Transistorized
Track Width
25.4 cm (10 in.)
Track Length
170.1 cm (67 in.)
Track Tension (Range)
6.4-9.5 mm (1/4-3/8 in.)
Track Style
Cobra
Spark Plug Type
NGK BPR4ES
Spark Plug Gap
0.7-0.8 mm (0.028-0.031 in.)
Ignition Timing (Fixed)
24° BTDC @ 3600 RPM
CARBURETOR
Type
Mikuni BV18-11-84Z1
CHASSIS
Overall Length
185.4 cm (73 in.)
Overall Height
86.3 cm (34 in.)
Overall Width
91.4 cm (36 in.)
Ski Center-to-Center Distance (Stance)
77.4 cm (30.5 in.)
MISCELLANEOUS
Gasoline (Recommended)
87 Minimum Octane Regular Unleaded
Gas Tank Capacity (Rated)
1.7 L (0.45 U.S. gal.)
Engine Oil (Recommended)
Synthetic 0W-40
Crankcase Oil Capacity
600 mL (20.3 fl oz)
Air Cleaner
Semi-Dry Polyurethane Foam Element
Taillight (p/n)
0609-934
Headlight Bulb (p/n)
0609-991
Starting System
Manual Recoil
Dry Weight
75.0 kg (167 lb)
Vibration — Hand/Arm
< 2.5 m/s2
Vibration — Seat
< 0.5 m/s2
Specifications subject to change without notice.
29
Warranty
BRP INTERNATIONAL LIMITED WARRANTY:
2023 LYNX® SNOWMOBILES
SCOPE OF THE LIMITED WARRANTY
Bombardier Recreational Products Inc. (“BRP”) warrants its 2023 LYNX snowmo-
biles sold by distributors or dealers authorized by BRP to distribute LYNX snowmo-
biles
("LYNX Distributor / Dealer") outside of the fifty United States, Canada,
members of the European Economic Area (which is comprised of the member states
of the European Union plus United Kingdom, Norway, Iceland and Liechtenstein)
(“EEA”), members states of the Commonwealth of the Independent States (including
Ukraine and Turkmenistan) (''CIS'') and Turkey, from defects in material or work-
manship for the period and under the conditions described below.
Non-factory installed parts and accessories are not covered under this limited war-
ranty. Please refer to the applicable parts and accessories limited warranty text.
This limited warranty will become null and void if: (1) the snowmobile was used for
racing or any other competitive activity, at any point, even by a previous owner; or (2)
the snowmobile has been altered or modified in such a way so as to adversely affect
its operation, performance or durability, or has been altered or modified to change its
intended use.
LIMITATIONS OF LIABILITY
TO THE EXTENT PERMITTED BY LAW, THIS WARRANTY IS EXPRESSLY
GIVEN AND ACCEPTED IN LIEU OF ANY AND
ALL OTHER WARRANTIES, EXPRESSED OR IMPLIED, INCLUDING WITH-
OUT LIMITATION ANY WARRANTY OF MERCHANTABILITY OR FITNESS
FOR A PARTICULAR PURPOSE. TO THE EXTENT THAT THEY CANNOT BE
DISCLAIMED, THE IMPLIED WARRANTIES ARE LIMITED IN DURATION
TO THE LIFE OF THE EXPRESS WARRANTY. INCIDENTAL AND CONSE-
QUENTIAL DAMAGES ARE EXCLUDED FROM COVERAGE UNDER THIS
WARRANTY. SOME JURISDICTIONS DO NOT ALLOW FOR THE DISCLAIM-
ERS, LIMITATIONS AND EXCLUSIONS IDENTIFIED ABOVE, AS A RESULT,
THEY MAY NOT APPLY TO YOU. THIS WARRANTY GIVES YOU SPECIFIC
RIGHTS, AND YOU MAY ALSO HAVE OTHER LEGAL RIGHTS WHICH MAY
VARY FROM COUNTRY TO COUNTRY. (FOR PRODUCTS PURCHASED IN
AUSTRALIA REFER TO “FOR PRODUCTS SOLD IN AUSTRALIA ONLY”,
BELOW).
Neither the LYNX Distributor / Dealer nor any other person has been authorized to
make any affirmation, representation or warranty regarding the product, other than
those contained in this limited warranty, and if made, shall not be enforceable against
BRP.
BRP reserves the right to modify this warranty at any time, being understood that
such modification will not alter the warranty conditions applicable to the products
sold while this warranty is in effect.
30
EXCLUSIONS - ARE NOT WARRANTED
The following are not warranted under any circumstances:
•
Normal wear and tear;
•
Routine maintenance items, tune ups, adjustments;
•
Damage caused by failure to provide proper maintenance and/or storage, as
described in the Operator's Guide;
•
Damage resulting from removal of parts, improper repairs, service, maintenance,
modifications or use of parts or accessories not manufactured or approved by
BRP which in its reasonable judgment are either incompatible with the product or
adversely affect its operation, performance and durability, or resulting from repairs
done by a person that is not an authorized servicing BRP snowmobile distributor/
dealer;
•
Damage caused by abuse, abnormal use, neglect, racing or operation of the
product on surfaces other than snow, or operation of the product in a manner
inconsistent with the recommended operation described in the Operator’s Guide;
•
Damage resulting from accident, submersion, fire, snow or water ingestion, theft,
vandalism or any act of God;
•
Operation with fuels, oils or lubricants which are not suitable for use with the prod-
uct (see the Operator’s Guide);
•
Damage resulting from rust, corrosion or exposure to the elements;
•
Incidental or consequential damages, or damages of any kind including without
limitation towing, storage, transportation expenses, telephone, rental, taxi, incon-
venience, insurance coverage, loan payments, loss of time, loss of income; or
time missed for down time experience due to service work.
•
And damage resulting from studs installed on tracks if the installation does not
conform to BRP’s instructions.WARRANTY COVERAGE PERIOD
This limited warranty will be in effect from the date of delivery to the first retail con-
sumer or the date the product is first put into use, whichever occurs first and for the
following period:
TWELVE (12) CONSECUTIVE MONTHS, for private or commercial use owners.
However, the warranty coverage period on a snowmobile delivered between June 1st
and December 1st of a given year will expire November 30th of the following year.
The repair or replacement of parts or the performance of service under this warranty
does not extend the life of this warranty beyond its original expiration date.
Note that the duration and any other modalities of the warranty coverage are subject
to the applicable national or local legislation in the customer's country.
CONDITIONS REQUIRED FOR WARRANTY COVERAGE
This warranty coverage is available only if each of the following conditions has been
fulfilled:
• The 2023 LYNX snowmobile must be purchased as new and unused by its first
owner from a LYNX Distributor / Dealer authorized to distribute LYNX snowmo-
biles in the country in which the sale occurred;
• The BRP specified pre-delivery inspection process must be completed and docu-
mented; - The product must have undergone proper registration by an authorized
LYNX Distributor / Dealer;
• The 2023 LYNX snowmobile must be purchased in the country or union of coun-
tries in which the purchaser resides.
• Routine maintenance outlined in the operator’s guide must be timely performed in
order to maintain warranty coverage. BRP reserves the right to make warranty
coverage contingent upon proof of proper maintenance.
31
BRP will not honor this limited warranty to any private use owner or commercial use
owner if one of the preceding conditions has not been met. Such limitations are nec-
essary in order to allow BRP to preserve both the safety of its products, and also that
of its consumers and the general public.
WHAT TO DO TO OBTAIN WARRANTY COVERAGE
The customer must cease using the snowmobile upon the appearance of an anomaly.
The customer must notify a servicing LYNX Distributor / Dealer within two (2) days
of the appearance of a defect, and provide it with reasonable access to the product and
reasonable opportunity to repair it. The customer must also present to the authorized
LYNX Distributor / Dealer, proof of purchase of the product and must sign the repair
/ work order prior to starting the repair in order to validate the warranty repair. All
parts replaced under this limited warranty become the property of BRP.
Note that the notification period is subject to the applicable national or local legisla-
tion in customer's country.
WHAT BRP WILL DO
To the extent permitted by law, BRP’s obligations under this warranty are limited to,
at its sole discretion, repairing parts found defective under normal use, maintenance
and service, or replacing such parts with new genuine LYNX parts without charge for
parts and labor, at any authorized LYNX Distributor / Dealer during the warranty
coverage period under the conditions described herein. BRP’s responsibility is lim-
ited to making the required repairs or replacements of parts. No claim of breach of
warranty shall be cause for cancellation or rescission of the sale of the snowmobile to
the owner. You may have other legal rights which may vary from country to country.
In the event that service is required outside of the country of original sale, the owner
will bear responsibility for any additional charges due to local practices and condi-
tions, such as, but not limited to, freight, insurance, taxes, license fees, import duties,
and any and all other financial charges, including those levied by governments, states,
territories and their respective agencies.
BRP reserves the right to improve or modify products from time to time without
assuming any obligation to modify products previously manufactured.
TRANSFER
If the ownership of a product is transferred during the warranty coverage period, this
limited warranty, subject to its terms and conditions, shall also be transferred and be
valid for the remaining coverage period provided BRP or an authorized LYNX Dis-
tributor/Dealer receives a proof that the former owner agreed to the transfer of owner-
ship, in addition to the coordinates of the new owner.
CONSUMER ASSISTANCE
In the event of a controversy or a dispute in connection with this limited warranty,
BRP suggests that you try to resolve the issue at the LYNX Distributor / Dealer level.
We recommend discussing the issue with the authorized LYNX Distributor / Dealer's
service manager or owner.
If the matter still remains unresolved, contact BRP by filling out the customer contact
form at www.brp.com or contact BRP by mail at one of the addresses listed under the
CONTACT US section of this guide.
32
BRP LIMITED WARRANTY FOR THE EUROPEAN
ECONOMIC AND THE COMMONWEALTH OF THE
INDEPENDENT STATES (CIS) AREAS AND
TURKEY: 2023 LYNX® SNOWMOBILES
SCOPE OF THE LIMITED WARRANTY
Bombardier Recreational Products Inc. (“BRP”) warrants its 2023 LYNX snowmo-
biles sold by distributors or dealers authorized by BRP to distribute LYNX snowmo-
biles (“LYNX Distributor/Dealer”) in member states of the European Economic Area
(which is comprised of the member states of the European Union plus the United
Kingdom, Norway, Iceland and Liechtenstein) (“EEA”), in member states of the
Commonwealth of the Independent States (including Ukraine and Turkmenistan)
(“CIS”) and Turkey from defects in material or workmanship for the period and under
the conditions described below.
Non-factory installed parts and accessories are not covered under this limited war-
ranty. Please refer to the applicable parts and accessories limited warranty text.
This limited warranty will become null and void if: (1) the snowmobile was used for
racing or any other competitive activity, at any point, even by a previous owner; or (2)
the snowmobile has been altered or modified in such a way so as to adversely affect
its operation, performance or durability, or has been altered or modified to change its
intended use.
LIMITATIONS OF LIABILITY
TO THE EXTENT PERMITTED BY LAW, THIS WARRANTY IS EXPRESSLY
GIVEN AND ACCEPTED IN LIEU OF ANY AND ALL OTHER WARRANTIES,
EXPRESSED OR IMPLIED, INCLUDING WITHOUT LIMITATION ANY WAR-
RANTY OF MERCHANTABILITY OR FITNESS FOR A PARTICULAR PUR-
POSE. TO THE EXTENT THAT THEY CANNOT BE DISCLAIMED, THE
IMPLIED WARRANTIES ARE LIMITED IN DURATION TO THE LIFE OF THE
EXPRESS WARRANTIES. INCIDENTAL AND CONSEQUENTIAL DAMAGES
ARE EXCLUDED FROM COVERAGE UNDER THIS WARRANTY. SOME
JURISDICTIONS DO NOT ALLOW FOR THE DISCLAIMERS, LIMITATIONS
AND EXCLUSIONS IDENTIFIED ABOVE, AS A RESULT, THEY MAY NOT
APPLY TO YOU. THIS WARRANTY GIVES YOU SPECIFIC RIGHTS, AND
YOU MAY ALSO HAVE OTHER LEGAL RIGHTS WHICH MAY VARY FROM
COUNTRY TO COUNTRY.
Neither the LYNX Distributor/Dealer nor any other person has been authorized to
make any affirmation, representation or warranty regarding the product, other than
those contained in this limited warranty, and if made, shall not be enforceable against
BRP.
BRP reserves the right to modify this warranty at any time, being understood that
such modification will not alter the warranty conditions applicable to the products
sold while this warranty is in effect.
EXCLUSIONS - ARE NOT WARRANTED
The following are not warranted under this limited warranty under any circum-
stances:
• Normal wear and tear;
• Routine maintenance items, tune ups, adjustments;
• Damage caused by negligence or failure to provide proper maintenance and/or
storage, as described in the Operator's Guide;
33
• Damage resulting from removal of parts, improper repairs, service, maintenance,
modifications or use of parts or accessories not manufactured or approved by
BRP which in its reasonable judgment are either incompatible with the product or
adversely affect its operation, performance and durability, or resulting from repairs
done by a person that is not an authorized servicing BRP snowmobile distributor/
dealer;
• Damage caused by abuse, abnormal use, neglect, racing or operation of the
product on surfaces other than snow, or operation of the product in a manner
inconsistent with the recommended operation described in the Operator’s Guide;
• Damage resulting from accident, submersion, fire, snow or water ingestion, theft,
vandalism or any act of God;
• Operation with fuels, oils or lubricants which are not suitable for use with the prod-
uct (see the Operator’s Guide);
• Damage resulting from rust, corrosion or exposure to the elements;
• Incidental or consequential damages, or damages of any kind including without
limitation towing, storage, transportation expenses, telephone, rental, taxi, incon-
venience, insurance coverage, loan payments, loss of time, loss of income; or
time missed for downtime experience due to service work.
• And damage resulting from studs installed on tracks if the installation does not
conform to BRP’s instructions.
WARRANTY COVERAGE PERIOD
This warranty will be in effect from (1) the date of delivery to the first retail consumer
or (2) the date the product is first put into use, whichever occurs first and for a period
of:
TWENTY-FOUR (24) CONSECUTIVE MONTHS, for private use owners and
TWELVE (12) CONSECUTIVE MONTHS for commercial use owners. However,
the warranty coverage period on a snowmobile delivered between June 1st and
December 1st of a given year will expire November 30th of the applicable year. A
snowmobile is used commercially when it is used in connection with generating
income or any work or employment during any part of the warranty period. A snow-
mobile is also used commercially when, at any point during the warranty period, it
has commercial tags or is licensed for commercial use.
The repair or replacement of parts or the performance of service under this warranty
does not extend the life of this warranty beyond its original expiration date.
Note that the duration and any other modalities of the warranty coverage are subject
to the applicable national or local legislation in the customer’s country.
CONDITIONS TO HAVE WARRANTY COVERAGE
This warranty coverage is available only if each of the following conditions has been
fulfilled:
• The 2023 LYNX snowmobile must be purchased as new and unused by its first
owner from a LYNX Distributor/Dealer authorized to distribute LYNX products in
the country in which the sale occurred;
• The BRP specified pre-delivery inspection process must be completed and docu-
mented;
• The product must have undergone proper registration by an authorized LYNX Dis-
tributor/Dealer;
• The 2023 LYNX snowmobile must be purchased within the EEA by an EEA resi-
dent, in the CIS for residents of the countries comprised in such area and in Tur-
key for residents of Turkey;
34
• Routine maintenance outlined in the Operator’s Guide must be timely performed
in order to maintain warranty coverage. BRP reserves the right to make warranty
coverage contingent upon proof of proper maintenance.
BRP will not honor this limited warranty to any private use owner or commercial use
owner if one of the preceding conditions has not been met. Such limitations are nec-
essary in order to allow BRP to preserve both the safety of its products, and also that
of its consumers and the general public.
WHAT TO DO TO OBTAIN WARRANTY COVERAGE
The customer must cease using the snowmobile upon the appearance of an anomaly.
The customer must notify a servicing BRP snowmobile distributor/ dealer within two
(2) months of the appearance of a defect, and provide it with reasonable access to the
product and reasonable opportunity to repair it. The customer must also present to the
authorized BRP snowmobile distributor/ dealer, proof of purchase of the product and
must sign the repair/work order prior to starting the repair in order to validate the
warranty repair. All parts replaced under this limited warranty become the property of
BRP.
Note that the notification period is subject to the applicable national or local legisla-
tion in customer's country.
WHAT BRP WILL DO
To the extent permitted by law, BRP’s obligations under this warranty are limited to,
at its sole discretion, repairing parts found defective under normal use, maintenance
and service, or replacing such parts with new genuine LYNX parts without charge for
parts and labor, at any authorized LYNX Distributor/Dealer during the warranty cov-
erage period under the conditions described herein. BRP’s responsibility is limited to
making the required repairs or replacements of parts. No claim of breach of warranty
shall be cause for cancellation or rescission of the sale of the snowmobile to the
owner. You may have other legal rights which may vary from country to country.
In the event that service is required outside of the EEA, CIS or Turkey, the owner will
bear responsibility for any additional charges due to local practices and conditions,
such as, but not limited to, freight, insurance, taxes, license fees, import duties, and
any and all other financial charges, including those levied by governments, states, ter-
ritories and their respective agencies.
BRP reserves the right to improve or modify products from time to time without
assuming any obligation to modify products previously manufactured.
TRANSFER
If the ownership of a product is transferred during the warranty coverage period, this
limited warranty, subject to its terms and conditions, shall also be transferred and be
valid for the remaining coverage period provided BRP or an authorized LYNX Dis-
tributor/Dealer receives a proof that the former owner agreed to the transfer of owner-
ship, in addition to the co-ordinates of the new owner.
CONSUMER ASSISTANCE
In the event of a controversy or a dispute in connection with this limited warranty,
BRP suggests that you try to resolve the issue at the LYNX Distributor/Dealer level.
We recommend discussing the issue with the authorized LYNX Distributor/Dealer's
service manager or owner.
If the matter still remains unresolved, contact BRP by filling out the customer contact
form at www.brp.com or contact BRP by mail at one of the addresses listed under the
CONTACT US section of this guide.
35
ADDITIONAL TERMS AND CONDITIONS FOR FRANCE
ONLY
The following terms and conditions are applicable to products sold in France only:
The seller shall deliver goods that are complying with the contract and shall be
responsible for defects existing upon delivery. The seller shall also be responsible for
defects resulting from packaging, assembling instructions or the installation when it
is its responsibility per the contract or if accomplished under its responsibility. To be
compliant with the contract, the good shall:
1. Be fit for normal use for goods similar thereto and, if applicable:
• Correspond to the description provided by the seller and have the qualities pre-
sented to the buyer though sample or model;
• Have the qualities that a buyer may legitimately expect considering the public
declarations of the seller, the manufacturer of its representative, including in
advertising or labeling; or
2. Have the characteristics mutually agreed upon as between the parties or be fit for
the specific use intended by the buyer and brought to the attention of the seller and
which accepted.
The action for failure to comply is prescribed after two years after delivery of the
goods. The seller is responsible for the warranty for hidden defects of the good sold if
such hidden defects are rendering the good unfit for the intended use, or if they
diminish its use in such a way that the buyer would not have acquired the good or
would have given a lesser price, had he known. The action for such hidden defects
shall be taken by the buyer within 2 years of the discovery of the defect.
36
Customer Information
Data Privacy Information
Bombardier Recreational Products inc., its affiliates and subsidiaries (“BRP”) is com-
mitted to protecting your privacy and support a general policy of openness about how
we collect, use and disclose your personal information in the course of managing our
relationship with you. More details can be found by visiting BRP’s Privacy Policy
at: https://brp.com/en/privacy-policy. html or by scanning the QR Code below.
Please be assured that we have appropriate security measures in place to ensure that
your personal information is protected against loss and unauthorized access.
Your personal information that may be collected by BRP, directly from you or from
authorized dealers or authorized third parties, includes:
• Contact, Demographic & Registration Information (e.g., name, full address,
phone number, email, gender, ownership history, language of communication)
• Vehicle Information (e.g., serial number, purchase and delivery date, unit usage,
vehicle location and movements)
• Third Party Information (e.g., information received from BRP partners, joint-
marketing activities information, social media)
• Technological Information (e.g., IP address, type of device, operating system,
browser type, webpages you view, cookies and similar technologies when you
use BRP or dealers’ websites or mobile application)
• Interaction with BRP Information (e.g., information collected when you call
BRP’s in-house sales representatives, buy items on a BRP web Site, sign up for
BRP emails, participate in BRP-sponsored contests and sweepstakes or attend
BRP-sponsored events)
• Transactional Information (e.g., information necessary to handle returns, pay-
ment information when you purchase our products or services through our web-
sites or mobile applications and other issues related to your purchase of BRP
products)
This information may be used and processed for the following purposes:
• Safety & Security
• Customer Support for Sales & After Sales (e.g., complete or follow up with you
about your purchase or maintenance)
• Registration & Warranty
• Communication (e.g., sending you a BRP satisfaction survey)
• Online Behavioral Advertising, Profiling and Location-Based Services (e.g., offer
customized experience)
• Compliance & Dispute Resolution
• Marketing & Advertising
• Assistance (e.g., help with any delivery issues, handle returns, and other issues
related to your purchase of BRP products).
We also may use personal information to generate aggregated or statistical data that
no longer identifies you personally.
Your personal information may be disclosed to the following: BRP, BRP’s authorized
dealerships, distributors, service providers, advertising & market research partners
and other authorized third parties.
37
We may receive information about you from diverse sources, including third parties,
such as BRP’s authorized dealerships and partners, with whom we offer services or
engage in joint-marketing activities. We may also receive information about you from
social media platforms such as Facebook and Twitter, when you interact with us on
those platforms.
Depending on the circumstances, your personal information may be communicated
outside the region where you reside. Your personal information is retained only for as
long as necessary for the purpose for which we obtained it and according to our reten-
tion policies.
To exercise your data privacy rights (e.g. right of access, right of rectification), to
withdraw your consent in order to be removed from the address list for marketing
purposes or for the satisfaction survey or for general data privacy questions, please
contact BRP’s Data Protection Officer at or by mail at privacyofficer@brp.com or by
mail at: BRP Legal Service, 726 St-Joseph, Valcourt, Quebec, Canada, J0E 2L0.
When BRP processes your personal information, they do so in compliance with its
Privacy Policy available at: https://www.brp.com/en/privacy-policy.html or by using
the following QR Code.
38
Contact Us
Sweden
Spinnvägen 15
903 61 Umeå
Europe
Sweden 90821
Finland
North America
Isoaavantie 7
Canada
PL 8040
96101 Rovaniemi
3200A, rue King Ouest,
Norway
Suite 300
Sherbrooke, Québec J1L 1C9
Ingvald Ystgaardsvei 15
United States of America
N-7484 Trondheim
Salg, marketing, ettermarked
10101 Science Drive
Sturtevant, Wisconsin 53177
39
Change of Address/Ownership
If your address has changed or if you are the new owner of the snowmobile, be sure to
notify BRP by either:
• Notifying an authorized BRP snowmobile dealer or distributor.
• North America Only: calling at 1-888-272-9222.
• Mailing one of the change of address cards on the following pages at one of the
BRP addresses indicated in the Contact Us section of this guide.
In case of change of ownership, please join a proof that the former owner agreed to
the transfer.
Notifying BRP, even after the expiration of the limited warranty, is very important as
it enables BRP to reach the snowmobile owner if necessary, like when safety recalls
are initiated. It is the owner’s responsibility to notify BRP.
STOLEN UNITS: If your personal snowmobile is stolen, you should notify BRP or
an authorized BRP snowmobile dealer. We will ask you to provide your name,
address, phone number, the vehicle identification number and the date it was stolen.
40