INSTRUKCJA OBSŁUGI MIERNIK CISNIENIA SPREZENIA SILNIKA BENZYNOWEGO HT8G412
PL
INSTRUKCJA OBSŁUGI
MIERNIK CIŚNIENIA SPRĘŻENIA SILNIKA BENZYNOWEGO
HT8G412
WARNING
WAŻNE
Przeczytaj uważnie instrukcję. Zwróć uwagę na wymagania eksploatacyjne
i ostrzeżenia. Używaj narzędzia zgodnie z przeznaczeniem. Nieodpowiednie
użytkowanie może spowodować uszkodzenia i / lub obrażenia ciała i utratę gwa-
rancji. Prosimy o zachowanie instrukcji.
I. ZASADY BEZPIECZEŃSTWA
1. Zablokuj koła napędowe przed użyciem. Ustaw hamulec postojowy i ustaw dźwignię zmia-
ny biegów w położeniu neutralnym w przypadku ręcznej skrzyni biegów lub parkowanie w
przypadku automatycznej skrzyni biegów.
2. Przed użyciem przeczytaj instrukcję obsługi pojazdu.
3. Tester trzymaj z dala od gorących lub ruchomych części silnika.
4. Używaj tylko z silnikami benzynowymi. Nie przekraczaj zakresu miernika.
5. Zabezpiecz połączenia przed użyciem.
6. Sprawdź przed każdym użyciem czy części są luźne lub uszkodzone.
7. Podczas użytkowania używaj okulary ochronne.
8. Używaj testera tylko w dobrze wentylowanych pomieszczeniach. Pracujący silnik benzynowy wytwarza tlenek węgla. Tlenek wę-
gla to bezbarwny, bezwonny gaz, który może spowodować poważne obrażenia lub śmierć.
II. ZASADY UŻYTKOWANIA
UWAGA: Wykonanie testu kompresji wymaga pracy dwóch osób; jedna osoba do obsługi wyłącznika zapłonu pojazdu, druga osoba
obsługuje tester kompresji.
1. Przygotować silnik do próby sprężania, uruchamiając go i pozwalając mu rozgrzać się do normalnego stanu temperatury
roboczej. Następnie wyłączyć zapłon. Nigdy nie uruchamiaj silnika benzynowego w zamkniętym garażu lub innym zamkniętym
pomieszczeniu.
2. Po wyłączeniu silnika odłącz oba przewody cewki od cewki silnika. Zaizoluj cewkę i przewody lub poprowadź je z dala od siebie
i wszystkich metalowych powierzchni.
3. Wykręć wszystkie świece zapłonowe. Zanotuj, które przewody świec zapłonowych trafiają do poszczególnych lokalizacji świec.
4. Podłącz złączkę adaptera i przewód do manometru.
5. Podłącz tester kompresji do pierwszego cylindra silnika.
6. Podczas rozruchu silnika obserwuj wskaźnik. Zapisz maksymalny odczyt.
7. Po zarejestrowaniu maksymalnego odczytu, wyłącz silnik. Następnie zwolnij ciśnienie powietrza w manometrze naciskając
przycisk manometru.
8. Wyjmij tester kompresji z pierwszego cylindra silnika. Następnie powtórz kroki # 5, # 6 i # 7 dla pozostałych cylindrów silnika.
UWAGA: Dobra kompresja cylindra silnika będzie sygnalizowana wysokim
odczytem początkowym i progresywnym narastaniem aż do końcowego
odczytu maksymalnego. Słabe sprężenie cylindra silnika będzie sygnalizo-
wane niskim odczytem początkowym i znacznie wolniejszym narastaniem
do końcowego odczytu maksymalnego. Odczyty sprężania dla wszystkich
cylindrów silnika nie powinny różnić się o więcej niż 10%. Sprawdź w in-
strukcji serwisowej dopuszczalne zakresy ciśnień.
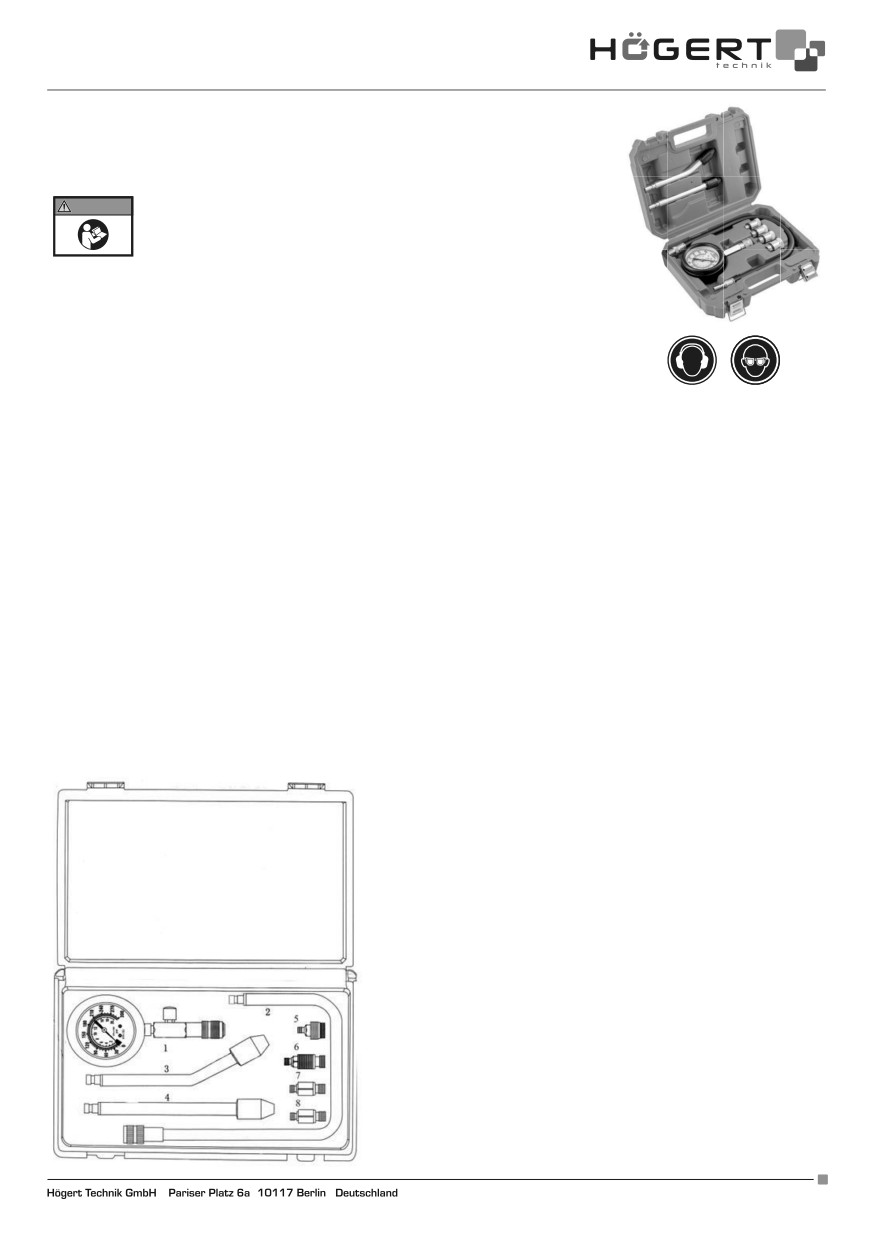
1. Manometr z szybkozłączką i zaworem spustowym 0-300PSI
2. Przewód elastyczny
3. Końcówka testowa odgięta z gumowym uszczelniaczem.
4. Końcówka testowa prosta z gumowym uszczelniaczem.
5. Adapter M18 X 1,5
6. Adapter M14 X 1,25
7. Adapter M12 X 1,25
8. Adapter M10 X 1.0
Adres producenta/ Adresse des Herstellers/ Manufacturer’s Address/ Адрес производителя
1
GTV Poland Sp. z o.o. Sp. k., ul. Przejazdowa 21, 05-800 Pruszków
DE
BEDIENUNGSANLEITUNG
KOMPRESSIONSMANOMETER FÜR BENZINMOTOREN HT8G412
WARNING
WICHTIG: Lesen sie die anweisungen sorgfältig durch und beachten sie die
betriebsanforderungen und warnhinweise. Verwenden sie das gerät nur für
den dafür vorgesehenen zweck. Eine unsachgemäße verwendung kann zu
schäden und / oder personenschäden führen und führt zum erlöschen der ga-
rantie. Bitte bewahren sie diese anweisungen auf.
I. SICHERHEITSHINWEISE
1. Blockieren Sie die Antriebsräder vor dem Gebrauch. Ziehen Sie die Feststellbremse an
und stellen Sie den Schalthebel in den Leerlauf.
2. Lesen Sie vor dem Gebrauch die Bedienungsanleitung des Fahrzeugs.
3. Halten Sie den Kompressionsmanometer von heißen oder beweglichen Motorteilen fern.
4. Nur mit Benzinmotoren verwenden.
5. Überprüfen und Sichern Sie alle Verbindungen vor dem Gebrauch.
6. Überprüfen Sie vor jedem Gebrauch, ob Teile lose oder beschädigt sind.
7. Verwenden Sie während des Gebrauchs eine Schutzbrille.
8. Verwenden Sie den Tester nur in gut belüfteten Bereichen. Ein laufender Benzinmotor erzeugt Kohlenmonoxid. Kohlenmonoxid
ist ein farbloses, geruchloses Gas, das schwere Verletzungen verursachen und in extremen Fällen zum Tod führen kann.
II. NUTZUNGSBEDINGUNGEN
HINWEIS: Für die Durchführung des Kompressionstests sind zwei Personen erforderlich. Eine Person zum Betätigen des Fahrzeug-
zündschalters, die andere Person zum Betätigen des Kompressionstesters.
1. Bereiten Sie den Motor für den Kompressionstest vor, indem Sie ihn starten und auf die normale Betriebstemperatur bringen ann
die Zündung ausschalten. Lassen Sie einen Benzinmotor niemals in einer geschlossenen Garage oder einem anderen geschlos-
senen Bereich laufen.
2. Trennen Sie bei ausgeschaltetem Motor beide Spulenleitungen von der Motorspule. Isolieren Sie die Spule und die Drähte oder
führen Sie die Spule und die Drähte von Ihnen und allen Metalloberflächen weg.
3. Entfernen Sie alle Zündkerzen. Beachten Sie, welche Zündkerzenkabel zu den einzelnen Zündkerzen führen.
4. Schließen Sie den Adapteranschluss und den Schlauch an das Manometer an.
5. Schließen Sie den Kompressionstester an den ersten Motorzylinder an.
6. Beobachten Sie die Anzeige, während Sie den Motor anlassen. Notieren Sie den maximalen Messwert.
7 Stellen Sie den Motor ab, nachdem der maximale Messwert aufgezeichnet wurde. Lassen Sie dann den Luftdruck im Manometer
durch Drücken der Manometer-Taste ab.
8. Entfernen Sie das Kompressionsprüfgerät vom ersten Motorzylinder. Wiederholen Sie die Schritte 5, 6 und 7 für die verbleiben-
den Motorzylinder.
HINWEIS: EINE GUTE KOMPRESSION DES MOTORZYLINDERS WIRD
DURCH EINEN HOHEN ANFANGSWERT UND EINEN PROGRESSIVEN
AUFBAU BIS ZUM ENDGÜLTIGEN MAXIMALWERT ANGEZEIGT. EINE
SCHLECHTE KOMPRESSION DES MOTORZYLINDERS WIRD DURCH
EINEN NIEDRIGEN ANFANGSWERT UND EINEN VIEL LANGSAMEREN
ANSTIEG AUF DEN ENDGÜLTIGEN MAXIMALWERT ANGEZEIGT. DIE KOM
PRESSIONSWERTE FÜR ALLE MOTORZYLINDER SOLLTEN SICH NICHT
UM MEHR ALS 10% UNTERSCHEIDEN. ÜBERPRÜFEN SIE DAS SERVICE
HANDBUCH AUF AKZEPTABLE DRUCKBEREICHE.
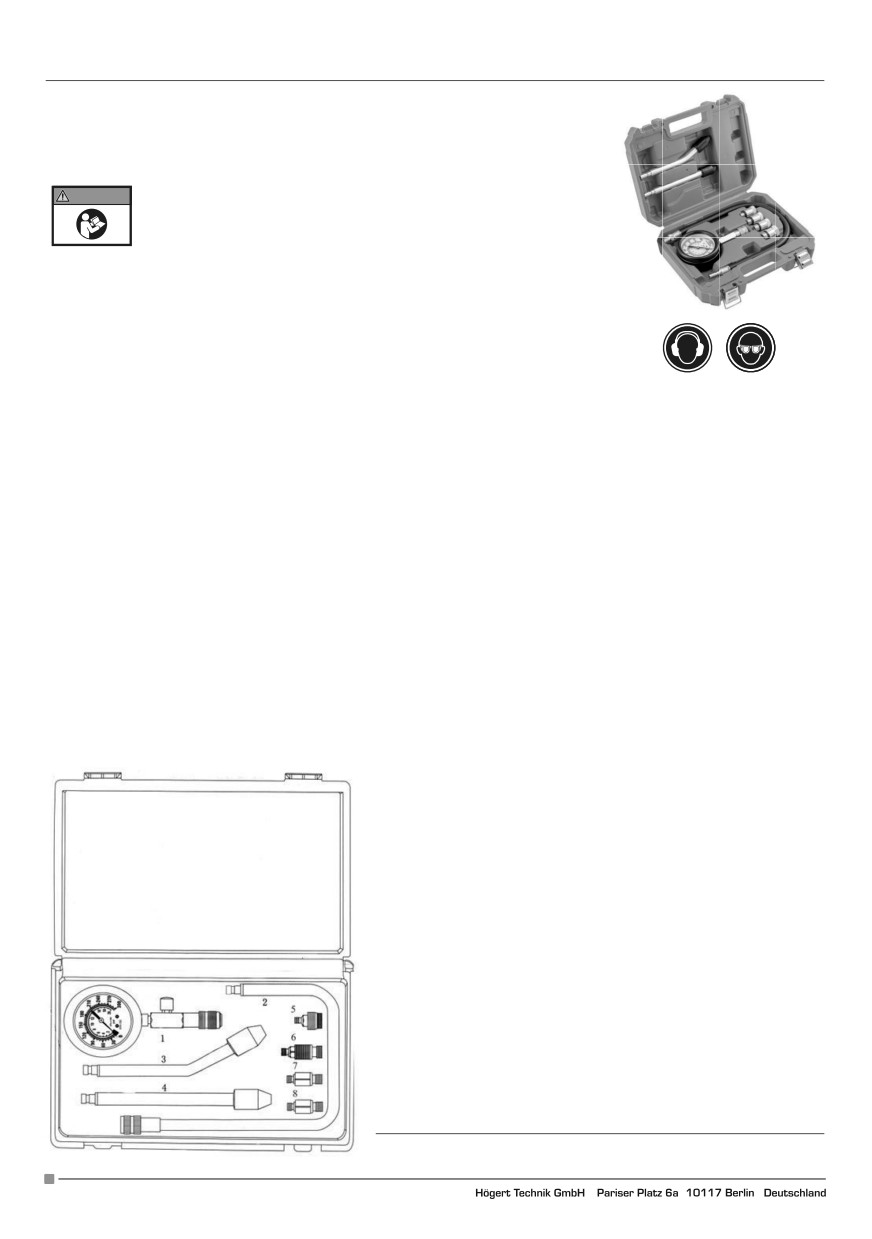
1. Manometer mit schnellkupplung und 0-300PSI ablassventil
2. Flexibler schlauch
3. Gebogene testspitze mit gummidichtmittel.
4. Gerade testspitze mit gummidichtmittel.
5. Adapter m18 x 1.5
6. Adapter m14 x 1.25
7. Adapter m12 x 1.25
8. Adapter m10 x 1.0
2
Adres producenta/ Adresse des Herstellers/ Manufacturer’s Address/ Адрес производителя
GTV Poland Sp. z o.o. Sp. k., ul. Przejazdowa 21, 05-800 Pruszków
EN
INSTRUCTION MANUAL
PETROL ENGINE COMPRESSION TEST KIT HT8G412
WARNING IMPORTANT:
Read these instructions carefully. Note the safe operational requirements, war-
nings and cautions. Use the tool correctly and with care for the purpose for which
it is intended. Failure to do so may cause damage and/or personal injury and will
invalidate the warranty. Please keep instructions safe for future use.
I. IMPORTANT SAFETY INFORMATION
1. Block drive wheels before use. Set parking brake and put gear selector in neutral for ma-
nual transmission or park for automatic transmission. Risk of sudden vehicle movement!
2. Read vehicle’s service manual before use.
3. Keep away from hot or moving engine parts.
4. Use with gasoline engines only. Do not exceed gauge range.
5. Secure connections before use.
6. Inspect before every use; do not use if parts loose or damaged.
7. Wear safety goggles during use.
8. Use the Tester only in well-ventilated areas. A running gasoline engine produces carbon monoxide. Carbon monoxide is a color-
less, odorless, gas that can cause serious injury or death.
II. INSTRUCTIONS
Read the ENTIRE IMPORTANT SAFETY INFORMATION section at the beginning of this document before set up or use of this product.
NOTE: Performing a compression test requires the work of two individuals; one person to operate the vehicle’s ignition switch
while the other person operates the Compression Tester.
1. Prepare the engine for compression testing by starting the engine and allowing it to warm up to its normal operating temperatu-
re. Then, switch off the ignition. WARNING! Aviod carbon monoxide poisoning! Never run a gasoline engine in an enclose garage
or other contained area.
2. Once the engine has been turned off, disconnect both coil wires from the coil of the engine. Insulate coil wires or route them away
from each other and all metal surfaces.
3. Remove all of the spark plugs. Make note of which spark plug wires go to each spark plug locations.
4. Attach either the Adapter Fitting or Hose and Hose Fitting to the Gauge.
5. Connect the Compression Tester to the first cylinder of the engine. With the gas pedal pressed all the way down, crank the engine
for at least eight revolutions.
6. While cranking the engine, observe the Gauge. Record the maximum reading.
7. After recording the maximum reading, stop cranking the engine. Then, release the air pressure in the Gauge by pressing the Air
Release Button.
8. Remove the Compression Tester from the first engine cylinder. Then repeat Steps #5, #6, and #7 for the remaining engine cylinders.
NOTE: Good engine cylinder compression will be indicated with a high
initial reading, and a progressive build-up to the final maximum reading.
Poor engine cylinder compression will be indicated with a low initial re-
ading, and a much slower build-up to the final maximum reading. The
compression readings for all of the engine cylinders should not vary by
more than 10%. Check service manual for acceptable pressure ranges.
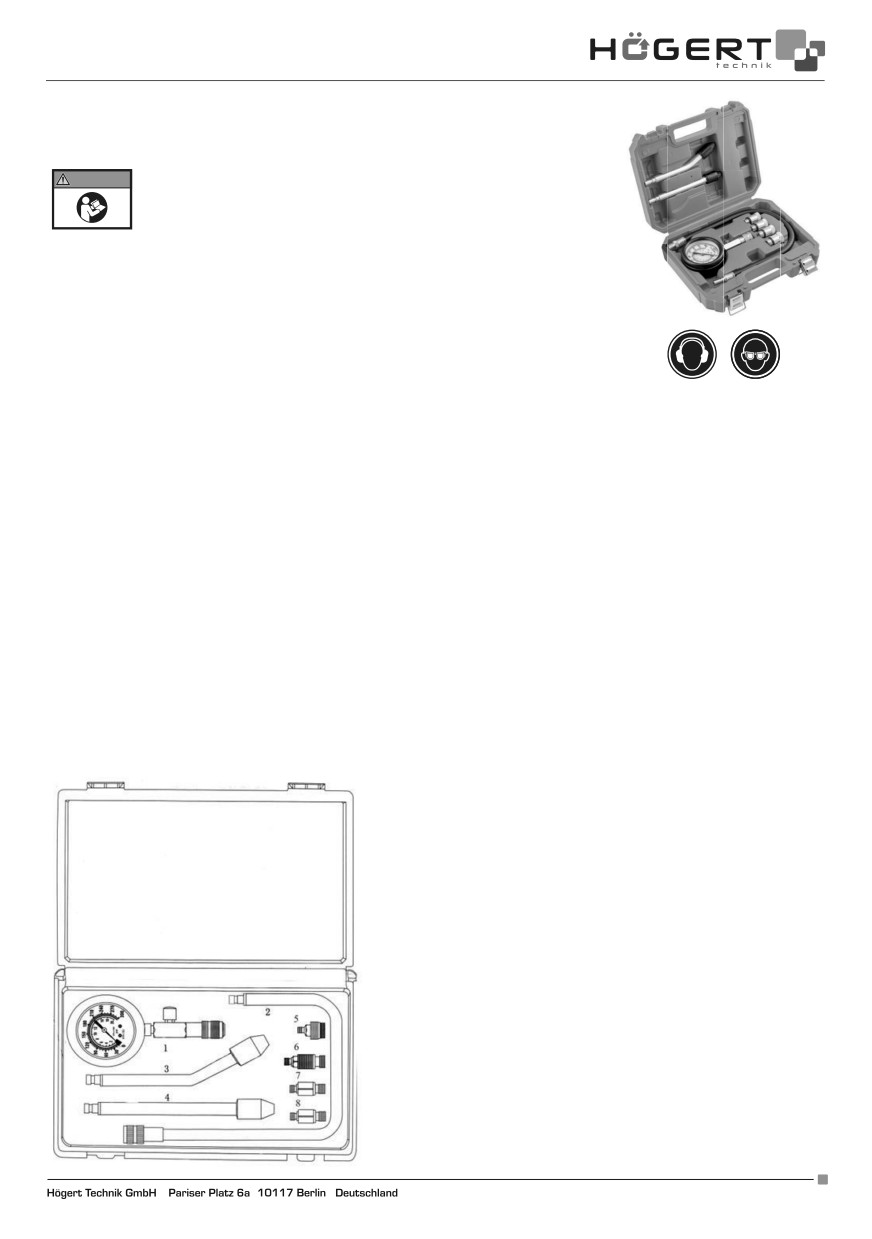
1. Air gauge with quick coupling & release valve 0-300PSI.
2. High-tension connecting pipe with safety lock coupling.
3. Crank shaft type test pipe with rubber plug.
4. Transverse axis test pipe with rubber plug.
5. M18 X 1.5 adapter
6. M14 X 1.25 adapter
7. M12 X 1.25 adapter
8. M10 X 1.0 adapter
Adres producenta/ Adresse des Herstellers/ Manufacturer’s Address/ Адрес производителя
3
GTV Poland Sp. z o.o. Sp. k., ul. Przejazdowa 21, 05-800 Pruszków