BRP Sea-Doo SWITCH TRAILERS. OPERATOR’S GUIDE (2024)
TABLE OF CONTENTS
GENERAL INFORMATION
GENERAL INFORMATION
6
Know Before You Go
6
About this User's Guide
6
Safety Messages
6
SAFETY INFORMATION
SPECIAL SAFETY MESSAGES
8
Important Warnings
8
Important Information
8
LOCATION OF THE IMPORTANT LABELS
10
Safety Labels (All Models)
10
Technical Information Labels
14
REPORTING SAFETY DEFECTS
19
OPERATING INSTRUCTIONS
TRAILER SET-UP
22
Tongue Weight
22
BEFORE GETTING UNDERWAY
23
Attaching the Trailer to the Tow Vehicle
23
Pre-Use Inspection
26
TOWING THE TRAILER
27
Maneuvering in Reverse
27
LAUNCHING THE WATERCRAFT
28
LOADING THE WATERCRAFT
29
MAINTENANCE
MAINTENANCE SCHEDULE
32
At Storage
32
At Preseason
32
MAINTENANCE AND INSPECTION PROCEDURES
33
Tongue Safety Cable
33
Coupler
33
Brakes (if equipped)
33
Tires
34
Wheels
34
Hubs, bearing and seals
34
Lights
37
Winch
37
Jack
37
Wooden Bunks
37
TRAILER CARE
38
Salt Water Use
38
Trailer Cleaning
38
3
TABLE OF CONTENTS
TECHNICAL INFORMATION
TRAILER IDENTIFICATION NUMBER
40
TECHNICAL SPECIFICATIONS
41
WARRANTY
KARAVAN TRAILERS LLC. LIMITED WARRANTY POLICY: SEA-DOO®
SWITCH TRAILER
44
...........................................................................................................44
CUSTOMER INFORMATION
DATA PRIVACY INFORMATION
48
CONTACT US
50
Asia Pacific
50
Europe, Middle East and Africa
50
Latin America
51
North America
51
CHANGE OF ADDRESS/OWNERSHIP
52
4
GENERAL INFORMATION
5

GENERAL INFORMATION
Congratulations on your purchase of
publication. Bombardier Recreational
your new BRP Sea-Doo® SWITCH®
Products Inc., however, maintains a
trailer. It is backed by the KARAVAN
policy of continuous improvement of
warranty and a network of authorized
its products without imposing upon it-
KARAVAN dealers ready to provide
self any obligation to install them on
the parts or service you may require.
products previously manufactured.
Due to late changes, some differen-
Know Before You Go
ces between the manufactured prod-
uct and the descriptions and/or
To learn how to reduce the risk of ac-
specifications in this guide may occur.
cident for you or bystanders, read this
BRP reserves the right at any time to
user’s guide before using this trailer.
discontinue or change specifications,
designs, features or equipment with-
Also, read all safety labels on the
out incurring any obligation upon
trailer and watch the safety video:
itself.
SEA-DOO HOW TO SERIES - PROP-
ER WATERCRAFT TRAILERING
The illustrations in this document
available here https://www. youtube.
show the typical construction of the
com/watch?v=mXtHWIdt7yI.
different assemblies and may not re-
produce the full detail or exact shape
Or using this QR code.
of the parts. However, they represent
parts that have the same or similar
function.
Safety Messages
This user’s guide utilizes the following
symbols and words to emphasize par-
ticular information:
Failure to follow the warnings con-
tained in this user's guide can result in
SERIOUS INJURY or DEATH.
The safety alert symbol
indicates
a potential injury hazard.
About this User''s Guide
WARNING
The following guide will help you be-
come better acquainted with your new
Indiicates a potentiall hazard
trailer and its safe operation.
whiich, iif not avoided, could result
in serious injury or death.
Keep this User's Guide in the tow ve-
hicle so you can refer to it.
CAUTION
If you want to view and/or print an ex-
Indiicates a potentiallly hazardous
tra copy of this User's Guide, simply
situatiion which, iif not avoiided,
visit the following website:
coulld result iin minor or moderate
injjury.
It is understood that this User's Guide
may be translated into another lan-
NOTICE
guage. In the event of any discrep-
Indiicates an iinstruction which, iif
ancy, the English version shall prevail.
not folllowed, could severely dam-
age watercraft components or
The information and components/
other property.
system descriptions contained in this
document are correct at the time of
6
SAFETY INFORMATION
7
SPECIAL SAFETY MESSAGES
Important Warnings
Hiitch
Always perform the Pre-Use Inspec-
WARNING
tion for safe driving.
The use of a hiitch with an iinsuffi-
Always follow guidelines in Towing the
cient lload rating can result in hiitch
Trailer.
breakdown.
Maintain your trailer as per the Main-
Be sure the hitch ball size matches
tenance Schedule.
the coupler size.
Make sure to always secure trailer
Inspect the hitch for wear, corrosion
with wheel blocks when not in use.
and cracks before coupling. Replace
the required components if any of the
Important Information
above conditions is observed.
Traiiler
WARNING
This BRP Sea-Doo SWITCH® trailer
Do not tow whenever a compo-
has been specially designed to carry
nent iis defective.
the watercraft it was sold with.
Winch Support Ladder
NOTICE
The coupliing socket should not be
Use the winch support ladder to ac-
alllowed to rest on the ground
cess the watercraft on the trailer. Be-
where dirt and sand can enter the
fore use, the trailer must be fixed to a
socket. This willl llead to excessiive
tow vehicle and on level surface.
wear or cause the llocking mecha-
Make sure the watercraft is secured
nism to malfunction.
on the trailer, and secure the tow ve-
hicle and trailer from rolling
(with
wheel blocks).
Ensure hitch is tight before coupling
the trailer to the vehicle.
The watercraft's boarding ladder
should not be used out of the water.
WARNING
Boarding from the back of the trailer
An iimproperly couplled trailler can
may shift weight balance and cause
resullt iin a loss of control or a seri-
the tongue to lift upward.
ous road hazard. Never use the
traiiler untill the pre-use inspection
WARNING
has been completed.
Avoiid personall injjury from the
trailer tilltiing backward when wallk-
Tow Vehiiclle
iing or standiing on the back of the
watercraft. If the trailer iis not at-
Some vehicles are not intended to tow
tached to the tow vehicle, support
a trailer. Make sure your vehicle is de-
the back of the traiiler adequately
signed to tow a trailer and its towing
by puttiing jjack stands under the
capacity is sufficient.
two longitudiinal frame members
before getting on the watercraft.
WARNING
Never tow this traiiler with a ve-
hicle not intended for trailler tow-
ing or with an iinsuffiicient towing
capacity.
8
SPECIAL SAFETY MESSAGES
Accessoriies and Modifications
We recommend to use replacement
parts and accessories from BRP.
They’ve been especially designed for
your trailer and manufactured to meet
BRP’s demanding standards.
Do not make unauthorized modifica-
tions, or use accessories that are not
approved by BRP. Since these
changes have not been tested by
BRP, they may increase the risk of ac-
cidents or injuries, and they can make
the trailer illegal for use.
9
LOCATION OF THE IMPORTANT LABELS
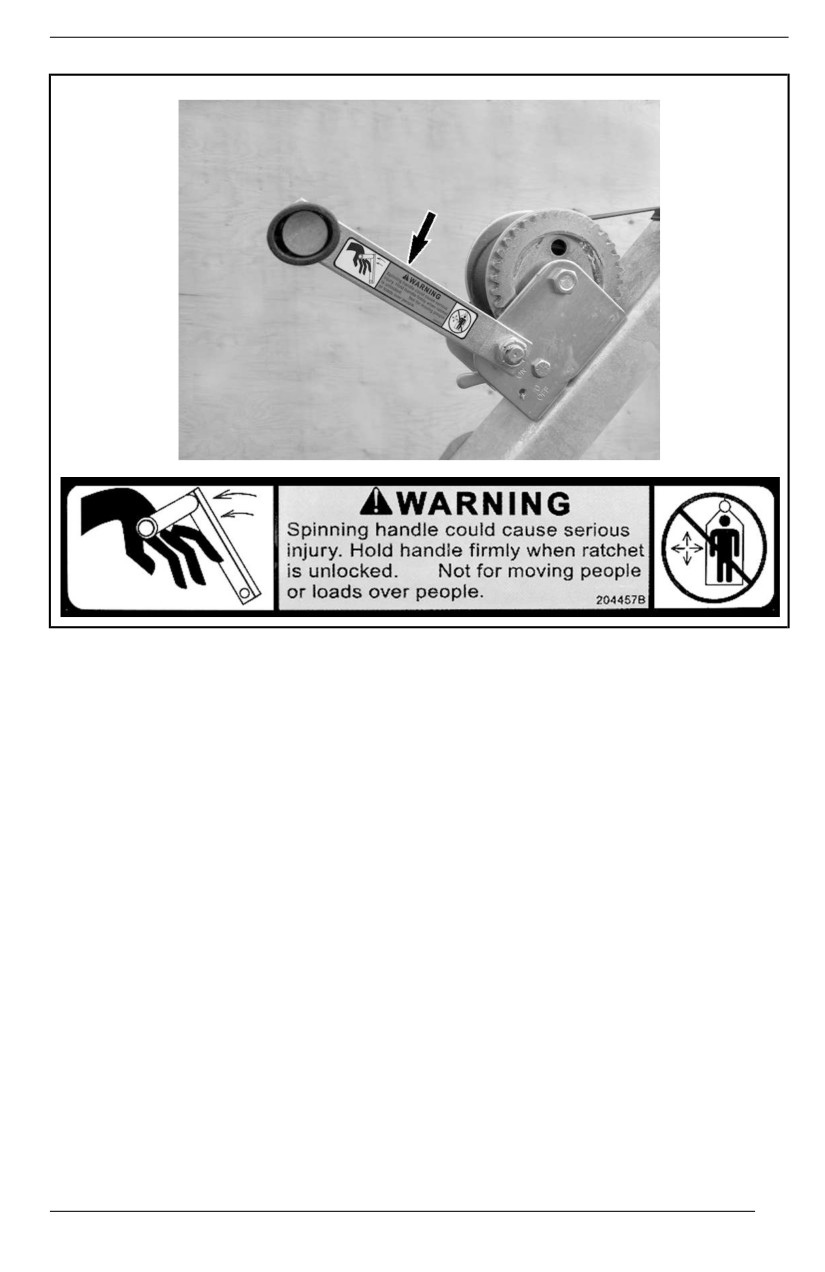
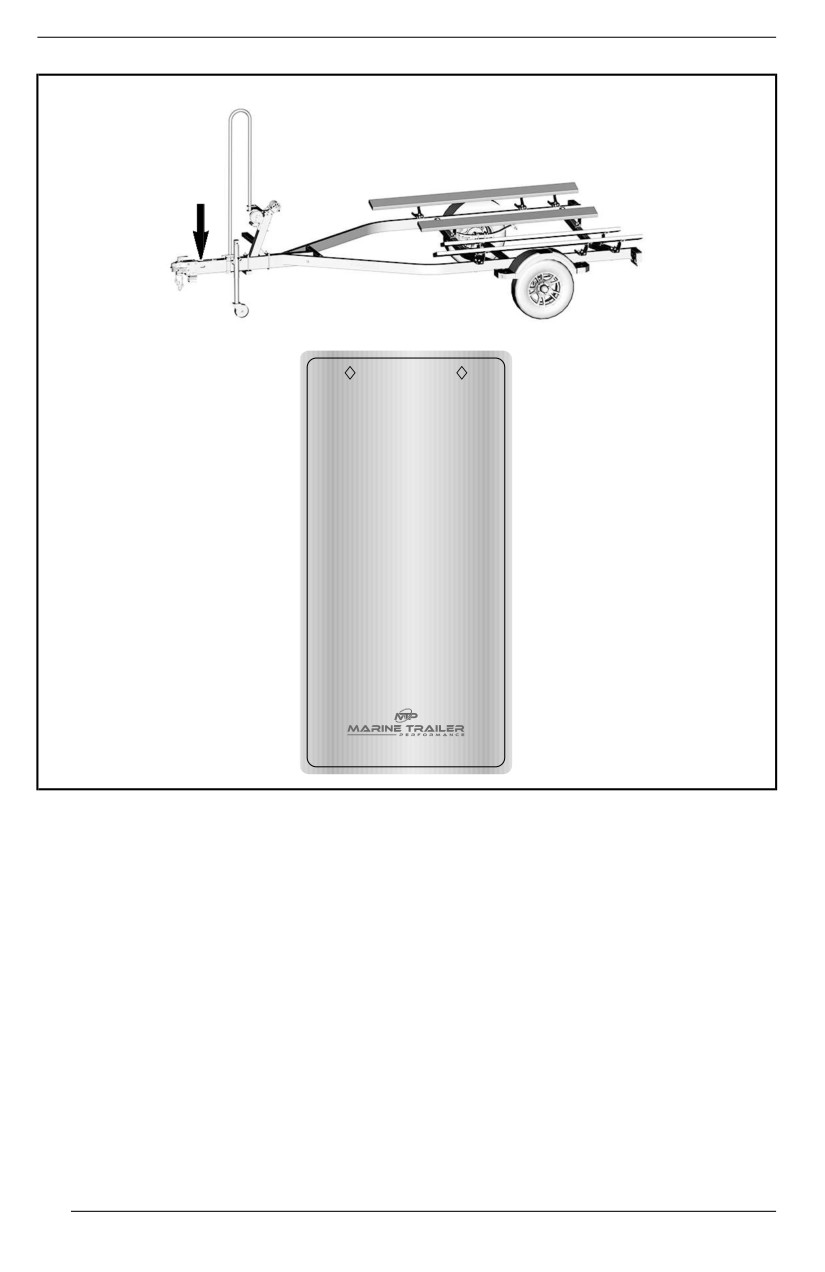
The following labels are on your trailer. If missing or damaged, they can be re-
placed free of charge. See an authorized Sea-Doo dealer.
Please read the following labels carefully before using your trailer.
Safety Labels (All Models)
WARNING
WARNING
Serious injury or death can result
Before towing this trailer check that:
if this trailer is towed before
• Coupler hitch and trailer ball are the same size. Coupler is latched. Safety chains are crisscrossed
under tongue and attached to towing vehicle.
familiarizing yourself with the
• All trailer lighting is working correctly. • Load is secured to trailer (front and rear).
manufacturer's operating
• Tongue jack (if trailer is equipped) is retracted. • Wheel lug bolts are properly tightened.
instructions listed on these labels.
• Tires are inflated to pressure indicated on the “ Tire and Loading Information ” label.
Do not exceed the vehicle’s
• Load is within trailer capacity and distributed properly to maintain proper tongue weight.
• Trailer brakes (if trailer is equipped) are properly adjusted and break-away device is attached to the towing vehicle.
“tow rating” or exceed the
You are required to comply with local and state requirements regarding brakes, licensing and any additional
GVWR or GVWR.
equipment that contact your state motor vehicle department for more information.
10
LOCATION OF THE IMPORTANT LABELS
11
LOCATION OF THE IMPORTANT LABELS
WARNING
ACTUATOR CAPACITY MAXIMUM
TRAILER GVWR/ATM
50mm
BALL 3500lbs (2,000
KG)
2”
BALL MTP 8500
LBS
(3,855 KG)
TONGUE
LOAD RATING
MINIMUM
5% GVWR
MAXIMUM 840 lbs
COUPLER
RATING TO
MEET
OR EXCEED TRAILER GVWR
ALWAYS
USE
SAFETY CHAINS
CHECK
FLUID LEVEL
USE ONLY DOT 3
BRAKE
FLUID
FROM A SEALED CONTAINER
BRAKES NOT
EFFECTIVE WHILE
MOVING
IN REVERSE
READ OWNERS MANUAL
BEFORE
USE
SAE &
V5 CLASS 4
MODEL
MTP 8500
Housto
n
TX
PATENT PENDING
12
LOCATION OF THE IMPORTANT LABELS
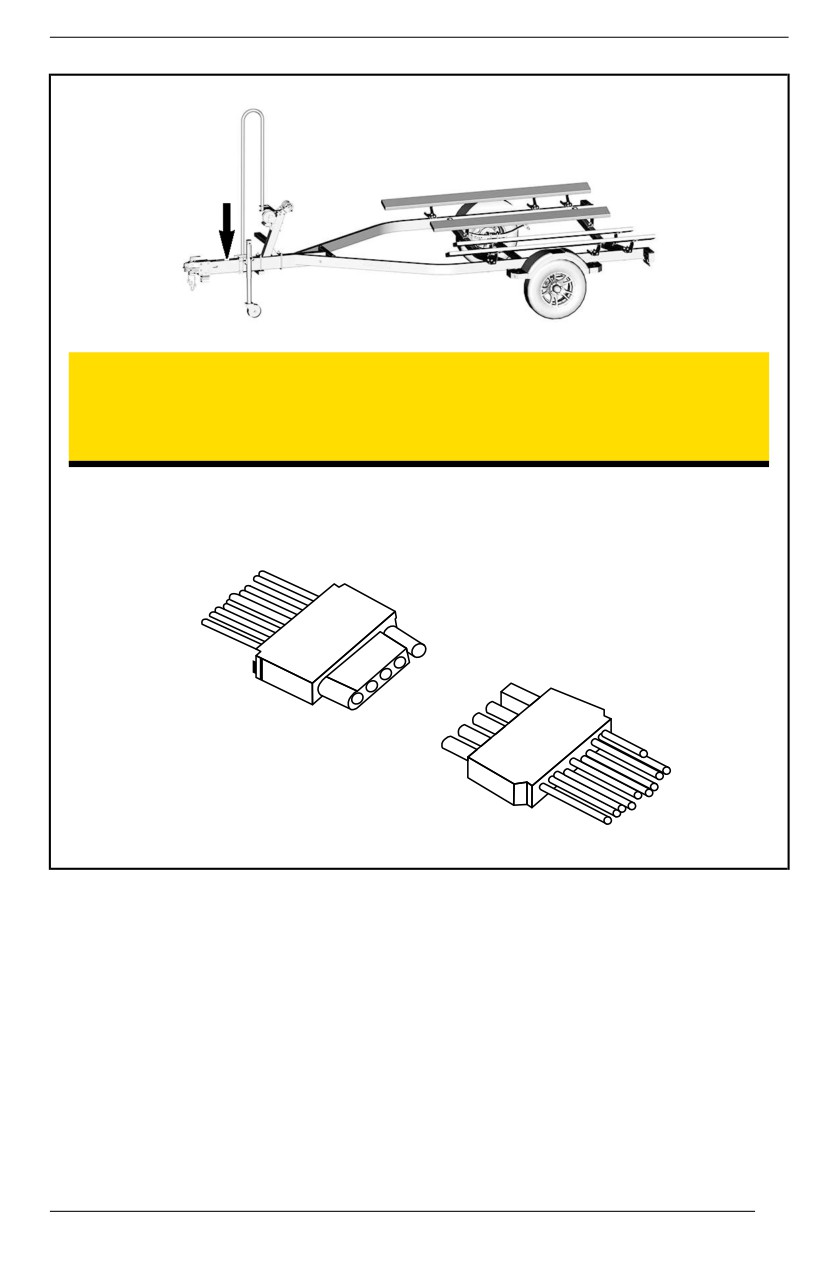
-ATTENTION-
TRAILER IS EQUIPPED WITH DISC BRAKES. THE TOW
VEHICLE MUST BE EQUIPPED WITH A 5-POLE WIRE
HARNESS TO ENABLE TRAILER TO BACK-UP PROPERLY.
VEHICLE
TRAILER
13
LOCATION OF THE IMPORTANT LABELS
Technical Information Labels
NOTICE
The folllowiing iinformation may differ from the labells on the traiiler. Refer
to the llabells on the traiiler or refer to the Specifiications sectiion for addi-
tiionall informatiion.
TYPICAL - LABELS LOCATION
14
LOCATION OF THE IMPORTANT LABELS
SWITCH COMPACT
SWITCH COMPACT
15
LOCATION OF THE IMPORTANT LABELS
SWITCH 16 FT.
SWITCH 16 FT.
16
LOCATION OF THE IMPORTANT LABELS
SWITCH 16 FT. WITH BRAKES
SWITCH 16 FT. WITH BRAKES
17
LOCATION OF THE IMPORTANT LABELS
SWITCH 19 FT.
SWITCH 19 FT.
18
REPORTING SAFETY DEFECTS
Your safety is very important to Bombardier Recreational Products Inc. (BRP). If
you have any concerns you should immediately contact BRP customer service.
If you believe that your vehicle has a defect which could cause a crash or could
cause injury or death, you should immediately inform the following authorities in
addition to notifying Bombardier Recreational Products Inc.:
- In the USA, the National Highway Traffic Safety Administration (NHTSA)
- In Canada, Transport Canada
- In other countries, the competent authorities.
If any of these authorities receives similar complaints, it may open an investiga-
tion, and if it finds that a safety defect exists in a group of vehicles, it may order a
recall and remedy campaign.
However, these authorities cannot become involved in any individual problems
between you, your dealer or Bombardier Recreational Products Inc.
To contact NHTSA:
888-327-4236
1 800-424-9153
National Highway Traffic Safety Administration
1200 New Jersey Avenue, SE
Washington, DC 20590
To contact Transport Canada:
819-994-3328 (Gatineau-Ottawa area or internationally)
Toll free : 1 800-333-0510 (in Canada)
Transport Canada - ASFAD
330 Sparks Street
Ottawa, ON
K1A 0N5
To Contact Australian Authorities:
1-800-815-272 (Monday to Friday, 9am to 5pm AEST, within
Australia)
Calling from overseas : +61 2 6274 7444
19
REPORTING SAFETY DEFECTS
The Director, Recalls Team Vehicle Safety Operations Branch
Department of Infrastructure, Transport, Regional Development,
Communications and the Arts GPO
Box 594
Canberra ACT
2601
recallls@infrastructure.gov.au
20
OPERATING INSTRUCTIONS
21
TRAILER SET-UP
Do not change the position of the axle.
The winch support has been adjusted
to fit the watercraft it was purchased
with.
The bunks are fixed to suit the shape
of the watercraft hull. They can not be
adjusted.
Tongue Weight
If heavy accessories are added or re-
moved from the pontoon, the winch
support position may need to be
readjusted.
Move the winch support towards the
front or rear to move the watercraft
mass. This changes the weight ap-
plied to the tongue.
The tongue weight should be from 7 to
12% of the total trailer and watercraft
weight with tongue parallel to the
ground.
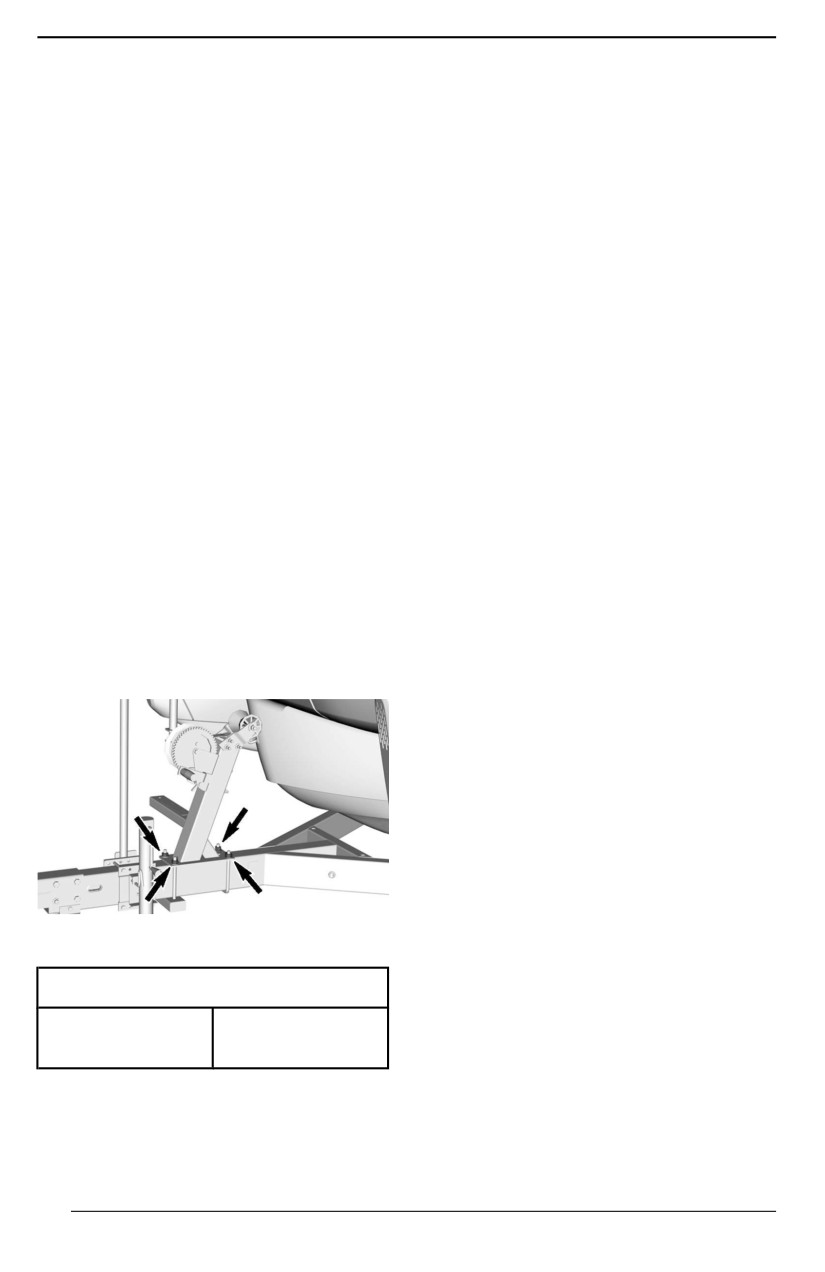
To adjust, loosen the 4 nuts under-
neath the winch support U-bolts,
move winch support to the desired
position.
Tighten nuts to specified torque.
Tiightening Torque
Winch support
27 ± 3 Nm
U-bolt nuts
(20 ± 2 lbf-ft)
22
BEFORE GETTING UNDERWAY
Attaching the Trailer to the
Tow Vehicle
1.
Make sure that the coupler and
hitch ball are the same size (2 in /
50 mm).
2.
Have someone guiding you and
back the tow vehicle as close as
possible to the trailer. This is eas-
ier and safer than pulling the trailer
to the vehicle.
3.
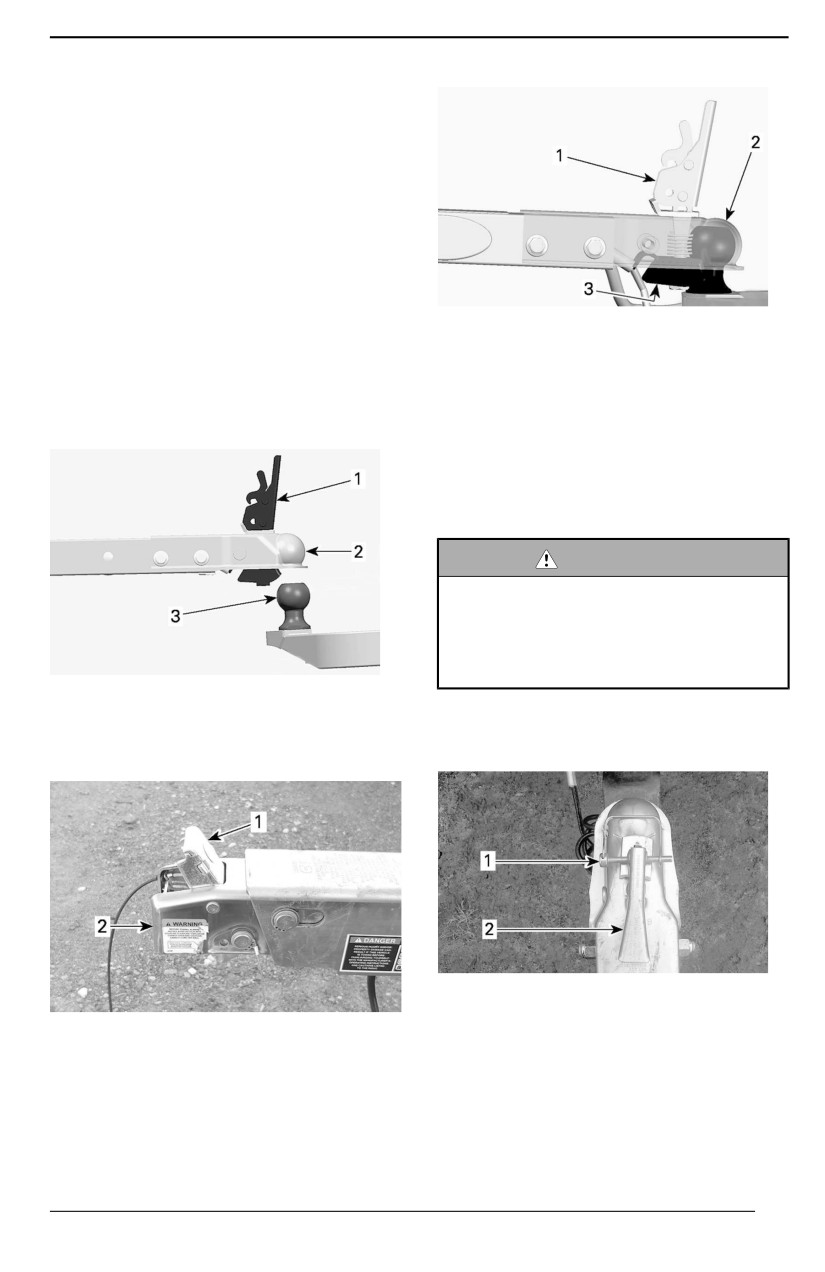
Be sure the coupler-locking mech-
TYPICAL, WITHOUT BRAKES
anism is released.
1. Coupler-locking mechanism (released)
4.
Raise the front end of the trailer.
2. Hitch ball in coupler
Position the coupler directly over
3. Ball clamp
the hitch ball and lower until it is all
6. Close the coupler on the hitch ball.
the way down.
7. Using the jack, lift the trailer
tongue. If it comes loose from the
ball, open the coupler, make sure
the clamp is positioned correctly,
the close it again.
WARNING
If the coupller cannot be secured
to hitch balll, do not tow the traiiler.
Refer to an authorized Sea-Doo
dealer to inspect the trailler as
soon as possiiblle.
TYPICAL, WITHOUT BRAKES
1. Coupler-locking mechanism (released)
8. Lock the coupler using a locking
2. Coupler
pin.
3. Hitch ball
TYPICAL, WITHOUT BRAKES
1. Locking pin
TYPICAL WITH BRAKES
2. Coupler-locking mechanism in locked
1. Coupler-locking mechanism (released)
position
2. Coupler
5. Check under the coupling to be
certain that the ball clamp is below
the ball and not riding on top of the
ball.
23
BEFORE GETTING UNDERWAY
NOTE: On brake-equipped trailers,
the electrical connector is a 5 pin type.
For Australia only, the electrical con-
nector is 7 pin type.
11. Attach the breakaway cable to the
tow vehicle as close to center as
possible. Do not attach to the
tongue safety cables.
WARNING
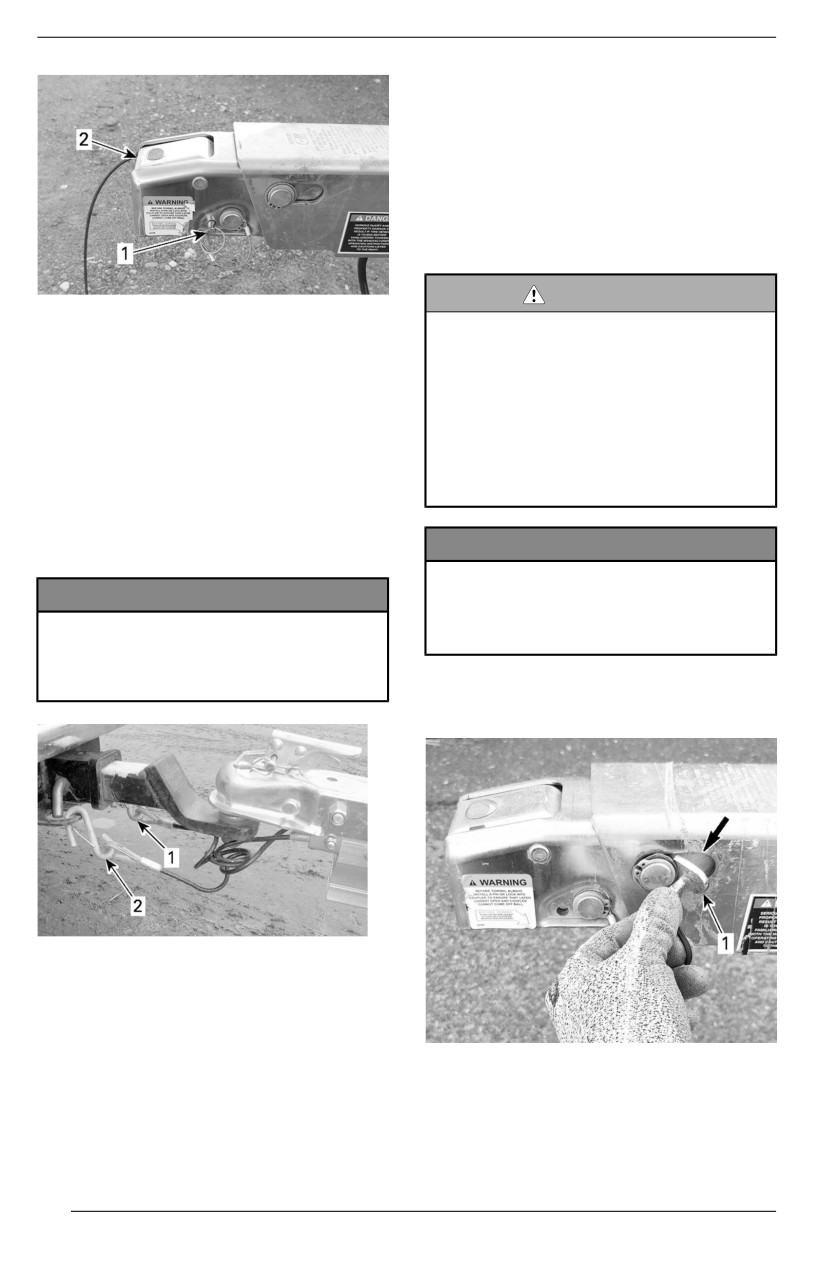
TYPICAL, WITH BRAKES
Never tow a traiiler without the
1. Locking pin
breakaway cablle secured to tow
2. Coupler-locking mechanism in locked
vehiiclle. Shoulld the traiiler become
position
complletelly detached from the
towing vehiicle, if the coupller and/
or tow balll, and safety chains
NOTE:
were to faiil, the breakaway cable
At this point the tow vehicle and the
is pullled which wiilll applly a brak-
trailer should be level.
ing force to the trailler.
9. Attach the tongue safety cables or
chains, in a crisscross pattern as
NOTICE
shown.
Make sure the cablle hangs cllear
NOTICE
of the traiiler tongue and iis long
enough so sharp turns can be per-
To avoid damaging wiiring har-
mitted wiithout pullliing the cable.
ness, ensure the harness iis not
passed between the tongue safety
cables.
12. Ensure the back-up lock pin is not
installed before taking the road.
1. LH tongue safety cable attached to the RH
side chains of hitch
2. RH tongue safety cable attached to the LH
side chains of hitch
10. Connect the trailer connector.
1. Back-up lock pin
24
BEFORE GETTING UNDERWAY
WARNING
The back-up lock piin wiilll prevent
the trailler brake to activate when
needed. This may lead to a loss of
control, causiing iinjuries or death.
25
BEFORE GETTING UNDERWAY
Pre-Use Inspection
Actiion
√
WARNING
Check lights operation.
Perform a pre-use iinspectiion be-
fore each use to detect potentiiall
Clean all reflectors and lights
problems during operation. The
lenses.
pre-use iinspectiion can help you
Check if watercraft is properly
moniitor wear and deteriioratiion
secured to the trailer at rear.
before they become a problem.
Correct any problems that you
Make sure the watercraft is
diiscover to reduce the riisk of a
properly secured at front. Refer
breakdown or crash. Visit an au-
to Loading the Watercraft.
thorized Karavan traiiler dealer as
necessary.
Check the breakaway cable is
secured. Refer to Attaching the
Trailer to the Tow Vehicle.
Action
√
Check the back-up lock pin is
Make sure the hitch ball size
off.
matches the coupler size (50
mm (2 in)).
Check that the watercraft is
ready to be towed according to
the manufacturer's
recommendations. Refer to the
watercraft’s operator’s guide.
Check that the jack is retracted.
Check tires condition. Refer to
Maintenance procedures for
details.
Check tires pressure. Refer to
Specifications for values.
Check of wheel lug nuts for
tightness.
Check that the load meets the
specifications.
Check that coupler is latched
and locked. Refer to Attaching
the Trailer to the Tow Vehicle.
Check that tongue safety cables
are crisscrossed under the
tongue and attached to the
hitch. Refer to Attaching the
Trailer to the Tow Vehicle.
26
TOWING THE TRAILER
Follow the tow vehicle's manufacturer
causes of loss of control of the trailer
instructions regarding trailer towing.
are:
-
Driving too fast for the conditions.
SEVERE INJURY OR DEATH can
–
Overloading the trailer or loading
result if you do not follow these
the trailer incorrectly.
instructions:
- Trailer improperly coupled to the
When towing the trailer, pay particular
hitch.
attention to the following:
- Inadequate towing hitch.
-
Not maintaining proper tire
-
Maintain a safe distance between
pressure.
the vehicle ahead and your
- Not keeping wheel lug nuts tight.
vehicle.
-
Inadequate maintenance of the
-
When towing a trailer, more time
trailer.
and distance are needed when
passing or stopping.
-
Reduce your speed and slow
Maneuvering in Reverse
down more than usual before turn-
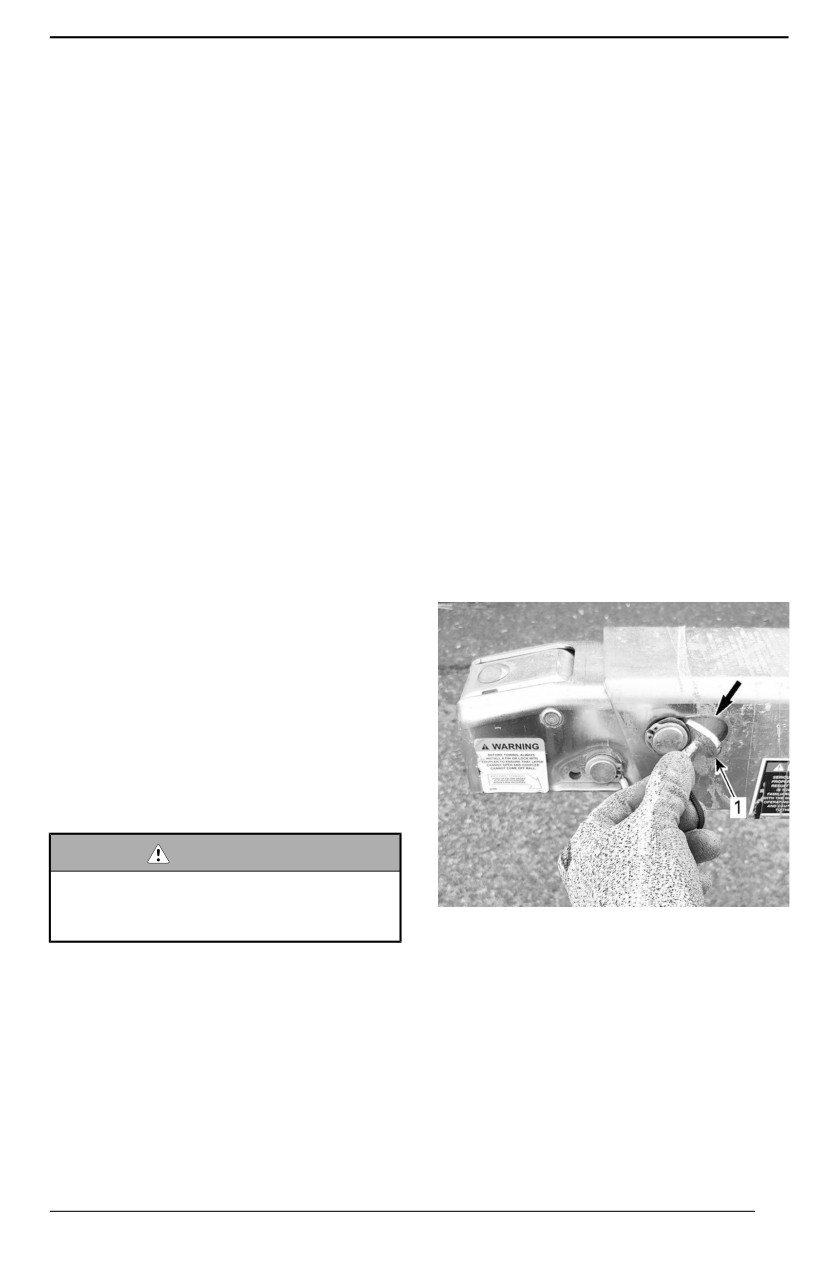
On brake-equipped models, it may be
ing. Avoid sharp turns.
necessary to intall the back-up lock
-
When cornering, do it on a larger
pin to reverse the trailer when the
radius. It takes more space to turn
trailer connector is disconnected. Pro-
with a trailer.
ceed as follow.
-
Always move slowly when backing
up. Ask someone to guide you
1.
Completely stop on level ground.
when possible. Practice in an open
2.
Install the back-up lock pin
as
area at the first opportunity.
shown.
-
If your trailer starts to sway you
need to react right away. If you see
(or feel) your trailer swaying do
NOT accelerate. Reduce speed by
removing your foot from the accel-
erator. Do not hit the brakes unless
you need them to avoid a collision.
Hold the steering wheel straight,
do not try to correct the sway by
turning. Maintaining a slower
speed will help.
WARNING
Never use the cruiise controll, driiv-
i
ing aids or autonomous driviing
when hauliing a trailler.
1.
Back-up lock pin
3.
Proceed to
launching
the
watercraft.
– When going downhill, reduce
speed before starting the descent.
Do not brake continuously. Apply
and release brakes alternately to
prevent brakes from overheating.
Loss of control of the trailer or trailer/
vehicle combination can result in seri-
ous injury or death. The most common
27
LAUNCHING THE WATERCRAFT
1. Prepare the watercraft for launch-
ing according to the manufactur-
er's recommendations.
2. Remove tie-downs from stern and
trailer eyelets.
3. Disconnect trailer connector.
4. Make sure the way is clear behind
the trailer (in and out of water).
5. Attach mooring cables to the
watercraft mooring cleats and pre-
vent them from hanging.
6. Have someone guiding you and
back the vehicle until trailer
reaches the desired depth into
water.
NOTE: The watercraft must not float
above the bunks.
7. Hold the winch handle firmly and
set winch mechanism to "unwind".
SET WINCH TO "UNWIND"
8. Have someone on the watercraft
and, if available, another person
holding a mooring cable.
9. Unwind until watercraft slides off
the trailer and floats. It may be
necessary to push the watercraft a
little.
10. Grab the mooring cables previ-
ously attached to the mooring
cleats.
11. Detach the watercraft from the
winch strap.
12. Moor the watercraft.
13. Drive the tow vehicle out of the
ramp.
14. Connect trailer connector.
28
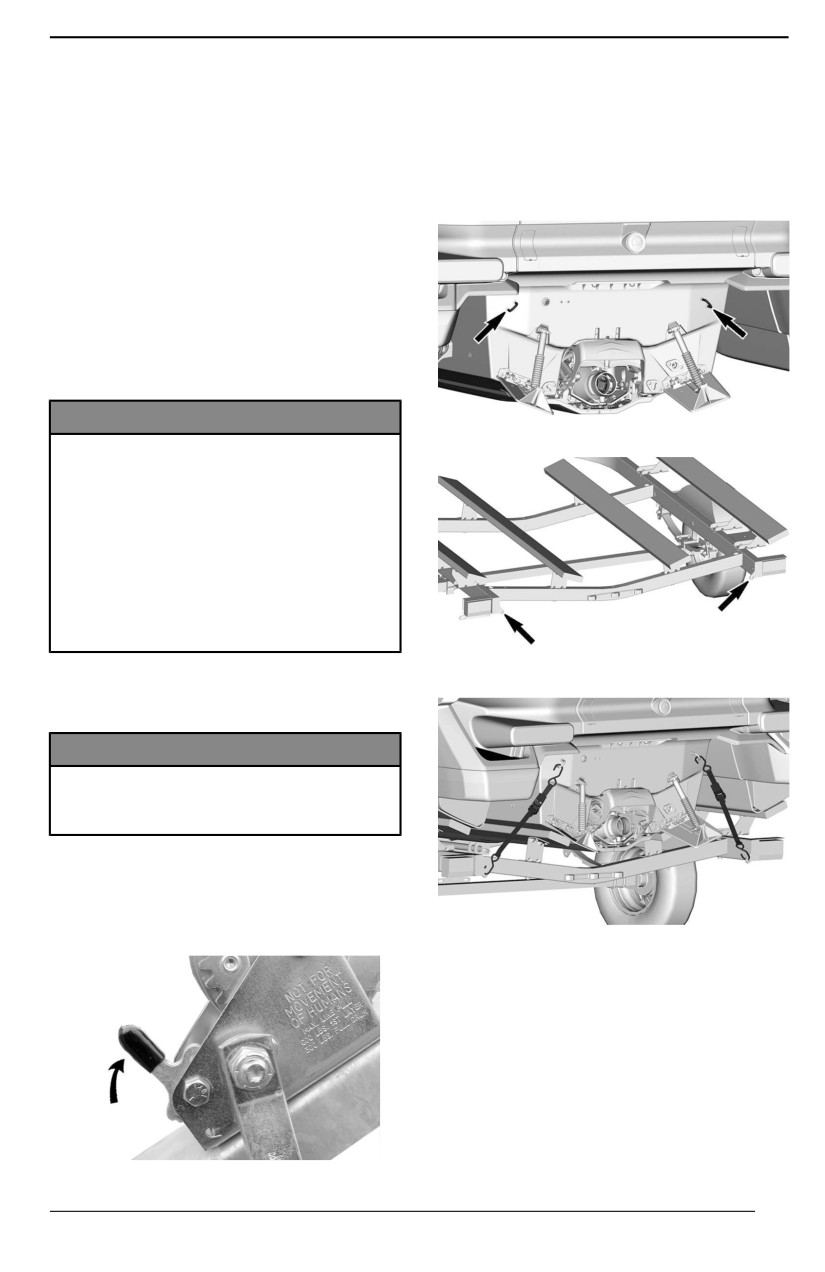
LOADING THE WATERCRAFT
1. Disconnect trailer connector.
7. Drive the tow vehicle out of the
2. Have someone guiding you and
ramp.
back the vehicle until the trailer
8. Secure watercraft on the trailer us-
reaches the desired depth into
ing suitable tie-downs attached to
water.
the stern eyelets and trailer eyelets
together.
NOTE: Bunks should be immersed in
water just enough for the watercraft to
be dragged onto them without floating
over them.
3. Unwind the winch strap to the ap-
propriate length.
4. Align the watercraft with the trailer
bunks.
NOTICE
WATERCRAFT STERN EYELETS
Allthough the boat requires onlly
30 cm (1 ft) of water to float, the
engiine should be started with at
l
least 90 cm (3 ft) of water below
the hulll. If the depth of the water
i
is lless than 90 cm (3 ft) and the
engiine is runniing, the impelller is
turniing and debriis can be drawn
from the bottom and damage the
propullsiion system.
TRAILER EYELETS
5. Attach the winch strap to the
watercraft bow eyelet.
NOTICE
Attach the strap as expllained. Us-
i
ing another method may damage
to the watercraft.
6. Set winch mechanism to "wind",
then wind until the watercraft bow
reaches the trailer bow stopper
roller.
TIE-DOWNS
9. Hook the safety strap to the front
eyelet.
SET WINCH TO "WIND"
29
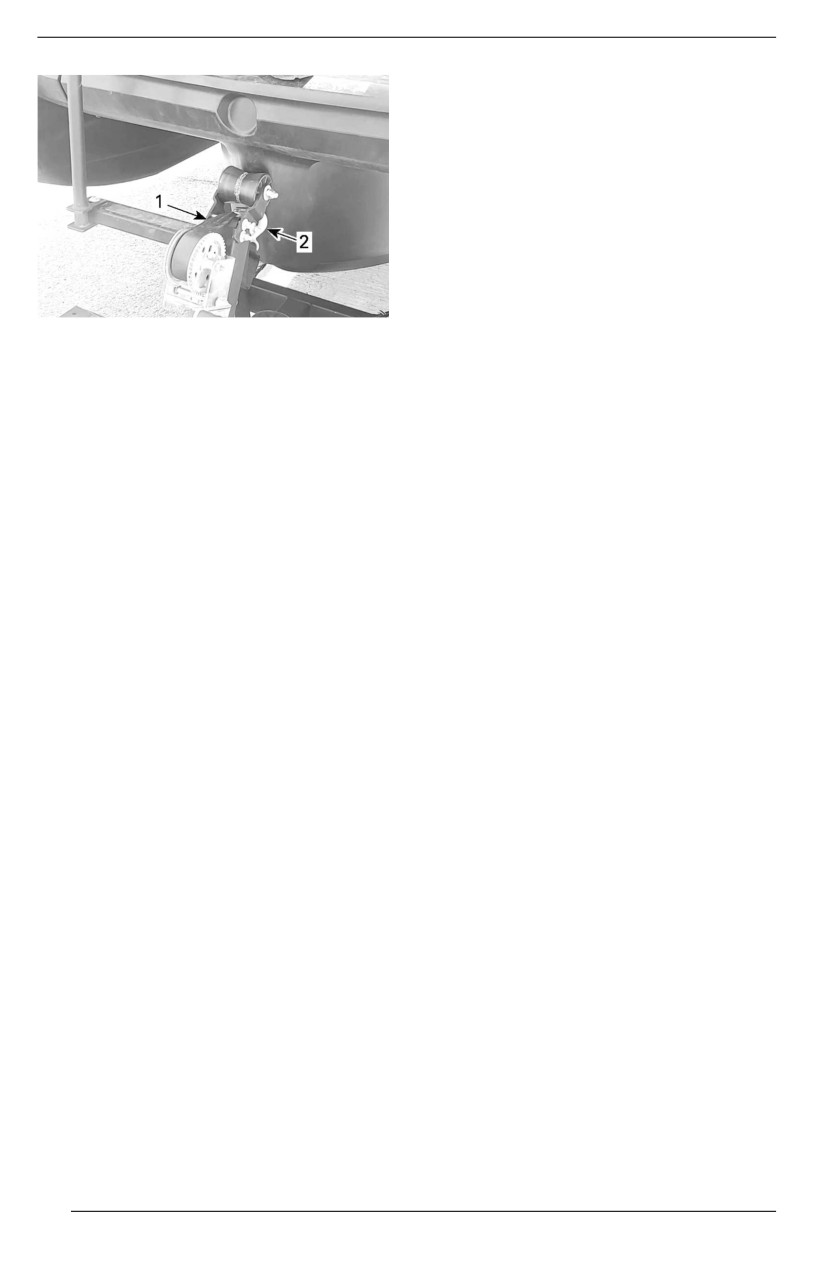
LOADING THE WATERCRAFT
1. Winch strap
2. Safety strap
10. Connect trailer connector.
30
MAINTENANCE
31
MAINTENANCE SCHEDULE
Maintenance is very important for
keeping your trailer in safe operating
condition.
The maintenance schedule does not
exempt the pre-use inspection.
NOTE:
If trailer is used all year round, carry
out both Storage and Pre-Season
maintenance operations once a year.
At Storage
Carry out the following at trailer
storage:
- Inflate tires to recommended
pressure.
- Check coupler condition and
lubricate.
- Lubricate jack.
- Apply Dielectric grease in all elec-
tric connectors and light bulb sock-
et to prevent corrosion.
- Trailers with winch: Check winch
and strap condition. Lubricate
winch mechanism.
- If possible, park trailer in a pro-
tected area, garage, carport, etc.
- Raise trailer and place blocks
under trailer frame to take most of
the weight off the suspension and
tires.
At Preseason
Carry out the following before using
the trailer after a storage period:
- Inspect wheels for damage.
- Check tightness of all fasteners.
- Check wheel bearing and seals.
- Check wiring harness and connec-
tor condition.
- Inspect tongue safety cables.
- Check brake fluid level.
32
MAINTENANCE AND INSPECTION PROCEDURES
This section includes instructions for
Apply a thin coat of multipurpose
basic maintenance procedures. If you
grease to the inner surface of the ball
have the necessary mechanical skills
socket.
and the required tools, you can per-
Apply light oil to the pivot and sliding
form these procedures. If not, see
surface of the lock mechanism.
your authorized Sea-Doo dealer.
Brakes (if equipped)
WARNING
Torque wrench tighteniing specifi-
Brake Fluiid Inspection
catiions must be strictlly adhered
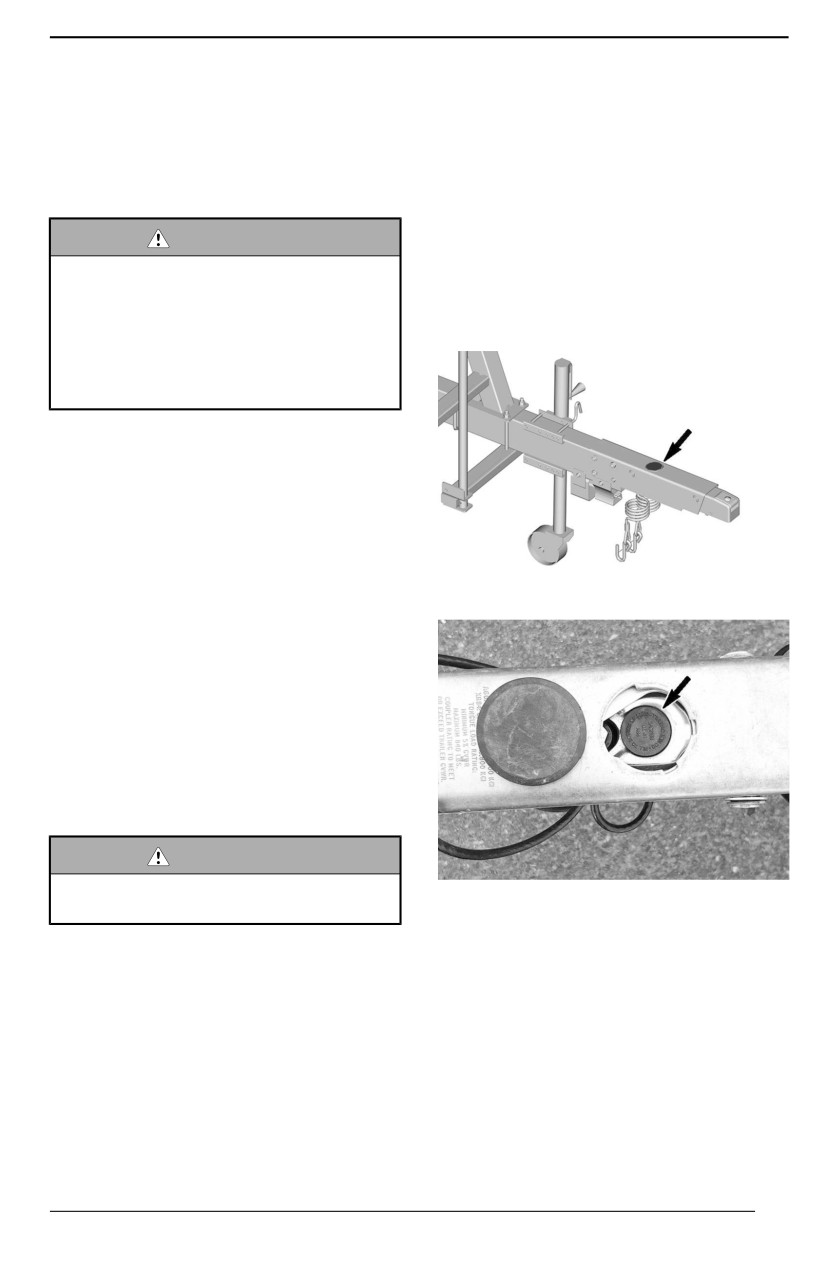
1.
Remove master cylinder protective
to.
cap on trailer tongue.
Locking deviices, when removed
(e.g.: locking tabs, ellastic stop
nuts, cotter piins, etc.), must be
replaced.
Hoses, cables or locking ties removed
during a procedure must be rein-
stalled as per factory standards.
Tongue Safety Cable
Tongue Safety Cablle Inspection
2.
Removing master cylinder cap.
Inspect for damage.
Discontinue use and contact an au-
thorized Sea-Doo dealer if cable or its
liner damage is found.
Breakaway Cable
Inspect cable for damage, wear or
frayed cable strands. Inspect end fit-
tings for damage. Replace if
necessary.
WARNING
Do not use the traiiler iif safety ca-
3.
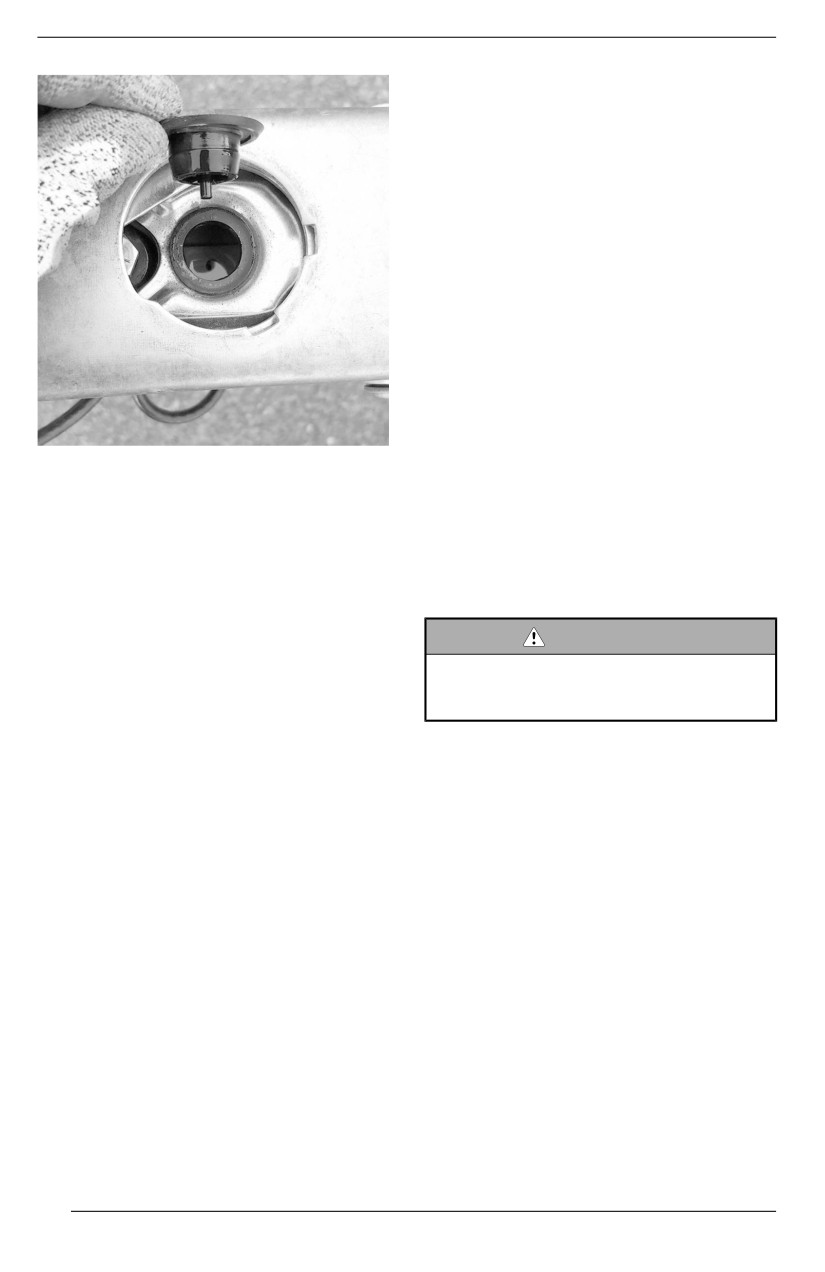
Check brake fluid level.
bles are damaged.
Coupler
Coupler Inspectiion and Lubriicatiion
Check locking mechanism operation.
On brake equipped models, ensure
back-up lock pin is present.
Check ball socket, ball clamp and lock
mechanism for wear or damage.
33
MAINTENANCE AND INSPECTION PROCEDURES
NOTE:
Do not check the tire pressure imme-
diately after towing the trailer. Allow at
least three hours for a tire to cool
down, if the trailer has been towed for
as much as 1.6 km (1 mi).
The required pressure varies accord-
ing to the trailer model. Refer to
Specifications.
Tire Inspectiion
Replace the tire before towing the
trailer if the tire tread has less than 1.6
mm (1/16 in) depth or if the built-in
wear indicator bars are visible and
flush with the remainder of the tire
tread.
4. Reinstall master cylinder cap.
Always replace a tire with one of the
Veriifyiing the Brake System
same dimensions and load limit.
The brakes are hydraulic disc types.
Inspect both sidewalls of each tire for
These brakes are self-adjusting and
any bubble, cut or bulge; and replace
do not require adjustment.
a damaged tire before towing the
trailer.
To keep brakes in good condition,
check the following as per the Mainte-
WARNING
nance Schedule:
A bubblle, cut or bullge iin the side-
- Entire brake system for fluid leaks
walll can result iin a tiire bllowout
- Brake discs for excessive wear
and lloss of controll.
and surface condition
- Brake pads for wear, damage or
looseness.
Wheels
See an authorized Sea Doo dealer if
Wheel Inspectiion
there are any problems with the brake
system or for servicing.
Check wheel for cracks, bumps or oth-
er damages. Replace wheel as
Have the brake system servicing by
required.
an authorized Sea Doo dealer, a re-
pair shop, or a person of your own
Hubs, bearing and seals
choosing.
Wheel Beariing Inspectiion
Tires
Install a jack under the axle and raise
until the tire gets off the ground. Push
Tiire Pressure
and pull the wheel from the upper
Check tire pressure. Tire pressure
edge to feel the play and rotate wheel.
must be checked while the tire is cold.
If any play is felt or if wheel does not
turn smoothly, refer to the Mainte-
nance of hub and wheel bearing sec-
tion bellow.
34
MAINTENANCE AND INSPECTION PROCEDURES
Wheel Beariing Seall Inspectiion
bearings. They should be replaced
immediately.
Inspect the grease seals periodically.
A slight film of grease around the seal
NOTE: It is important to use a castle
is normal. Have the seal replaced if an
nut cotter pin the same size as the
excessive leak or damage is noticed.
hole to make sure the Sure Lube sys-
tem works properly.
Lubriication System
This trailer uses a Sure Lube system
When and What to Check
on all its axles. Its advantages are as
follow:
Trailers are often stored for extended
- Check on hub and grease with
periods of time, so it is important to
ease.
check all of these before any use.
- Change the grease in the hub and
- Bearings that have been re-
bearing (rotate slowly the hub
checked and repacked before stor-
while putting grease in).
age and after immersion in salt
- Grease the bearing without taking
water will last longer.
the hubs off.
- Check the lubricant level when the
- Grease the hub with ease, even
hub is warm.
during a long trip.
- Since it is a boat trailer, it is recom-
mended to check just prior to
Under the rubber dust cap there is a
launching to be sure the hub is full
grease fitting. The grease fitting
of grease when the axle is
presses grease into the hole that goes
submerged.
all the way through the center of the
spindle and comes out by the back
Recommended Lubricant
bearing. At that point, it greases the
back bearing and fills the inside of the
Any good marine grade water-resist-
hub. It then greases the front bearing.
ant grease is recommended. Different
When grease can be seen coming out
types of grease thickeners should not
of the castle nut, the hub and bearing
be mixed.
are full.
Bearing Repacking
Maintenance of hub and
Since wheels and bearings are sub-
wheel bearing
merged in the water when loading and
1. Once or twice a year (depending
unloading, preventative maintenance
on usage), install a jack under the
is required. Considering the various
axle and raise until the tire gets off
ways this trailer might be used, follow
the ground.
these general guidelines.
2. Push and pull the wheel from the
1. When water gets in the bearing
upper edge to feel the play and ro-
and in contact with the steel itself,
tate the wheel. If any play is felt,
it will rust. So the most important
then the castle nut needs to be ad-
part is getting a good grade wheel
justed or the bearings need be
bearing grease that will not break
changed. (Refer to Bearing Adjust-
down when water is mixed with it.
ment for the castle nut adjustment)
2. Pack the bearings by forcing the
3. When greasing the bearings, look
grease into all its small cavities. Fill
at the old grease that comes out. If
the cavity in the hub with grease.
small silver-like filings are present,
3. Make sure the grease seals are in
it may indicate a problem with the
usable condition.
35
MAINTENANCE AND INSPECTION PROCEDURES
4.
Keep the bearings and grease free
3.
While rotating the wheel, tighten
of any dirt or foreign matter.
the spindle nut to specifications.
5.
The wheel bearings should be re-
Do not over tighten.
packed anytime the trailer is
stored.
Tighteniing Torque
6.
If the trailer is often moved in the
water, the chances of getting water
Two 1-1/16"
2.3 Nm (20
in the bearings increase. Bearings
bearings
lbf-in)
should then definitely be packed at
set-up
least twice during the season.
7.
Towing a trailer over long distan-
1-3/8" and 1-1/
3.4 Nm (30
ces has its good points and bad
16" bearings
lbf-in)
points. Doing so may warm the
set-up
hub and grease it up enough to re-
4.
Look for the hole in the spindle
move any water it may have col-
through the slots in the spindle nut.
lected. However, moving the warm
hubs into the water shortly after a
- If you can see any part of the
long tow will cause them to take on
hole through the slot in the nut,
water through condensation. It is
turn the nut counterclockwise
therefore important to let them cool
until the next slot in the nut
before backing into the water.
lines up with the cross hole. In-
8.
Be sure the bearings are properly
sert cotter pin.
adjusted (Refer to Bearing Adjust-
- If you cannot see any portion of
ment). In most instances, if a good
the hole in the spindle through
quality lubricant is used and the lu-
the slots in the nut, turn the nut
bricant levels are maintained, it
counterclockwise until the hole
may not be necessary to com-
lines up with the first slot avail-
pletely repack the bearings. How-
able in the nut. Insert cotter pin.
ever, if the grease appears to be
- This adjustment will give you
contaminated or broken down,
from one-thousandths to ten
completely repack to remove all of
thousandths end play, which is
the old grease from the bearings
in tolerance for proper
and hubs. Removing the rear bear-
adjustment.
ing will most likely damage the rear
5.
Check wheel again for the move-
seal. Install a new one when
ment. If there is no lateral move-
reassembling.
ment, spin the wheel. Wheel
should turn easily and have no end
Bearing Adjustment
play.
6.
Bend the ends of the cotter pin to
The wheel bearings have been pread-
keep it from coming off.
justed at the factory. However, check-
ing the bearing adjustment after the
NOTE: A large cotter pin must be
first
80.5 km (50 miles) of use and
used to fill the hole for the Sure Lube
checking again every time the bear-
system to work properly.
ings are repacked will maximize their
life.
7. Install the dust cover. Tap lightly
1. Using a jack, lift one side of the
on the edges to place the dust
trailer.
cover.
2. Grip the edge of the wheel and try
8. Use a screwdriver and a hammer
to rock it or move it. If there is a
to tap the dust cover until it is com-
play, remove the dust cap and the
pletely into the hub and the flange
cotter pin.
on the dust cover is tight against
36
MAINTENANCE AND INSPECTION PROCEDURES
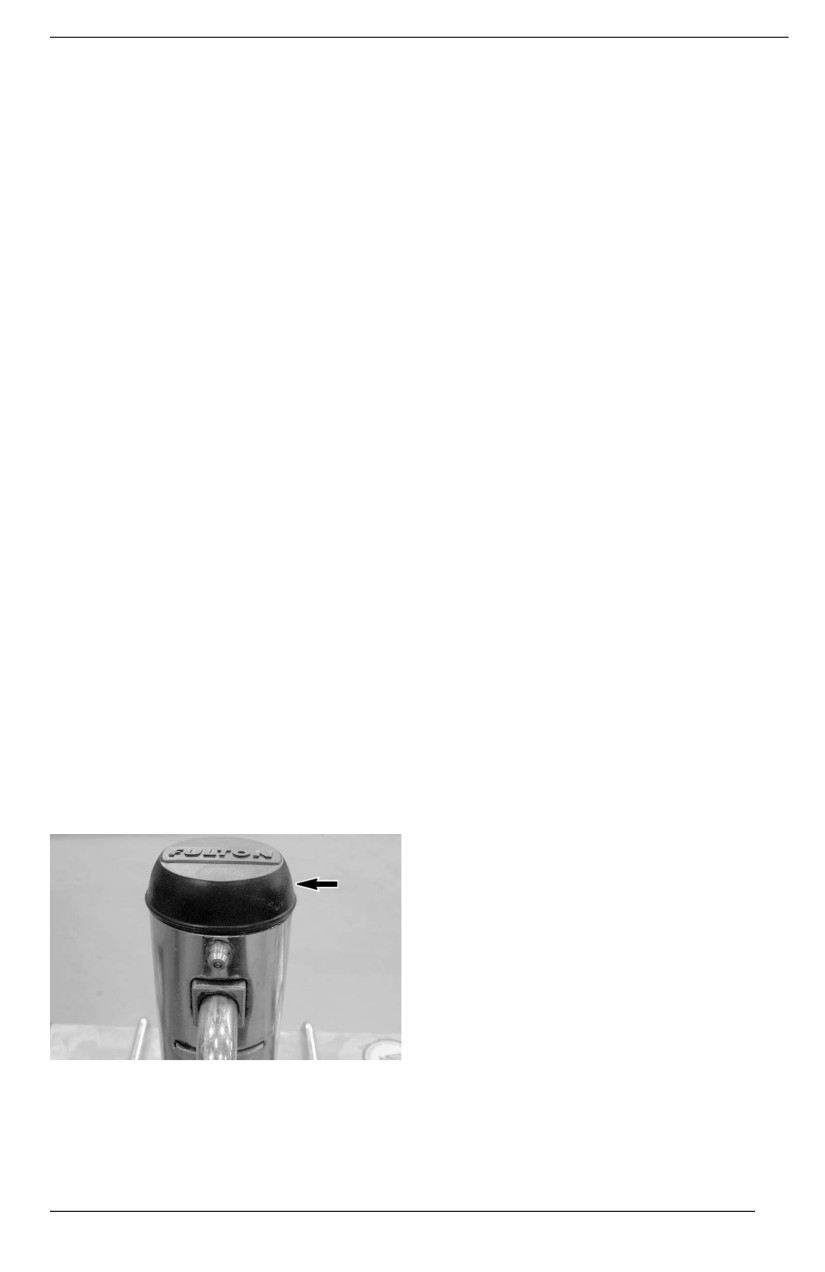
the hub face. Alternate sides
oil and rotate parts to distribute oil
around the dust cover to avoid any
evenly.
bending.
9. Repeat on other wheels.
Wooden Bunks
Check wooden bunks carpet condition
Lights
and wood hardness.
All the lights are built with LEDs (light
emitting diode) and this technology
proved to be reliable. In the unlikely
event they do not work, have them
checked by an authorized Sea-Doo
dealer.
Winch
Wiinch Inspectiion
Inspect gears, bushings and strap for
wear or damage.
Wiinch Lubricatiion
Apply a thin coat of multipurpose
grease to the gearing teeth and pivot
points. Rotate handle to distribute
grease evenly.
Lubricate ratchet pivot point with light
oil.
Jack
Jack Lubriication
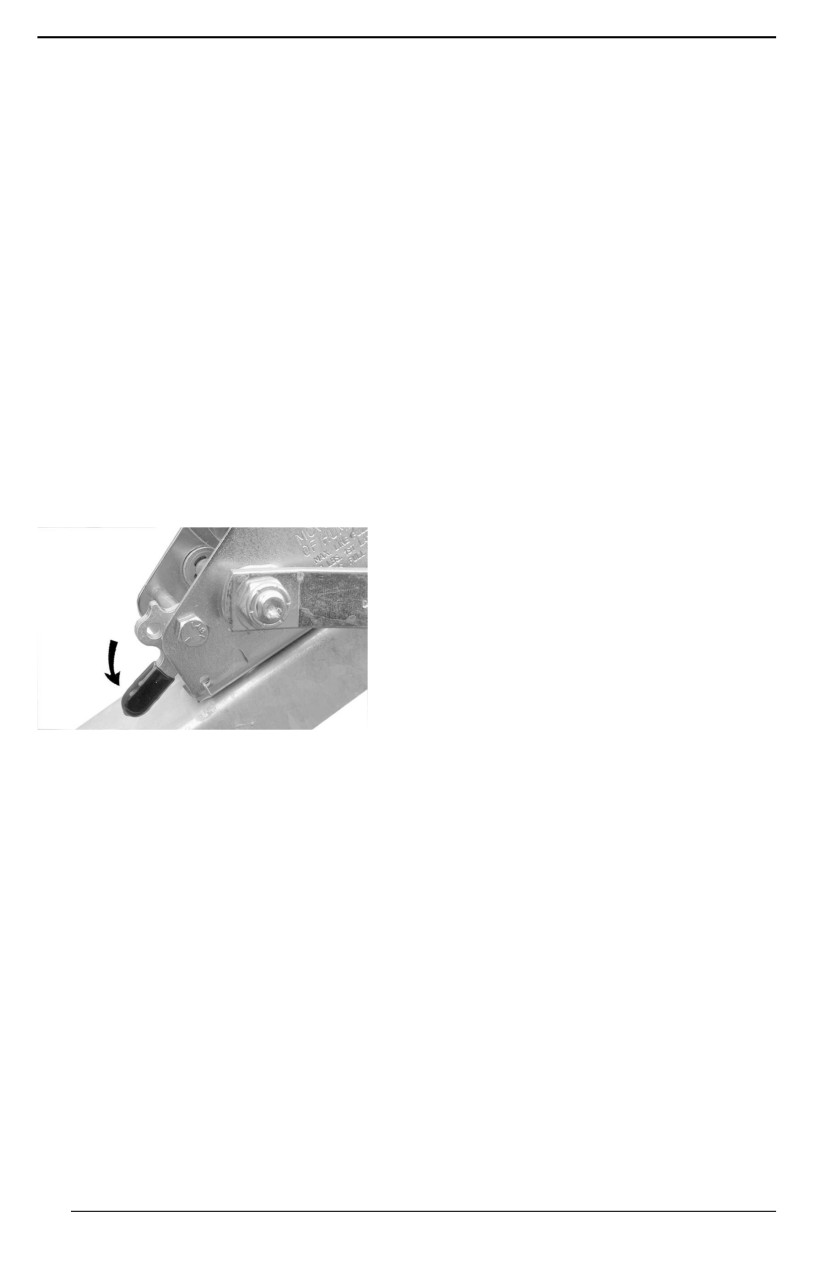
Remove plastic cap to lubricate gears
using multipurpose grease. Rotate
handle to distribute grease evenly.
TYPICAL
Lubricate handle pivot point and
wheel axle with light oil. Wipe excess
37
TRAILER CARE
Salt Water Use
If trailer used in salt water, thoroughly
rinse trailer daily with fresh water.
Trailer Cleaning
1. Rinse the trailer thoroughly with
fresh water to remove loose dirt.
2. Using a soft, clean cloth, wash the
trailer with water mixed with a mild
detergent, such as soap specially
formulated for motorcycles or
automobiles.
3. While washing the trailer, check for
grease or oil. An automotive
grease remover can be used.
Thoroughly follow the manufactur-
er's instructions.
4. Dry the trailer with a chamois or a
soft towel.
CAUTION
Never use any kind of viinyll or
pllastic protector on the wallk pads
as they woulld get sliippery.
38
TECHNICAL INFORMATION
39
TRAILER IDENTIFICATION NUMBER
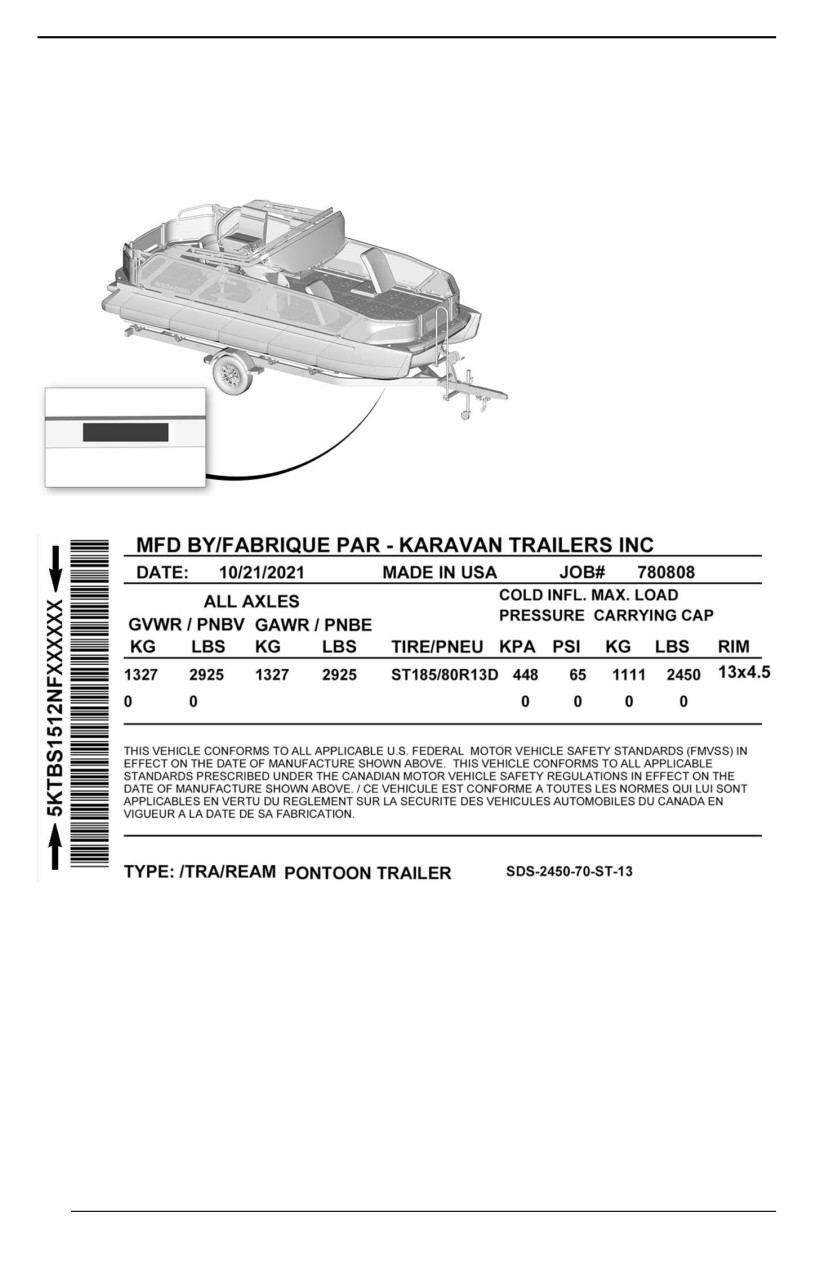
The trailer is identified by a serial number. It may sometimes become necessary
to locate this number for warranty purposes or to trace the trailer in the event of
theft. The serial number is located on the Technical Information label and is also
engraved on the tongue of the trailer.
TECHNICAL INFORMATION LABEL LOCATION
TYPICAL
40
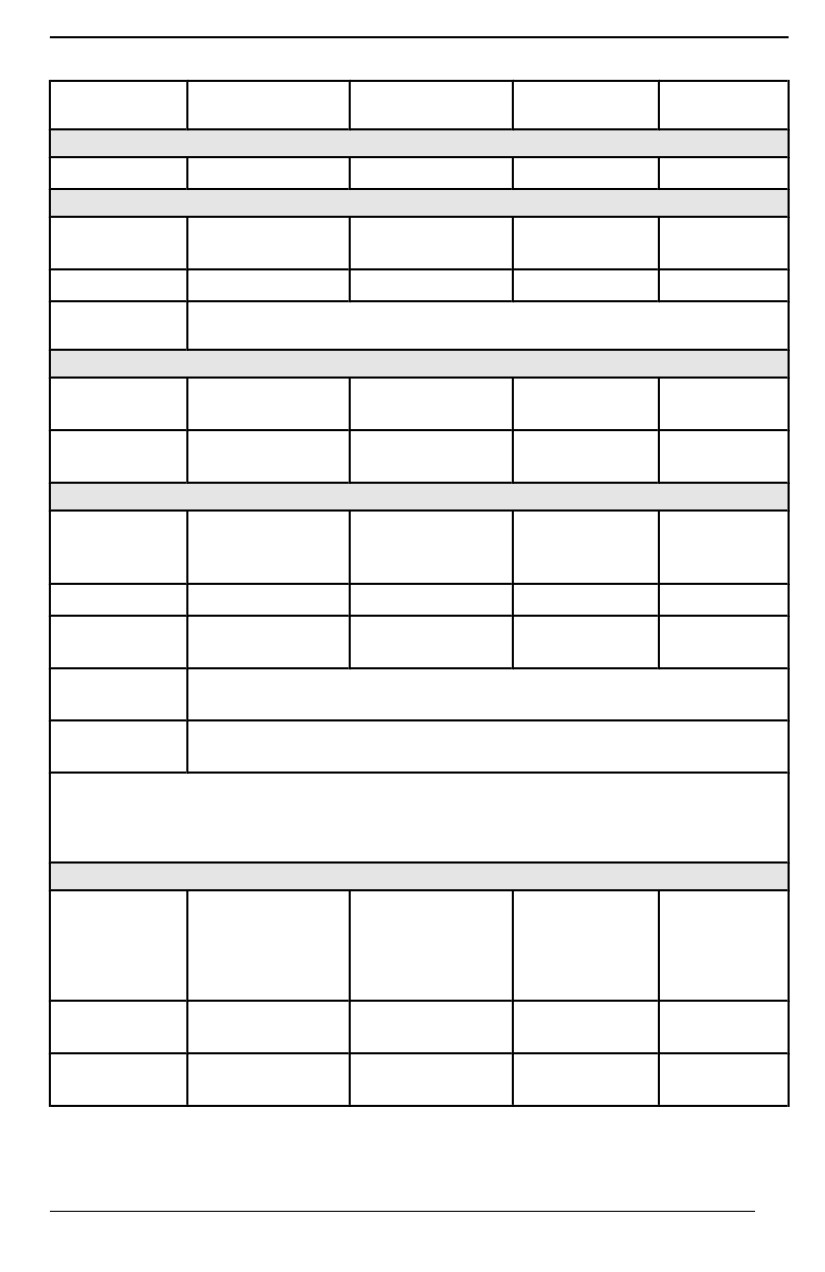
TECHNICAL SPECIFICATIONS
Switch 16
Switch 19
MODEL
Swiitch 13
Swiitch 16
wiith brakes
with brakes
SUSPENSION
Type
Leaf spring
Leaf spring
Leaf spring
Leaf spring
DIMENSIONS
6.5 m (21.4
Overall length
4.5 m (14.9 ft)
5.5 m (17.9 ft)
5.7 m (18.9 ft)
ft)
Overall width
2.3 m (7.5 ft)
2.3 m (7.5 ft)
2.3 m (7.5 ft)
2.4 m (7.7 ft)
Coupler ball
5 cm (2 in)
size
WEIGHT AND LOAD LIMITS
Approximate
335.7kg (740
215 kg (475 lb)
247kg (545 lb)
285 kg (629 lb)
dry weight
lb)
Carrying
1127 kg (2485
1111 kg (2450
1221 kg (2691
1364 kg
capacity
lb)
lb)
lb)
(3000 lb)
TIRES AND WHEELS
ST185/
ST205/
ST185/80R13D
ST185/80R13D
Tire size
80R13D
75R14C
(1480# cap.)
(1710# cap.)
(1710# cap.)
(2040# cap.)
Wheel size
13 x 4.5 (in)
13 x 4.5 (in)
13 x 4.5 (in)
14 x 6 (in)
448 kPa (65
448 kPa (65
448 kPa (65
413 kPa (60
Cold pressure
PSI)
PSI)
PSI)
PSI)
Lug nuts
100 ± 5Nm (74 ± 4 lbf-ft)
torque
Minimum
1.6 mm (1/16 in)
thread depth
(1) Maximum watercraft width
(2) Tongue on the ground
(3) Hitch coupler 50.8 cm (20.2 in) above the ground
N.A.: Not Available
BRAKES
Hydraulic,
Hydraulic,
single piston
single piston
Type
N/A
N/A
floating
floating
caliper, solid
caliper, solid
discs
discs
25.4 cm (10
Size
N/A
N/A
25.4 cm (10 in)
in)
Brake fluid
N/A
N/A
DOT 4
DOT 4
type
41
TECHNICAL SPECIFICATIONS
Swiitch 16
Swiitch 19
MODEL
Switch 13
Switch 16
with brakes
with brakes
Brake pad
8 mm
min.
N/A
N/A
(0.32 in)
thickness
Brake rotor
17 mm
min.
N/A
N/A
(0.67 in)
thickness
42
WARRANTY
43
KARAVAN TRAILERS LLC. LIMITED WARRANTY
POLICY: SEA-DOO® SWITCH TRAILER
All Warranty is supported directly by Karavan Trailers, LLC.
A complete Owner’s Manual is available online
Contact us at:
- warranty@karavantrailers.com
-
920-928-6411
–
Toll Free: 1-866-527-2826
–
Australia: +61-2-8317-3180
Karavan Traillers, LLC. warrants each new Karavan Traillers trailer to be free
from defects in materials and workmanship for a period of one (1) year from the
date of purchase.
Karavan Traillers shall repair or replace, without charge, any parts found to be
defective because of imperfect workmanship or materials, within a reasonable
time after the trailer is returned at purchaser's expense to any Karavan Traiilers
authorized distributor or dealer.
Who is covered?
This warranty is extended to the original purchaser only.
How do I make a claim?
1. Your claim must be filed on the Karavan website at: http://www. karavan-
trailers. com or in writing to: Karavan Trailers, LLC., 100 Karavan Drive, Fox
Lake, WI, 53933.
2. Claim must provide true and complete information when filed.
3. You must cooperate with Karavan when attempting to resolve the claim.
4. Only Karavan and authorized dealers may be used to fulfill the warranty
claim.
5. Karavan may elect to repair or replace your product, or in some cases, offer
you a refund.
6. Karavan will inform you whether your claim is covered by warranty within
thirty days of receiving the trailer.
7. Any disputes must be resolved in state or federal court.
What is not covered?
Although you may use the parts and maintenance, and repair services of your
choosing, we recommend using authorized dealers and parts for any repairs or
maintenance, because improper or incorrect use of parts, maintenance, or re-
pairs will void this warranty. Authorized parts are recommended for replacement
of winches, lights, couplers, brakes, tongue jacks, and springs. Authorized deal-
ers are listed on the Karavan website.
The warranty will not cover defects or damage caused by unauthorized modifica-
tions or alterations.
44
KARAVAN TRAILERS LLC. LIMITED WARRANTY POLICY: SEA-DOO® SWITCH TRAILER
The warranty does not apply to any defect or malfunction caused by damage, un-
reasonable use, or failure to provide reasonable and necessary maintenance.
The warranty will not cover damage caused by overloading the trailer beyond
stated capacities or the use of improperly installed weight distribution hitches in
conjunction with hydraulic surge brakes.
Rust formation is not covered because the trailer is exposed to highly corrosive
conditions.
Tires are not covered. Warranty on tires shall be made through the nearest tire
representative.
Bearing cups, bearings and seals are covered for 180 days from date of
purchase.
The use of any unit as part of a rental fleet or use for commercial purposes voids
this warranty.
Other limitations
Any implied warranties, obligations, or liabilities including, but not limited to, any
implied warranty of merchantability or implied warranty of fitness for a particular
purpose, shall be limited in duration to the one-year duration of the written limited
warranty.
Karavan Traillers, LLC. shall not be liable for incidental expenses of the con-
sumer including, without limitation: loss of time, inconvenience, towing charges,
travel expenses, lodging, telephone, gas, or loss or damage to personal property
or loss of wages.
Karavan Traiilers, LLC. shall not be liable for any incidental or consequential
damages for breach of this or any other warranty expressed or implied.
This warranty gives you specific legal rights, and you may also have other rights
which vary from State to State.
Some States do not allow limitations on how long an implied warranty lasts, and/
or the exclusion or limitation of incidental or consequential damages, so the
above limitation or exclusion may not apply to you.
Karavan Traiilers, LLC. will follow any controlling warranty laws for trailers pur-
chased in countries outside the United States.
Bow Eye Safety Chain
WARNING: Failure to tie down the bow independently from the winch strap
could allow your boat to shift while traveling, causing loss of control of the tow ve-
hicle and result in serious injury or property damage.
Karavan Traiilers, LLC. starts using bow eye safety chains on trailers with a
1200-lb winch rating and over. It is very important that you use the bow eye
safety chain at all times when loading and unloading.
45
KARAVAN TRAILERS LLC. LIMITED WARRANTY POLICY: SEA-DOO® SWITCH TRAILER
The bow eye safety chain is an added protection should the winch or winch strap
fail.
Brakes
In most states, trailers with a Gross Vehicle Weight Rating of 3,000 pounds or
more are required by law to have brakes on all wheels.
Upon special request, you can order axles with brake flanges to be able to install
brakes. Brakes are becoming more of a necessity especially since the introduc-
tion of the small size car.
Most trailer brakes are designed to operate automatically when the towing ve-
hicle’s brakes are applied.
When the towing vehicle slows down or stops, the forward momentum of the
trailer against the ball hitch applies pressure to a master cylinder in the trailer
coupler.
This pressure activates the trailer brakes through a hydraulic brake system.
Cautiion: Weight equalizing or sway control devices inhibit the performance of
surge brake actuators and must not be used.
Air shocks on the rear axle of the tow vehicle offer a good means of leveling the
vehicle and trailer when necessary.
Reporting Safety Defects
If you believe that your vehicle has a defect that could cause a crash or could
cause injury or death, you should immediately inform the National Highway Traf-
fic Safety Administration (NHTSA) in addition to notifying Karavan Trailers, LLC.
If NHTSA receives similar complaints, it may open an investigation, and if it finds
that a safety defect exists in a group of vehicles, it may order a recall and remedy
campaign.
However, NHTSA cannot become involved in individual problems between you,
your dealer, or Karavan Trailers, LLC.
To contact NHTSA, call the Vehicle Safety Hotline toll-free at: 1-800-327-4236
(TTY 1-800-424-9153),
http://www. safecar. gov; or write to: Administrator, NHTSA, 1200 New Jersey
Avenue S.E., Washington, DC 20590
You can also obtain other information about motor vehicle safety from http://safe-
car.gov.
46
CUSTOMER INFORMATION
47
DATA PRIVACY INFORMATION
Bombardier Recreational Products inc., its affiliates and subsidiaries (“BRP”) is
committed to protecting your privacy and support a general policy of openness
about how we collect, use and disclose your personal information in the course
of managing our relationship with you. More detaiils can be found by visiting
BRP’’s Priivacy Poliicy at:
https://brp.com/en/privacy-poliicy.htmll or by scanniing the QR Code below.
Please be assured that we have appropriate security measures in place to en-
sure that your personal information is protected against loss and unauthorized
access.
Your personal information that may be collected by BRP, directly from you or
from authorized dealers or authorized third parties, includes:
- Contact, Demographiic & Registratiion Informatiion (e.g., name, full ad-
dress, phone number, email, gender, ownership history, language of
communication)
- Vehicle Information (e.g., serial number, purchase and delivery date, unit
usage, vehicle location and movements)
- Third Party Informatiion (e.g., information received from BRP partners, join-
t-marketing activities information, social media)
- Technological Information (e.g., IP address, type of device, operating sys-
tem, browser type, webpages you view, cookies and similar technologies
when you use BRP or dealers’ websites or mobile application)
- Interaction with BRP Information (e.g., information collected when you call
BRP’s in-house sales representatives, buy items on a BRP web Site, sign up
for BRP emails, participate in BRP-sponsored contests and sweepstakes or
attend BRP-sponsored events)
- Transactiionall Informatiion (e.g., information necessary to handle returns,
payment information when you purchase our products or services through
our websites or mobile applications and other issues related to your purchase
of BRP products)
This information may be used and processed for the following purposes:
- Safety & Security
- Customer Support for Sales & After Sales (e.g., complete or follow up with
you about your purchase or maintenance)
- Registration & Warranty
- Communication (e.g., sending you a BRP satisfaction survey)
- Online Behavioural Advertising, Profiling and Location-Based Services
(e.g., offer customized experience)
- Compliance & Dispute Resolution
- Marketing & Advertising
- Assistance (e.g., help with any delivery issues, handle returns, and other is-
sues related to your purchase of BRP products).
We also may use personal information to generate aggregated or statistical data
that no longer identifies you personally.
Your personal informatiion may be disclosed to the folllowiing: BRP, BRP’s
authoriized deallerships, diistriibutors, serviice proviiders, advertising & mar-
ket research partners and other authoriized third partiies.
We may receive information about you from diverse sources, including third par-
ties, such as BRP’s authorized dealerships and partners, with whom we offer
48
DATA PRIVACY INFORMATION
services or engage in joint-marketing activities. We may also receive information
about you from social media platforms such as Facebook and Twitter, when you
interact with us on those platforms.
Depending on the circumstances, your personal information may be communi-
cated outside the region where you reside. Your personal information is retained
only for as long as necessary for the purpose for which we obtained it and ac-
cording to our retention policies.
To exercise your data privacy rights (e.g. right of access, right of rectification), to
withdraw your consent in order to be removed from the address list for marketing
purposes or for the satisfaction survey or for general data privacy questions,
please contact BRP’s Data Protection Officer at or by mail at privacyoffii-
cer@brp.com or by mail at:
BRP Legal Service, 726 St-Joseph, Valcourt, Quebec, Canada, J0E 2L0.
When BRP processes your personall iinformation, they do so in complliance
wiith its Privacy Pollicy avaiilable at: https://www.brp.com/en/privacy-poliicy.
htmll or by using the folllowiing
QR Code.
49
CONTACT US
Asia Pacific
Australia
Level 26
477 Pitt Street
Sydney, NSW 2020
China
上海市徐汇区衡山路10号6号楼301
Rm 301, Building 6,
No.10 Heng Shan Rd,
Shanghai, China
Japan
21F Shinagawa East One Tower
2-16-1 Konan, Minato-ku-ku,
Tokyo 108-0075
New Zealland
Suite 1.6, 2-8 Osborne Street,
Newmarket, Auckland 2013
Europe, Middle East and Africa
Bellgium
Oktrooiplein 1
9000 Gent
Czech Republiic
Stefanikova 43a
Prague 5
150 00
Germany
Itterpark 11
40724 Hilden
Fiinland
Isoaavantie 7
PL 8040
96101 Rovaniemi
France
Arteparc Bâtiment B
Route de la côte d'Azur,
13 590 Meyreuil
Norway
Ingvald Ystgaardsvei 15
N-7484 Trondheim
50
CONTACT US
Salg, marketing, ettermarked
Sweden
Spinnvägen 15
903 61 Umeå
Sweden 90821
Switzerlland
Avenue d’Ouchy 4-6
1006 Lausanne
Latin America
Brazill
Av. James Clerck Maxwell, 230
Campinas, Sao Paulo
CEP 13069-380
Mexiico
Av. Ferrocarril 202
Parque Industrial Querétaro
Santo Rosa Jauregui, Querétaro
C.P. 76220
North America
Canada
3200A, rue King Ouest,
Suite 300
Sherbrooke (Québec) J1L 1C9
Uniited States of Ameriica
10101 Science Drive
Sturtevant, Wisconsin
53177
51
CHANGE OF ADDRESS/OWNERSHIP
If your address has changed or if you are the new owner of the boat, be sure to
notify BRP by either:
- Notifying an authorized Sea-Doo dealer.
- North America Only: calling at 1 888 272-9222.
- Mailing one of the change of address cards on the following pages at one of
the BRP addresses indicated in the Contact Us section of this guide.
In case of change of ownership, please join a proof that the former owner agreed
to the transfer.
Notifying BRP, even after the expiration of the limited warranty, is very important
as it enables BRP to reach the boat owner if necessary, like when safety recalls
are initiated. It is the owner’s responsibility to notify BRP.
STOLEN UNITS: In the event that your boat is stolen, you should notify your
area’s distributor warranty department of such. We will ask you to provide your
name, address, phone number, Hull Identification Number and date it was stolen.
52